前置操作
默认所有主机操作
前置操作,可能服务器可能已经做了
关闭 selinux,防火墙, swap
1 | swapoff -a |
时间同步
能连接外网的不需要操作, 一台作为服务器eg: 192.168.100.101,其他的指向这台服务器。这里使用 ntp1
2
3
4
5
6
7
8
9
10
11
12
13
14
15yum -y install ntp
# 服务端 192.168.100.101 /etc/ntp.conf 文件
cat >/etc/ntp.conf<<eof
server 127.127.1.0
fudge 127.127.1.0 stratum 10
eof
# 应用端
cat >/etc/ntp.conf<<eof
server 192.168.100.101
eof
# 所有机器
systemctl enable -now ntpd.service
ntpq -p
修改主机名网络
按实际情况修改
/etc/sysconfig/network-scripts/ifcfg-ens321
2
3
4
5
6
7
8
9
10
11
12
13
14
15
16
17
18
19
20TYPE=Ethernet
PROXY_METHOD=none
BROWSER_ONLY=no
BOOTPROTO=static # 修改的地方
DEFROUTE=yes
IPV4_FAILURE_FATAL=no
IPV6INIT=yes
IPV6_AUTOCONF=yes
IPV6_DEFROUTE=yes
IPV6_FAILURE_FATAL=no
IPV6_ADDR_GEN_MODE=stable-privacy
NAME=ens32 # 和文件对应
UUID=40ae9247-96ad-43d0-8c22-974897f62a64
DEVICE=ens32 # 和文件对应
ONBOOT=yes # 修改的地方
## 下方为添加的地方
IPADDR=192.168.100.101
GATEWAY=192.168.100.1
DNS1=8.8.8.8
DNS2=114.114.114.114
重启网络1
service network restart
/etc/hosts1
2
3
4
5
6
7
8cat >/etc/hosts<<eof
127.0.0.1 localhost localhost.localdomain localhost4 localhost4.localdomain4
::1 localhost localhost.localdomain localhost6 localhost6.localdomain6
192.168.100.101 hdp01
192.168.100.102 hdp02
192.168.100.103 hdp03
eof
修改主机名
1
hostnamectl set-hostname hdp01 # 或者修改 /etc/hostname
建立互信
生成密钥文件1
2rm -rf ~/.ssh
ssh-keygen -f ~/.ssh/id_rsa -N '' -t rsa -q -b 2048
建立互信1
2
3ssh-copy-id -i ~/.ssh/id_rsa.pub hdp01
ssh-copy-id -i ~/.ssh/id_rsa.pub hdp02
ssh-copy-id -i ~/.ssh/id_rsa.pub hdp03
安装 java
可以在此寻找 https://www.oracle.com/java/technologies/downloads/1
2
3
4
5
6
7
8
9
10
11mkdir /opt/bigdata/java
tar zxf jdk-*.tar.gz -C /opt/bigdata/java
cd /opt/bigdata/java
ln -s jdk* current
cat >/etc/profile.d/java_env.sh<<eof
export JAVA_HOME=/opt/bigdata/java/current
export CLASSPATH=.:\$JAVA_HOME/jre/lib/rt.jar:\$JAVA_HOME/lib/dt.jar:\$JAVA_HOME/lib/tools.jar
export PATH=\$JAVA_HOME/bin:\$PATH
eof
source /etc/profile
java -version
hadoop 原生安装 (本地运行模式)
下载地址 https://archive.apache.org/dist/hadoop/common/
1 | useradd hadoop |
后续安装hadoop 分布式,参考 hadoop手动安装操作
使用 ambari 安装
前置操作做完,其中 ambari 可以 默认下载 java 和 postgres ,可以不进行 java 和 数据库 的安装
因为官网无法下载最新版本,当前 服务器使用的 hdp-3.1.5 本地包,java 为 jdk8 最新版,使用 mysql 作为数据库
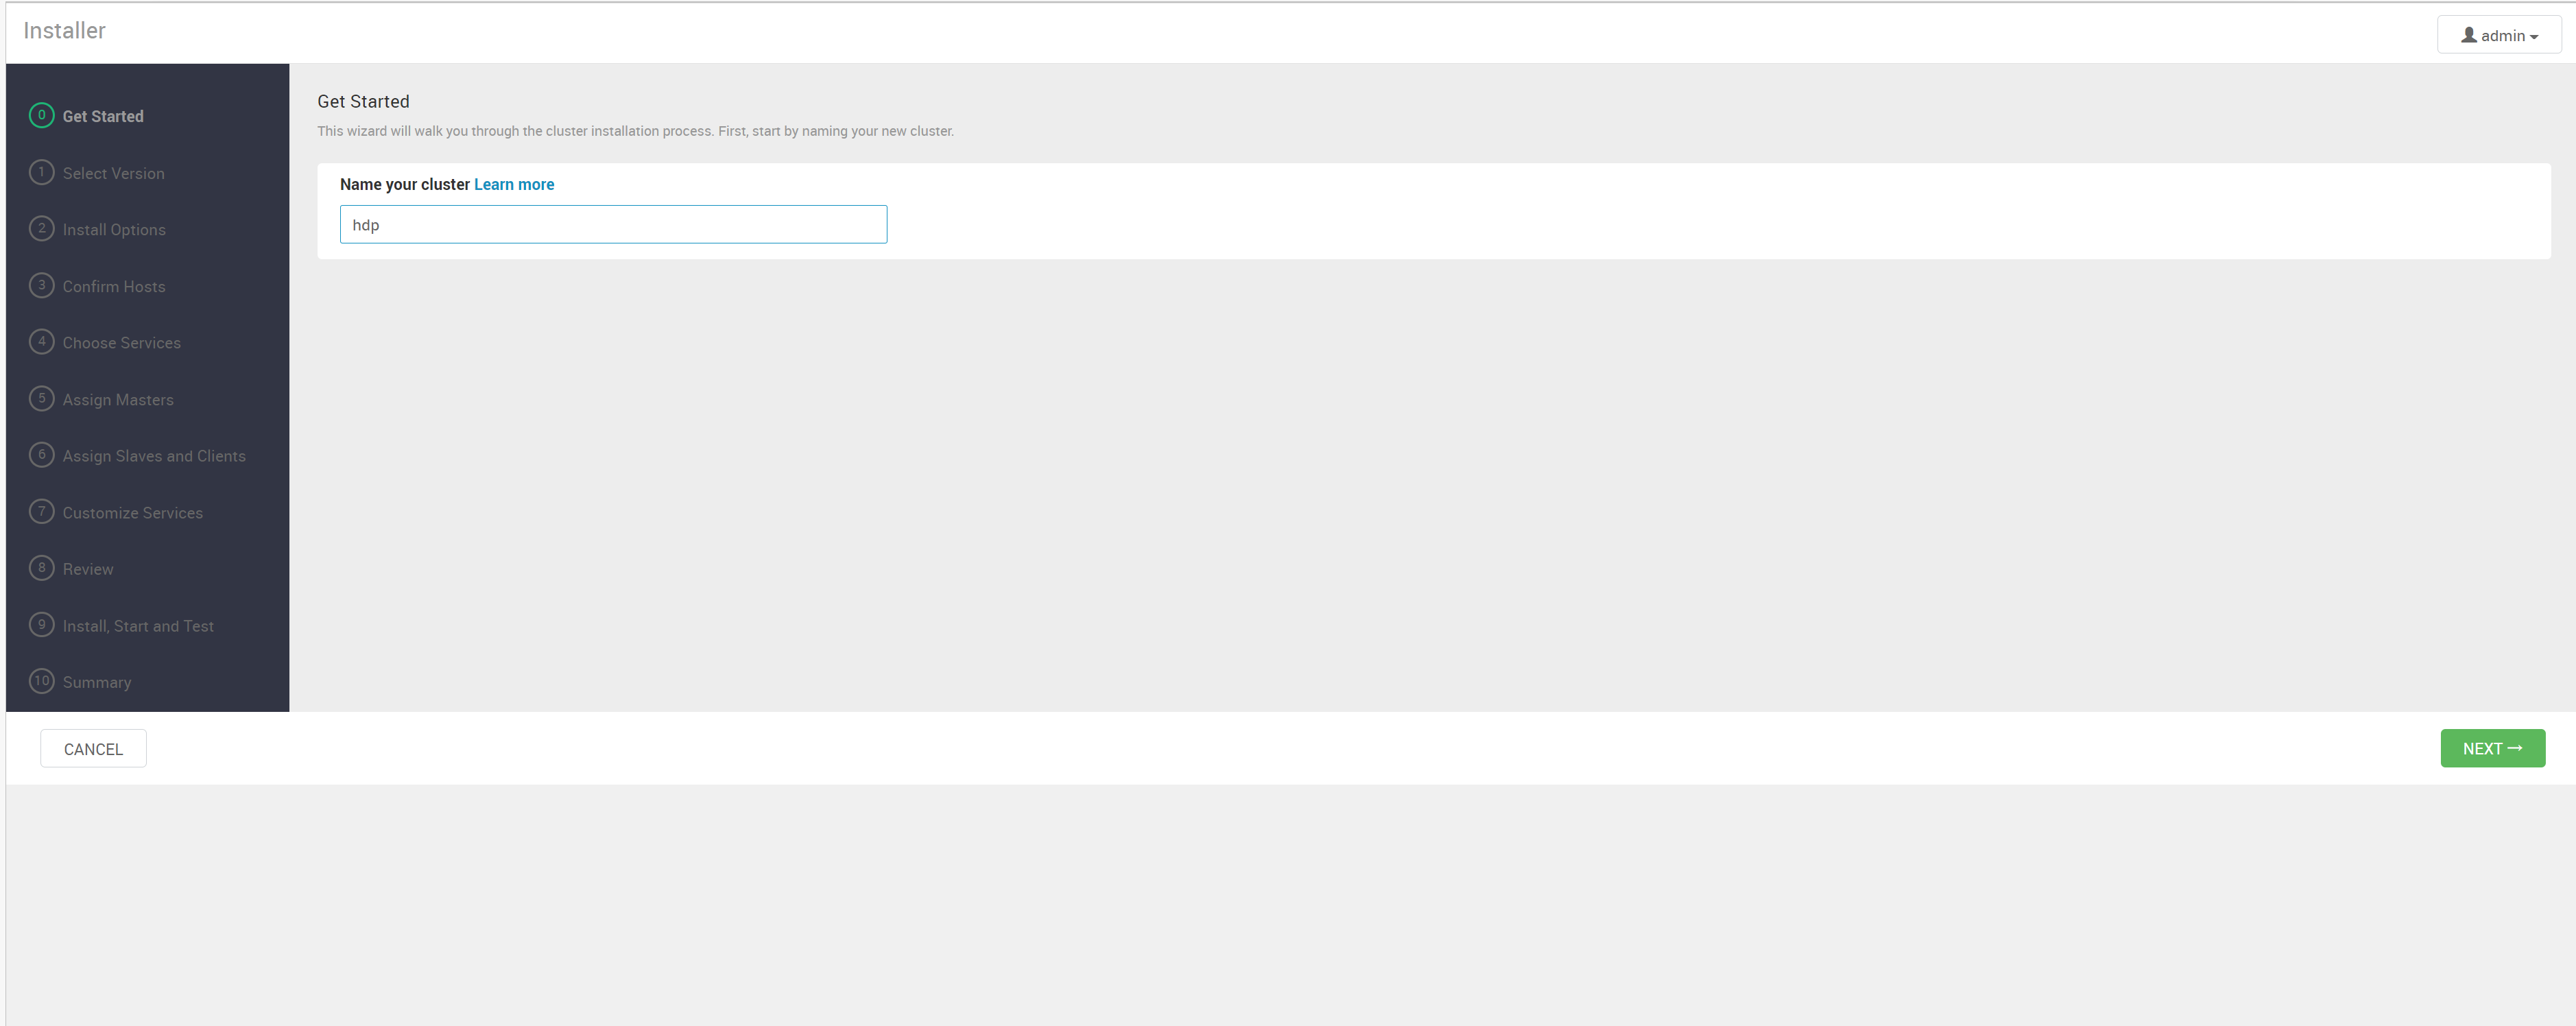
操作步骤
1 | mkdir HDP3.1.5 |
安装 数据库
eg: mysql
可以只在一台服务器上运行 eg: 192.168.100.101
可在此查找 rpm 包 https://dev.mysql.com/downloads/repo/yum/1
2
3
4
5rpm -ivh mysql*.noarch.rpm
yum install -y mysql-server mysql
systemctl enable --now mysqld
## 临时密码 /var/log/mysqld.log
暂时先用 mysql-5.7, 因为默认导入数据的sql 在 8.0 上语法有问题,先忽略
https://downloads.mysql.com/archives/community/1
2
3
4
5
6
7
8wget https://downloads.mysql.com/archives/get/p/23/file/mysql-community-server-5.7.36-1.el7.x86_64.rpm
wget https://downloads.mysql.com/archives/get/p/23/file/mysql-community-client-5.7.36-1.el7.x86_64.rpm
wget https://downloads.mysql.com/archives/get/p/23/file/mysql-community-common-5.7.36-1.el7.x86_64.rpm
wget https://downloads.mysql.com/archives/get/p/23/file/mysql-community-libs-5.7.36-1.el7.x86_64.rpm
rpm -ivh mysql-community-common-5.7.36-1.el7.x86_64.rpm
rpm -ivh mysql-community-libs-5.7.36-1.el7.x86_64.rpm
rpm -ivh mysql-community-client-5.7.36-1.el7.x86_64.rpm
rpm -ivh mysql-community-server-5.7.36-1.el7.x86_64.rpm
初始化, 临时密码 /var/log/mysqld.log 中可查1
/usr/bin/mysql_secure_installation
需要 mysql-connector-java.jar 包, 下载链接 https://dev.mysql.com/downloads/connector/j/
也可以 直接安装 (不用 linux 直接连接,最好下载jar包导入,不用 yum 安装)1
2yum install -y mysql-connector-java
# 会生成文件 /usr/share/java/mysql-connector-java.jar
MySQL 新建数据库(需要时操作)
使用简单密码可能不满足要求
1 | SHOW VARIABLES LIKE 'validate_password%'; |
使用 ambari 安装 hadoop
1 | create database ambari character set utf8mb4; |
hive 前置准备
1 | CREATE DATABASE hive character set utf8mb4; |
oozie 前置准备1
2
3
4
5
6
7
8
9CREATE DATABASE oozie character set utf8mb4;
use oozie;
CREATE USER 'oozie'@'%' IDENTIFIED BY 'oozie';
GRANT ALL PRIVILEGES ON *.* TO 'oozie'@'%';
CREATE USER 'oozie'@'localhost' IDENTIFIED BY 'oozie';
GRANT ALL PRIVILEGES ON *.* TO 'oozie'@'localhost';
CREATE USER 'oozie'@'hdp01' IDENTIFIED BY 'oozie';
GRANT ALL PRIVILEGES ON *.* TO 'oozie'@'hdp01';
FLUSH PRIVILEGES;
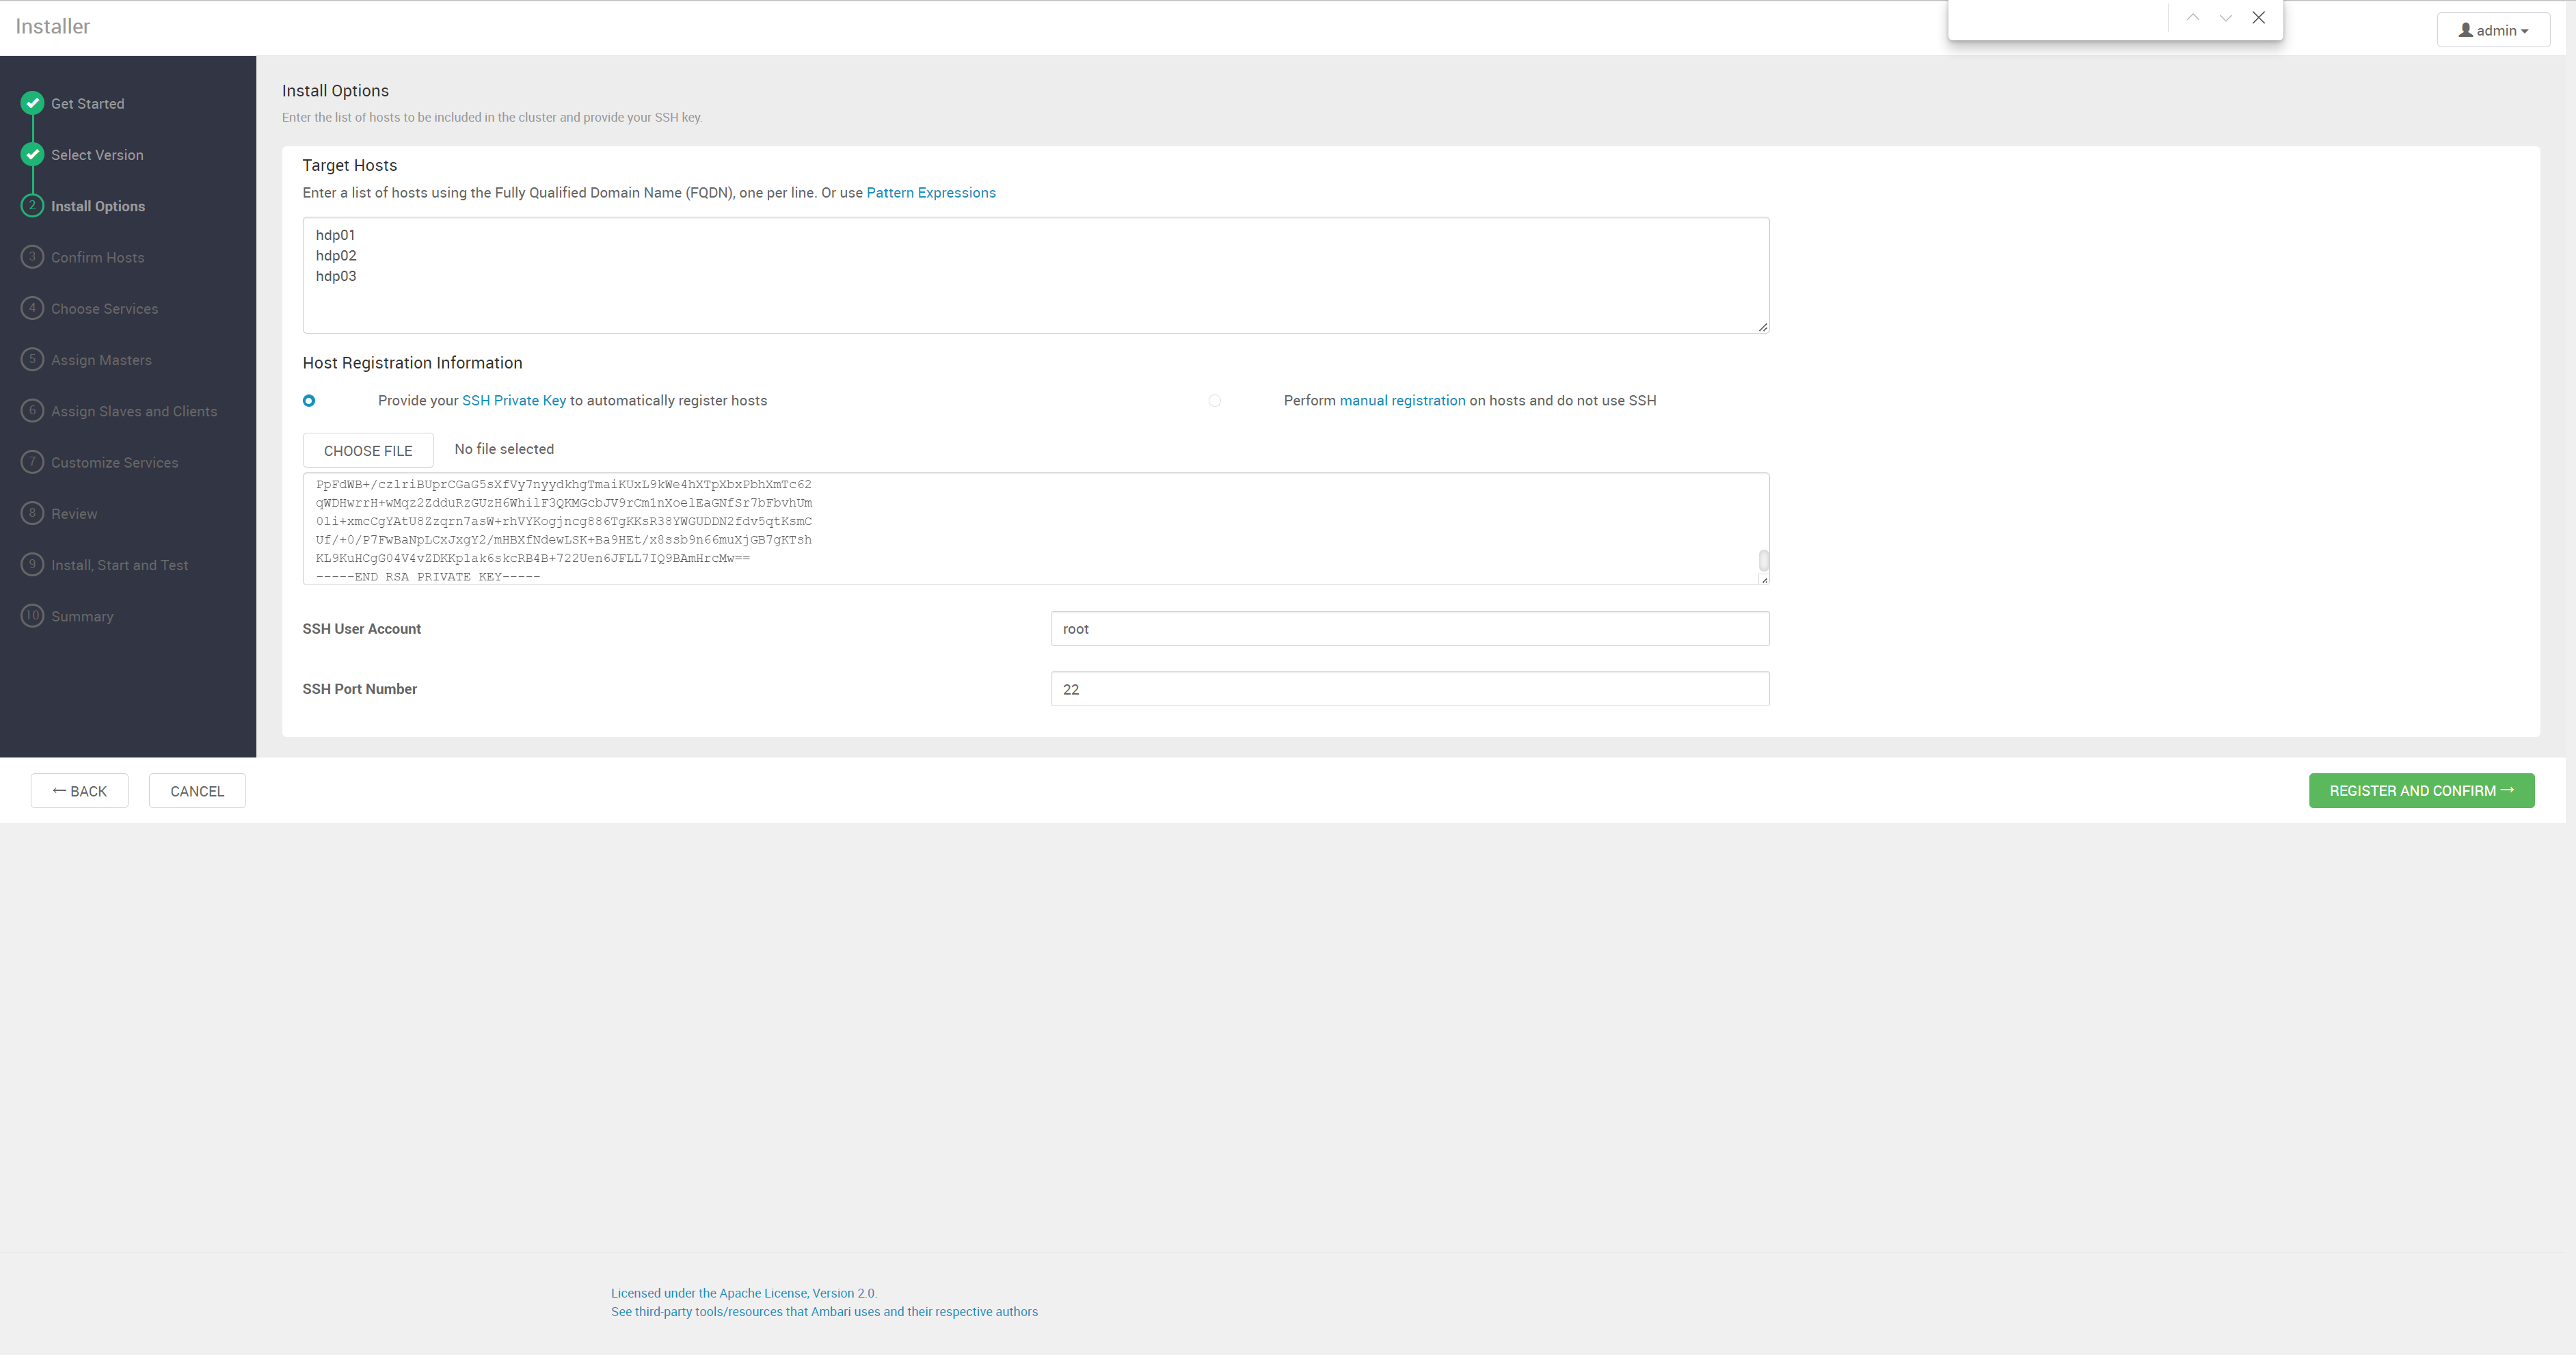
安装步骤
192.168.100.1011
2
3
4
5
6yum -y install ambari-server
ambari-server setup # 进行一些初始化设置
# 操作完后 启动 ambari-server
# mysql> source /var/lib/ambari-server/resources/Ambari-DDL-MySQL-CREATE.sql # 创建数据库,mysql 需要操作。postgres 自动操作
# ambari-server start
所有主机安装 ambari-agent1
2yum -y install ambari-agent
systemctl start ambari-agent
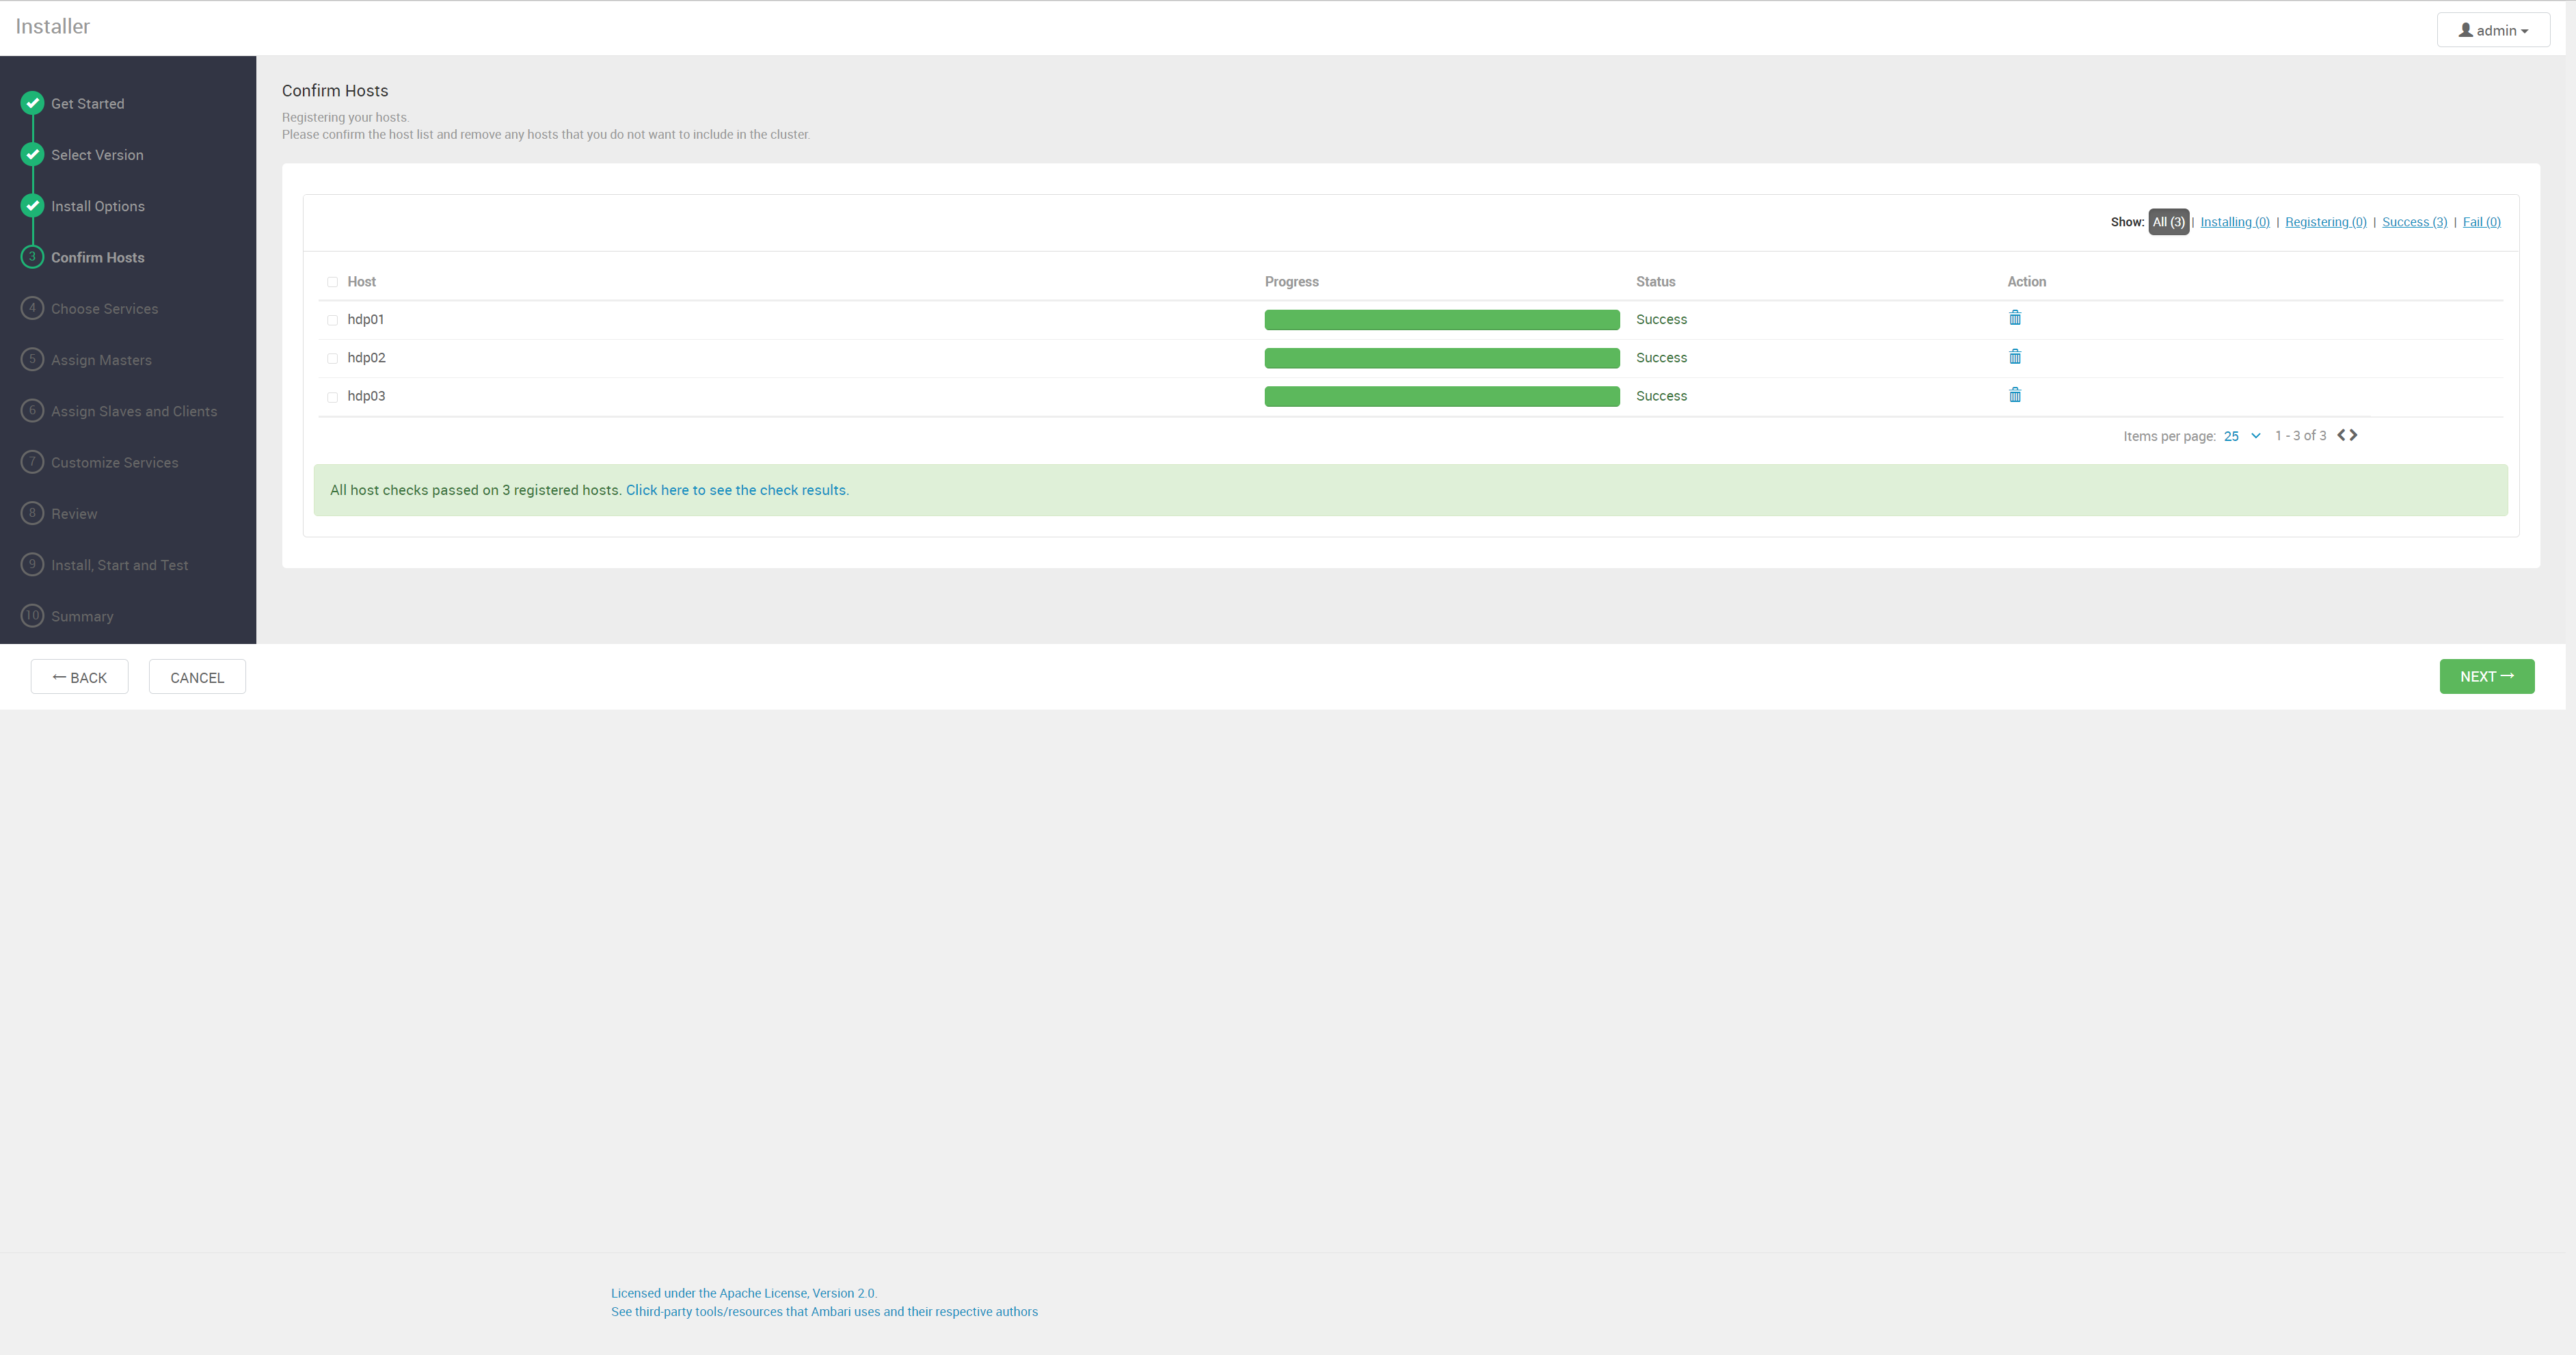
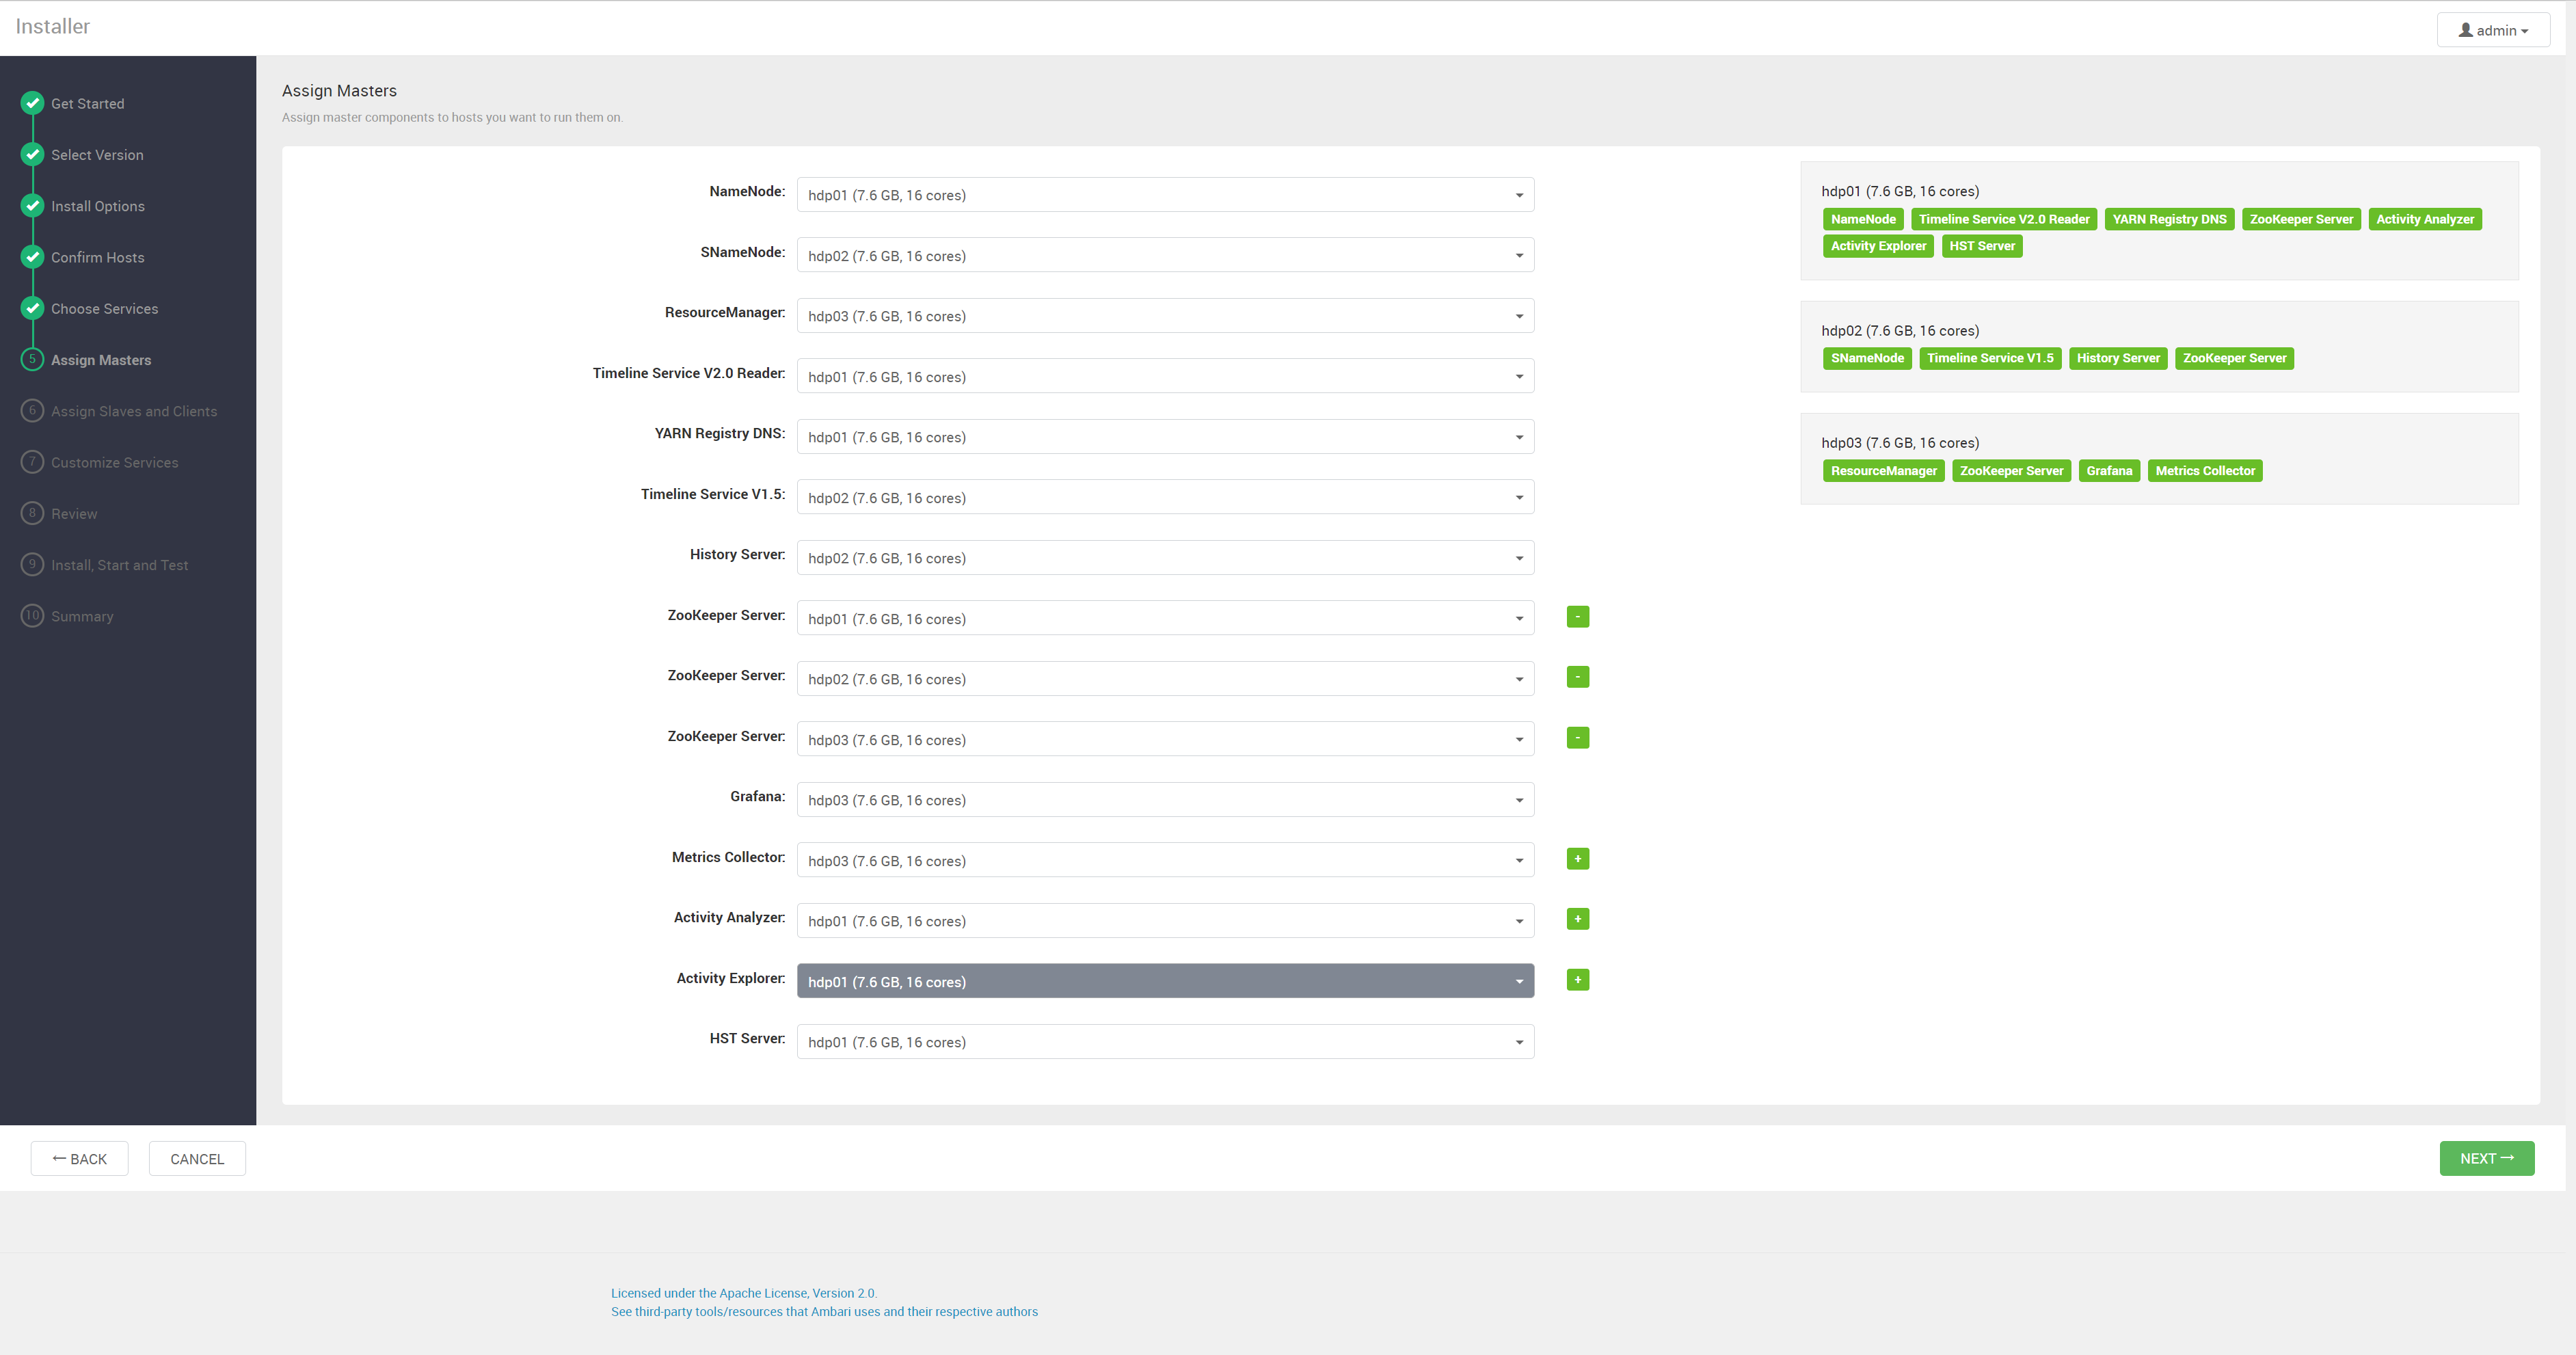
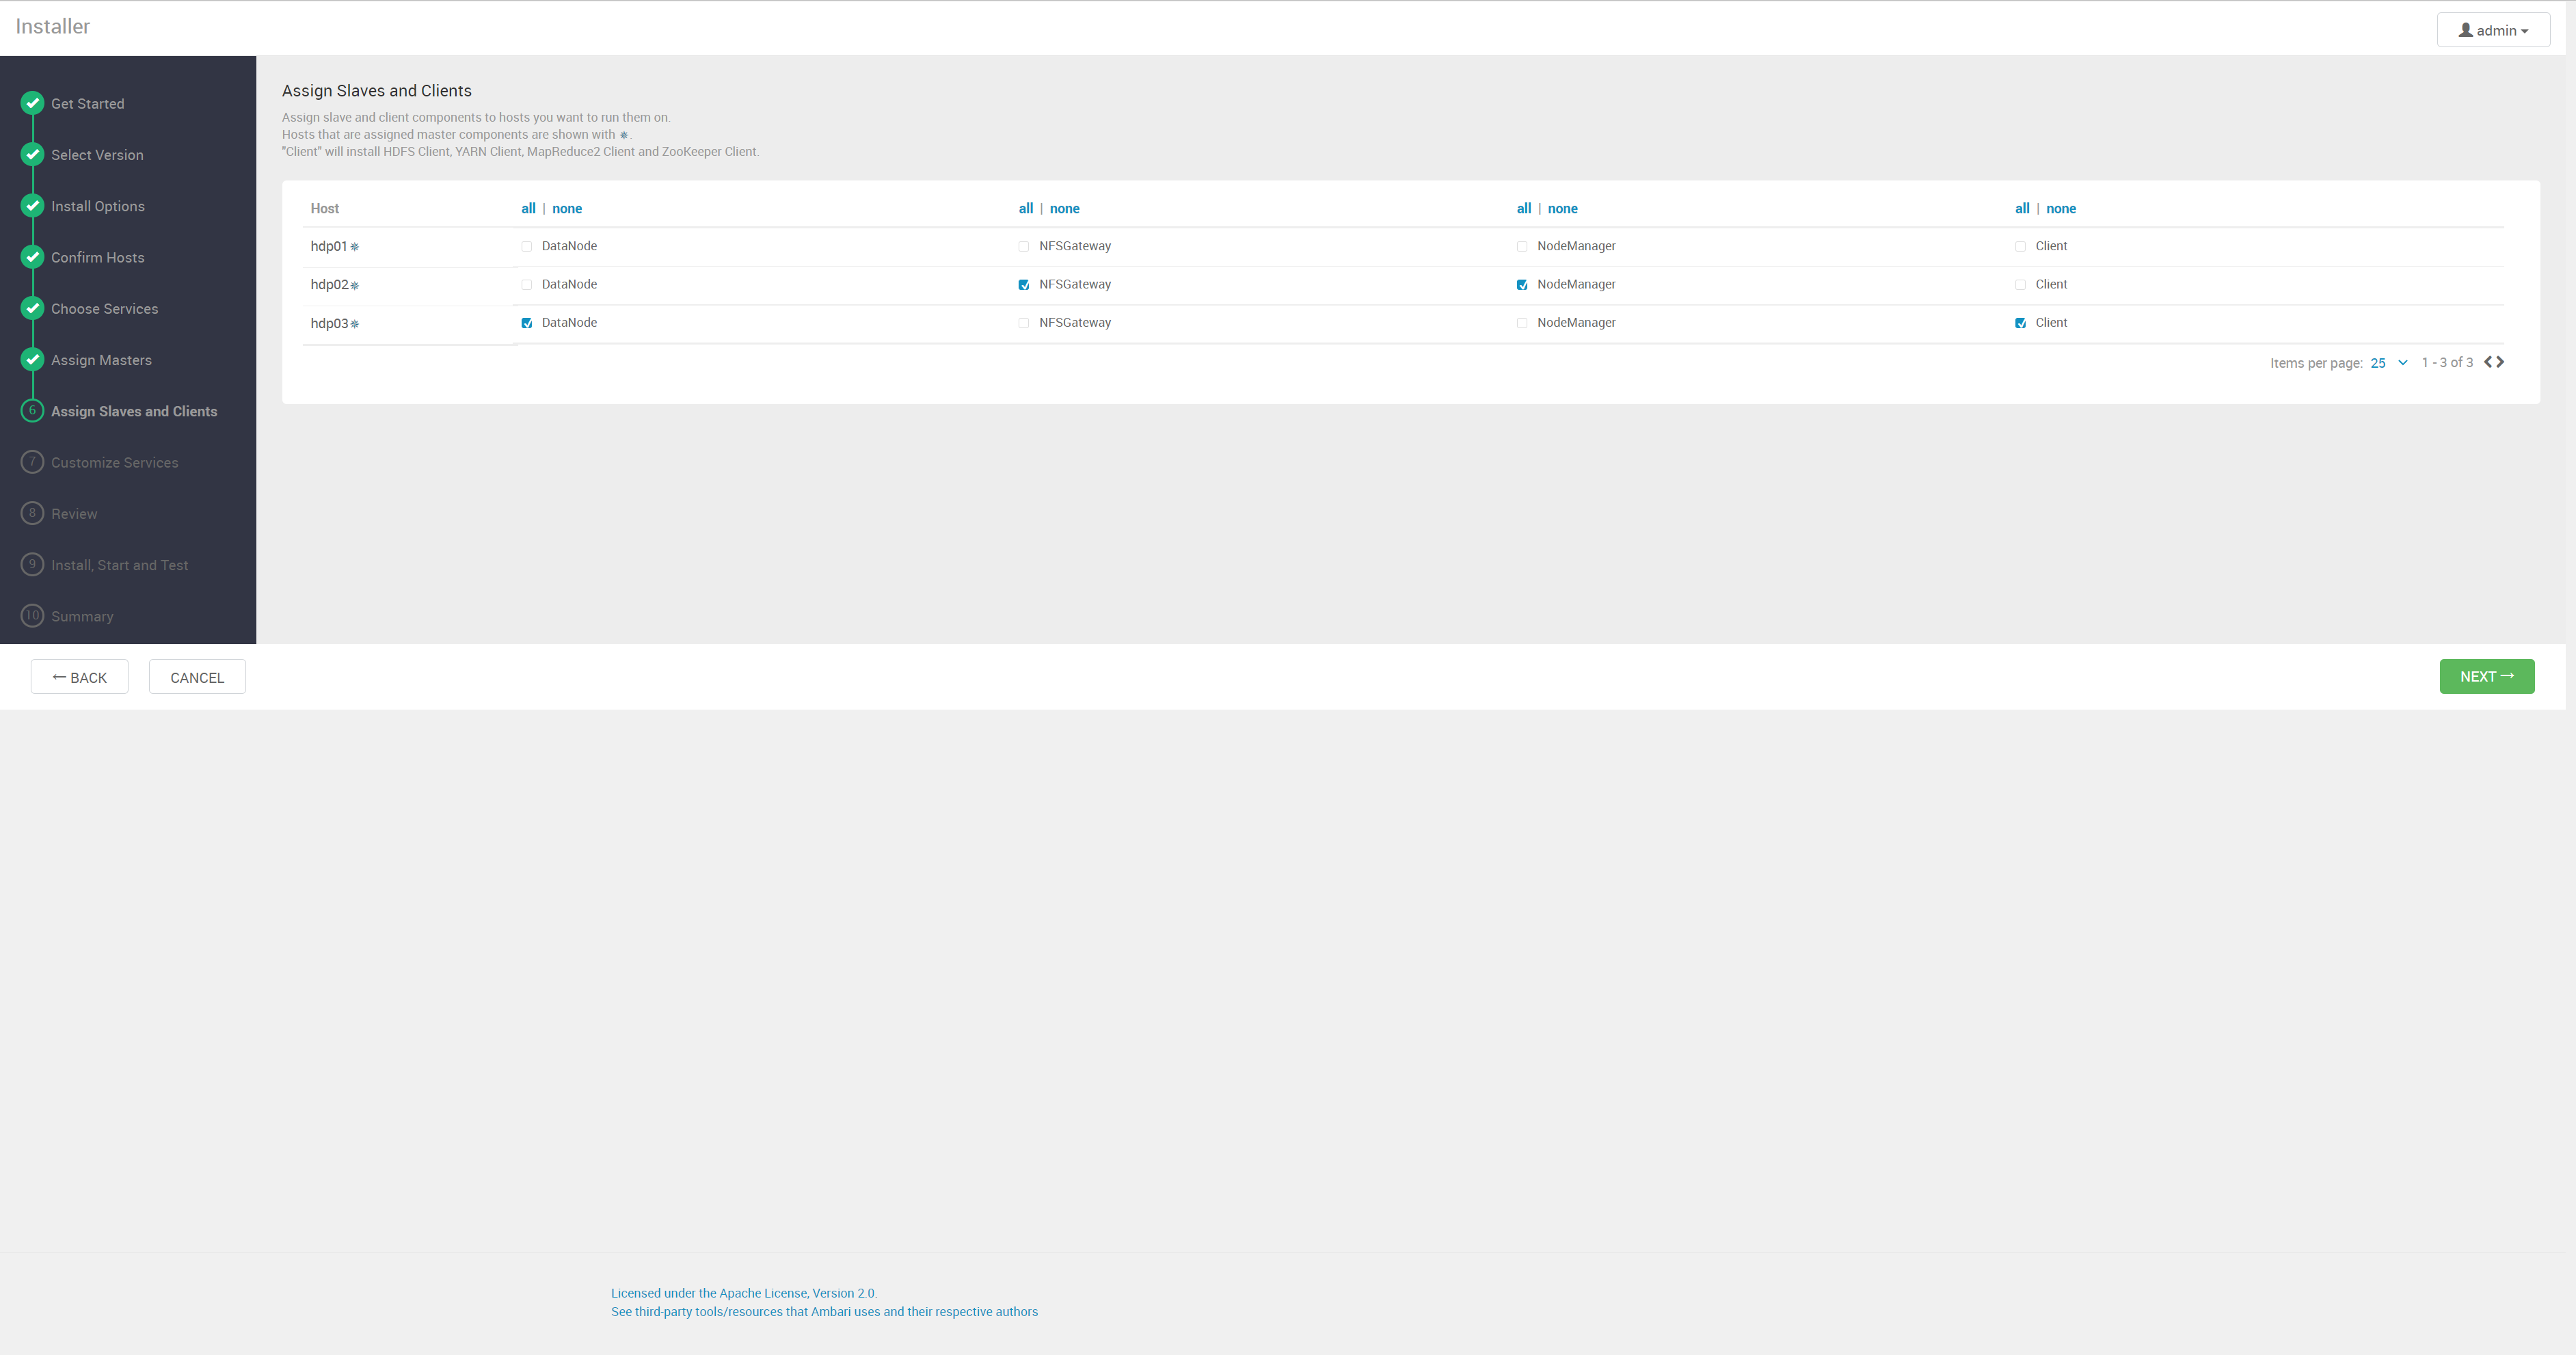
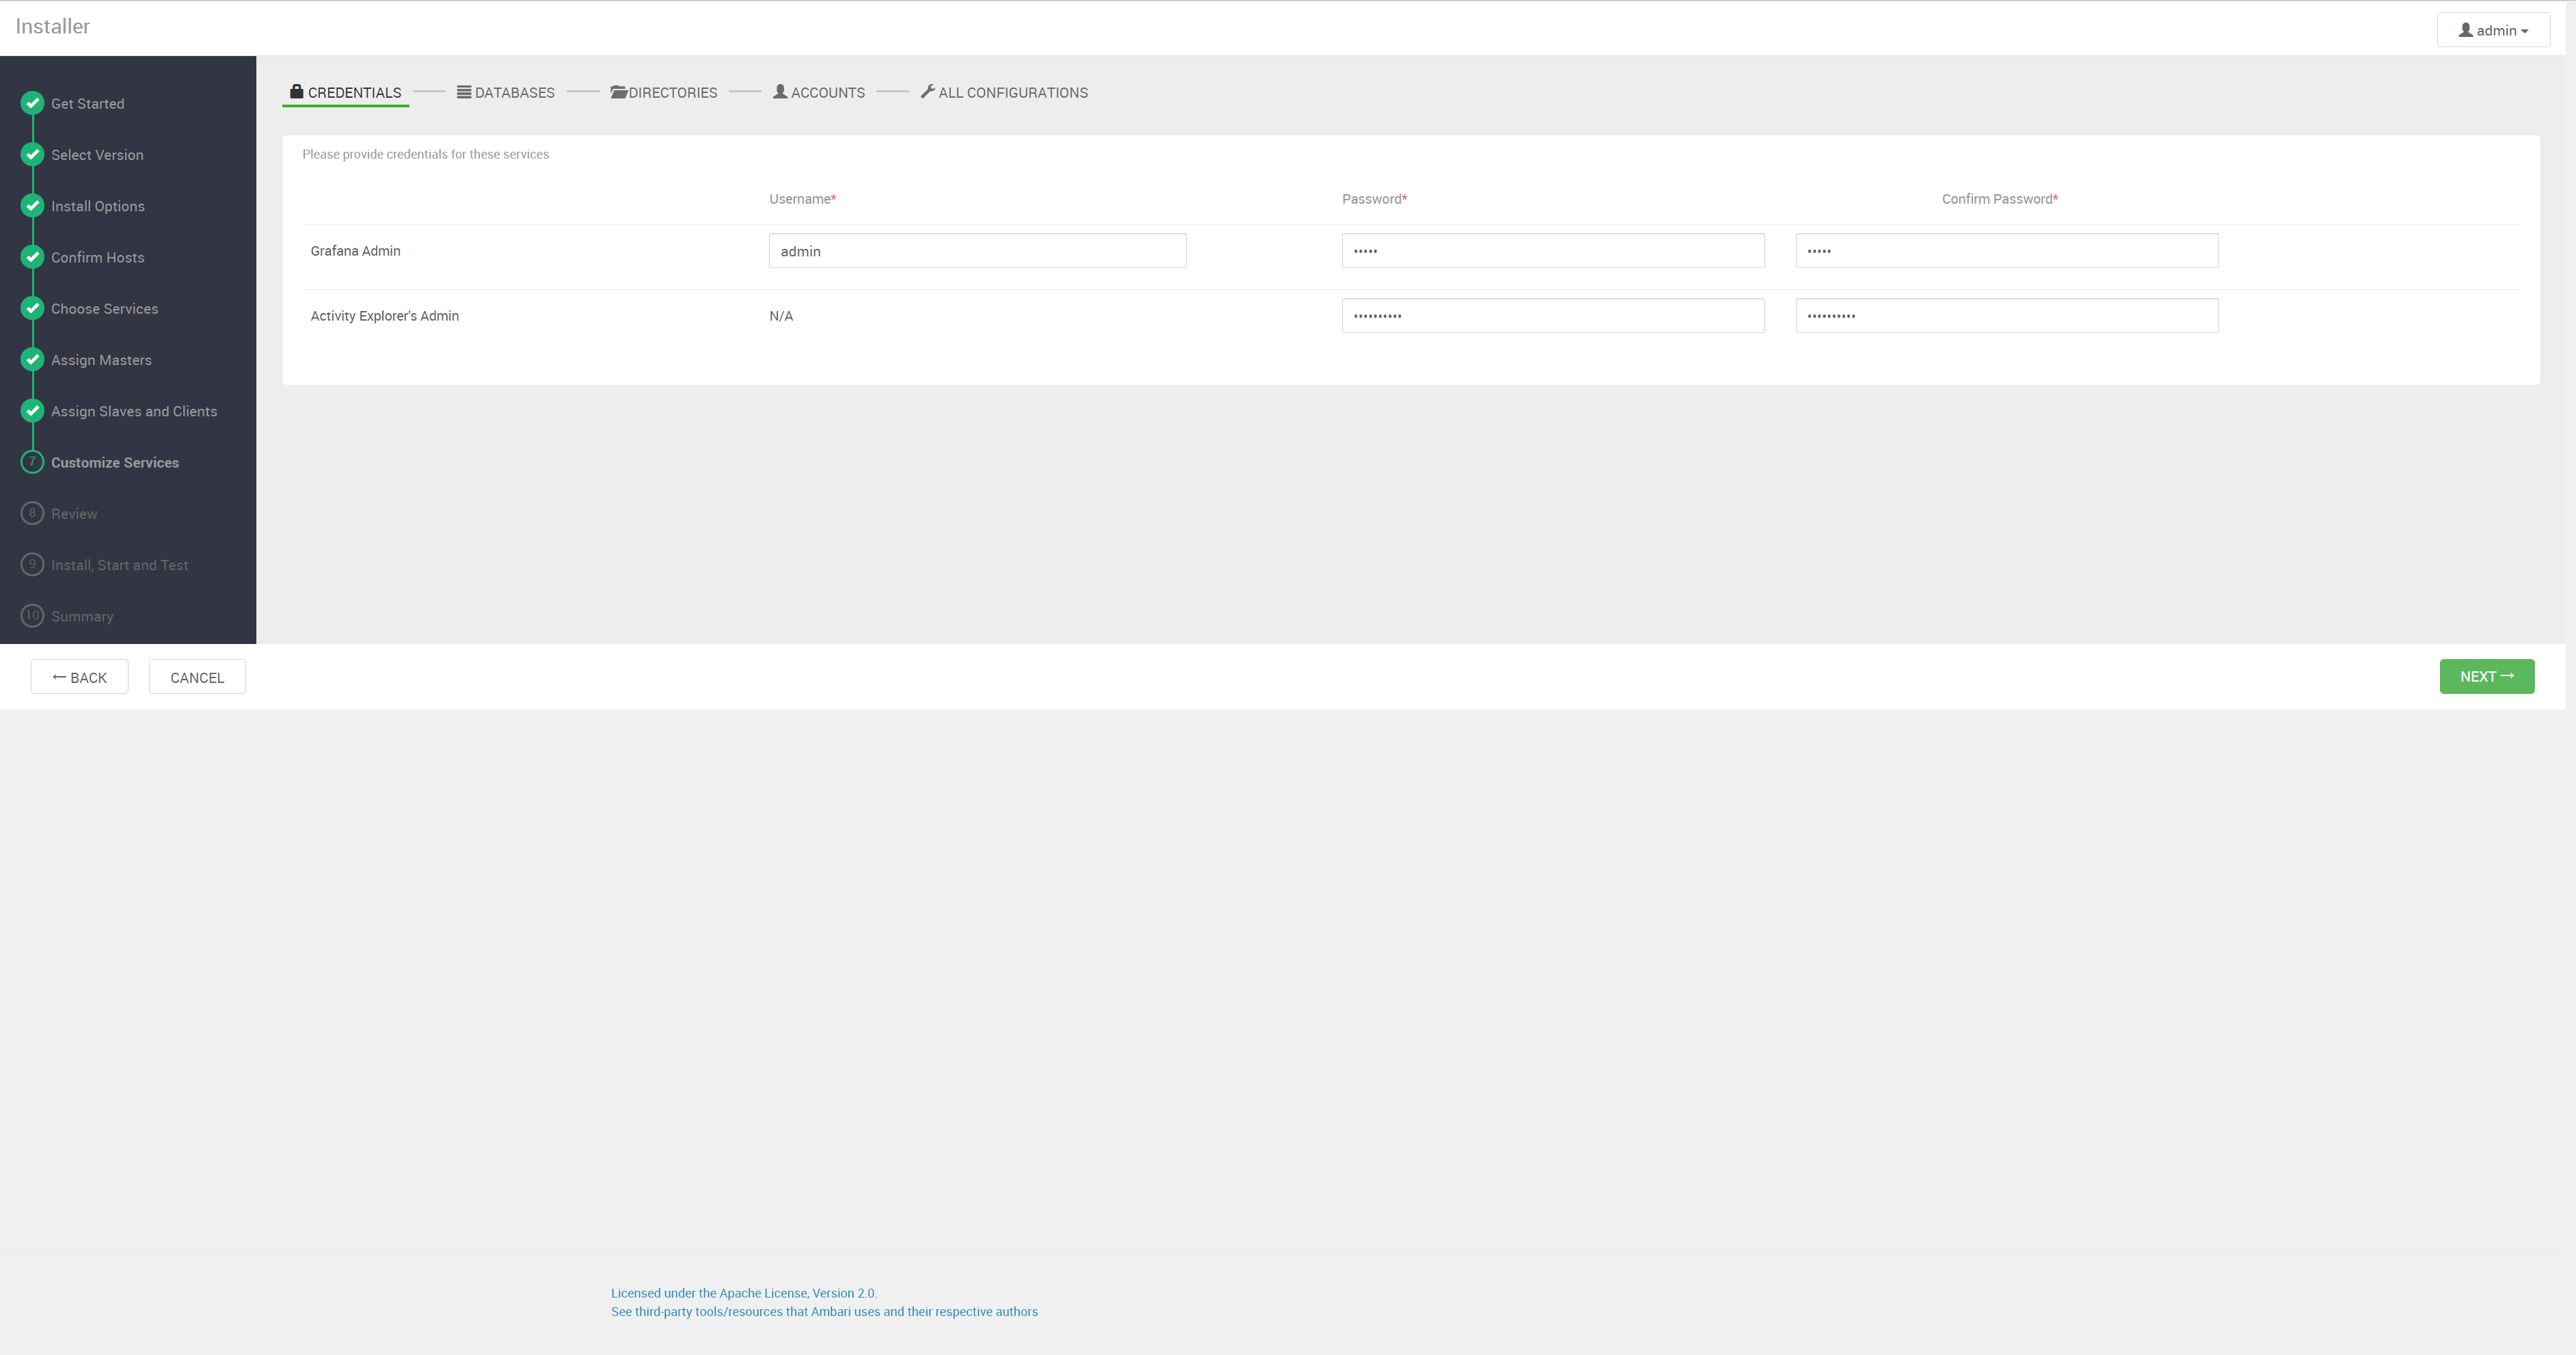
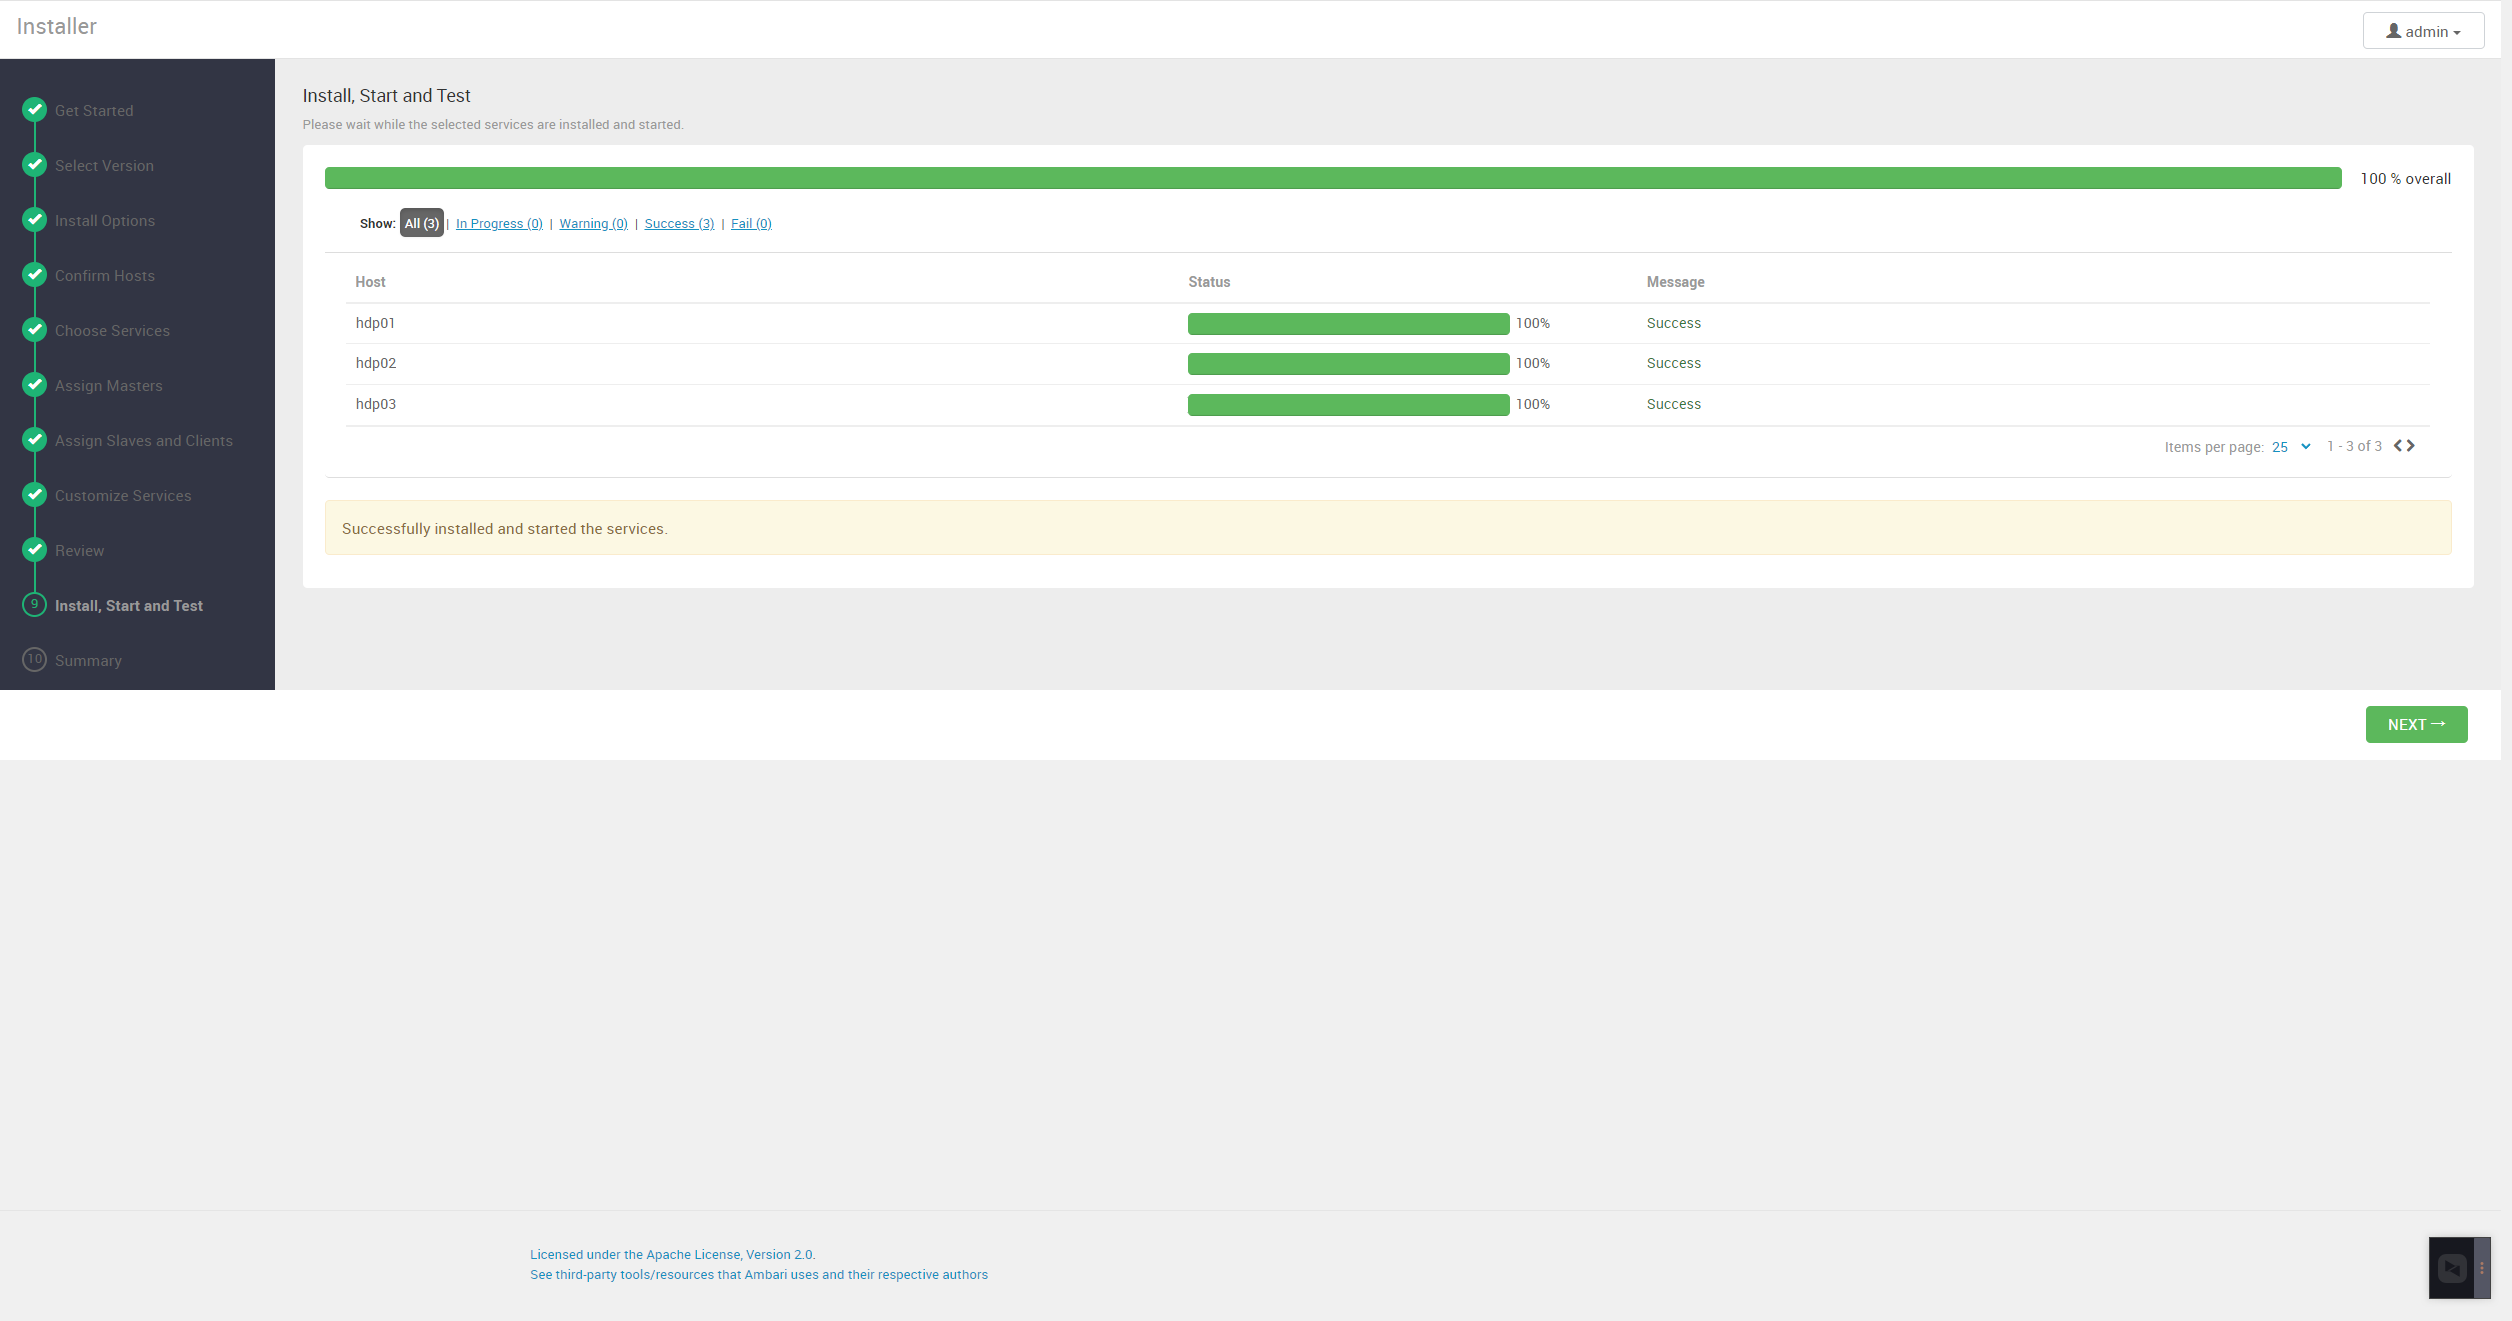
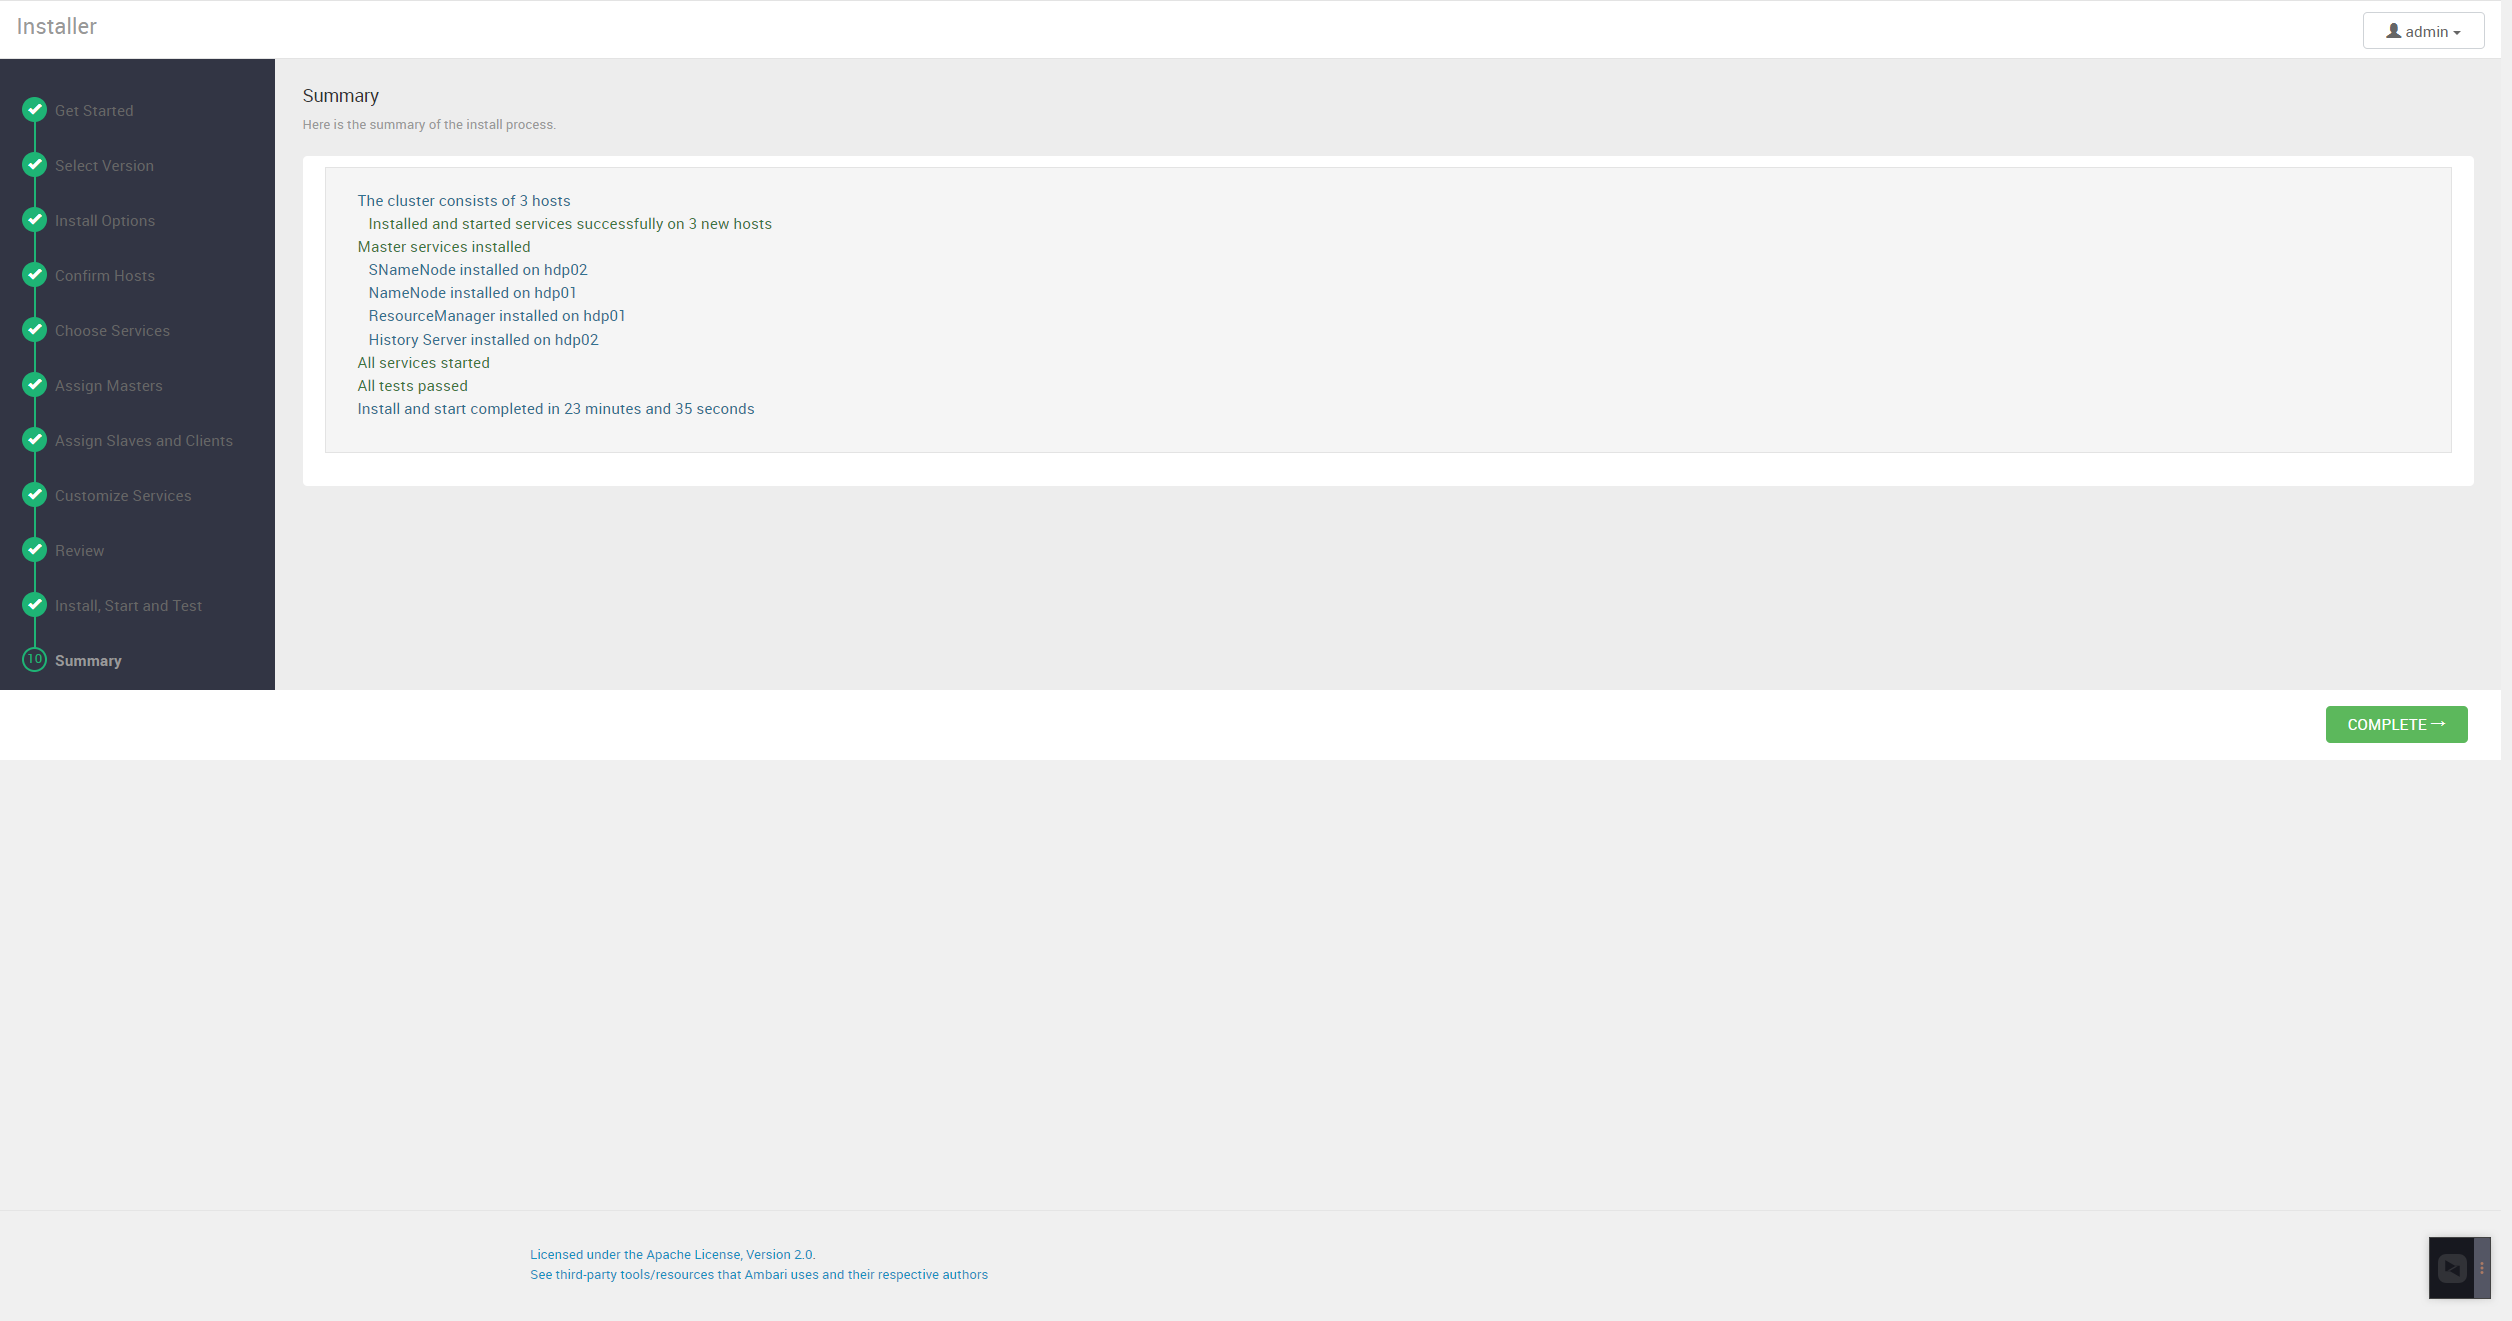
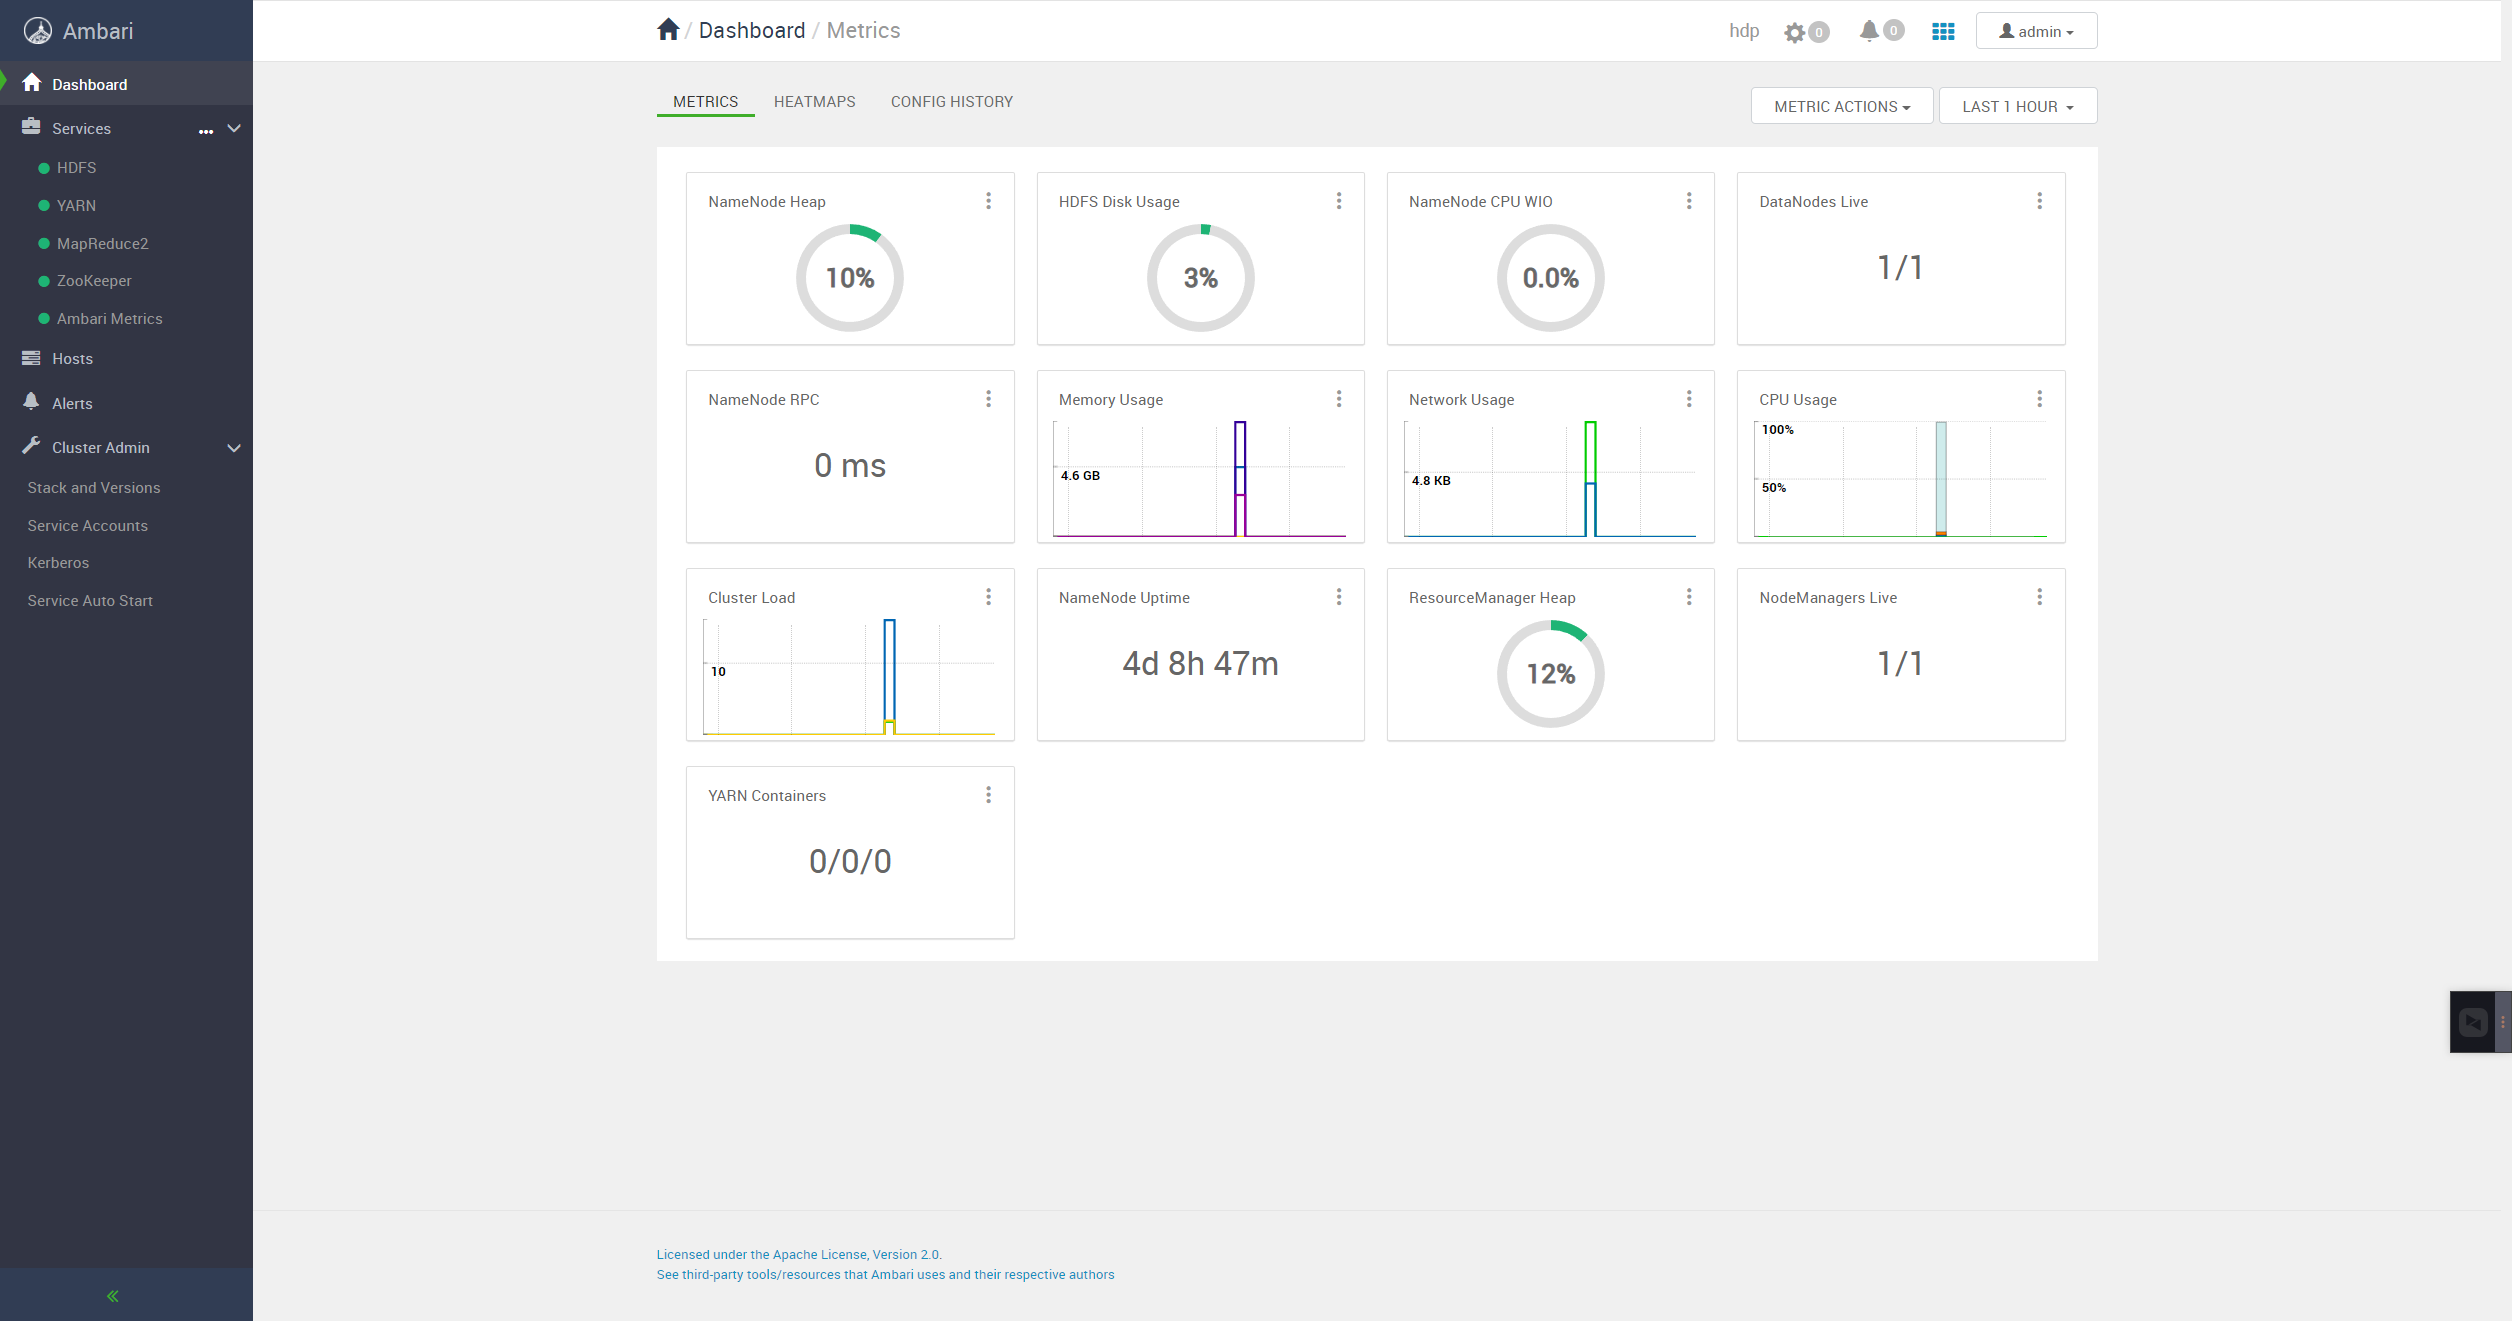
上述操作完后,可在网页上操作. 有问题查看日志解决
1、登录界面:http://hdp01:8080
默认管理员账户登录, 账户:admin 密码:admin
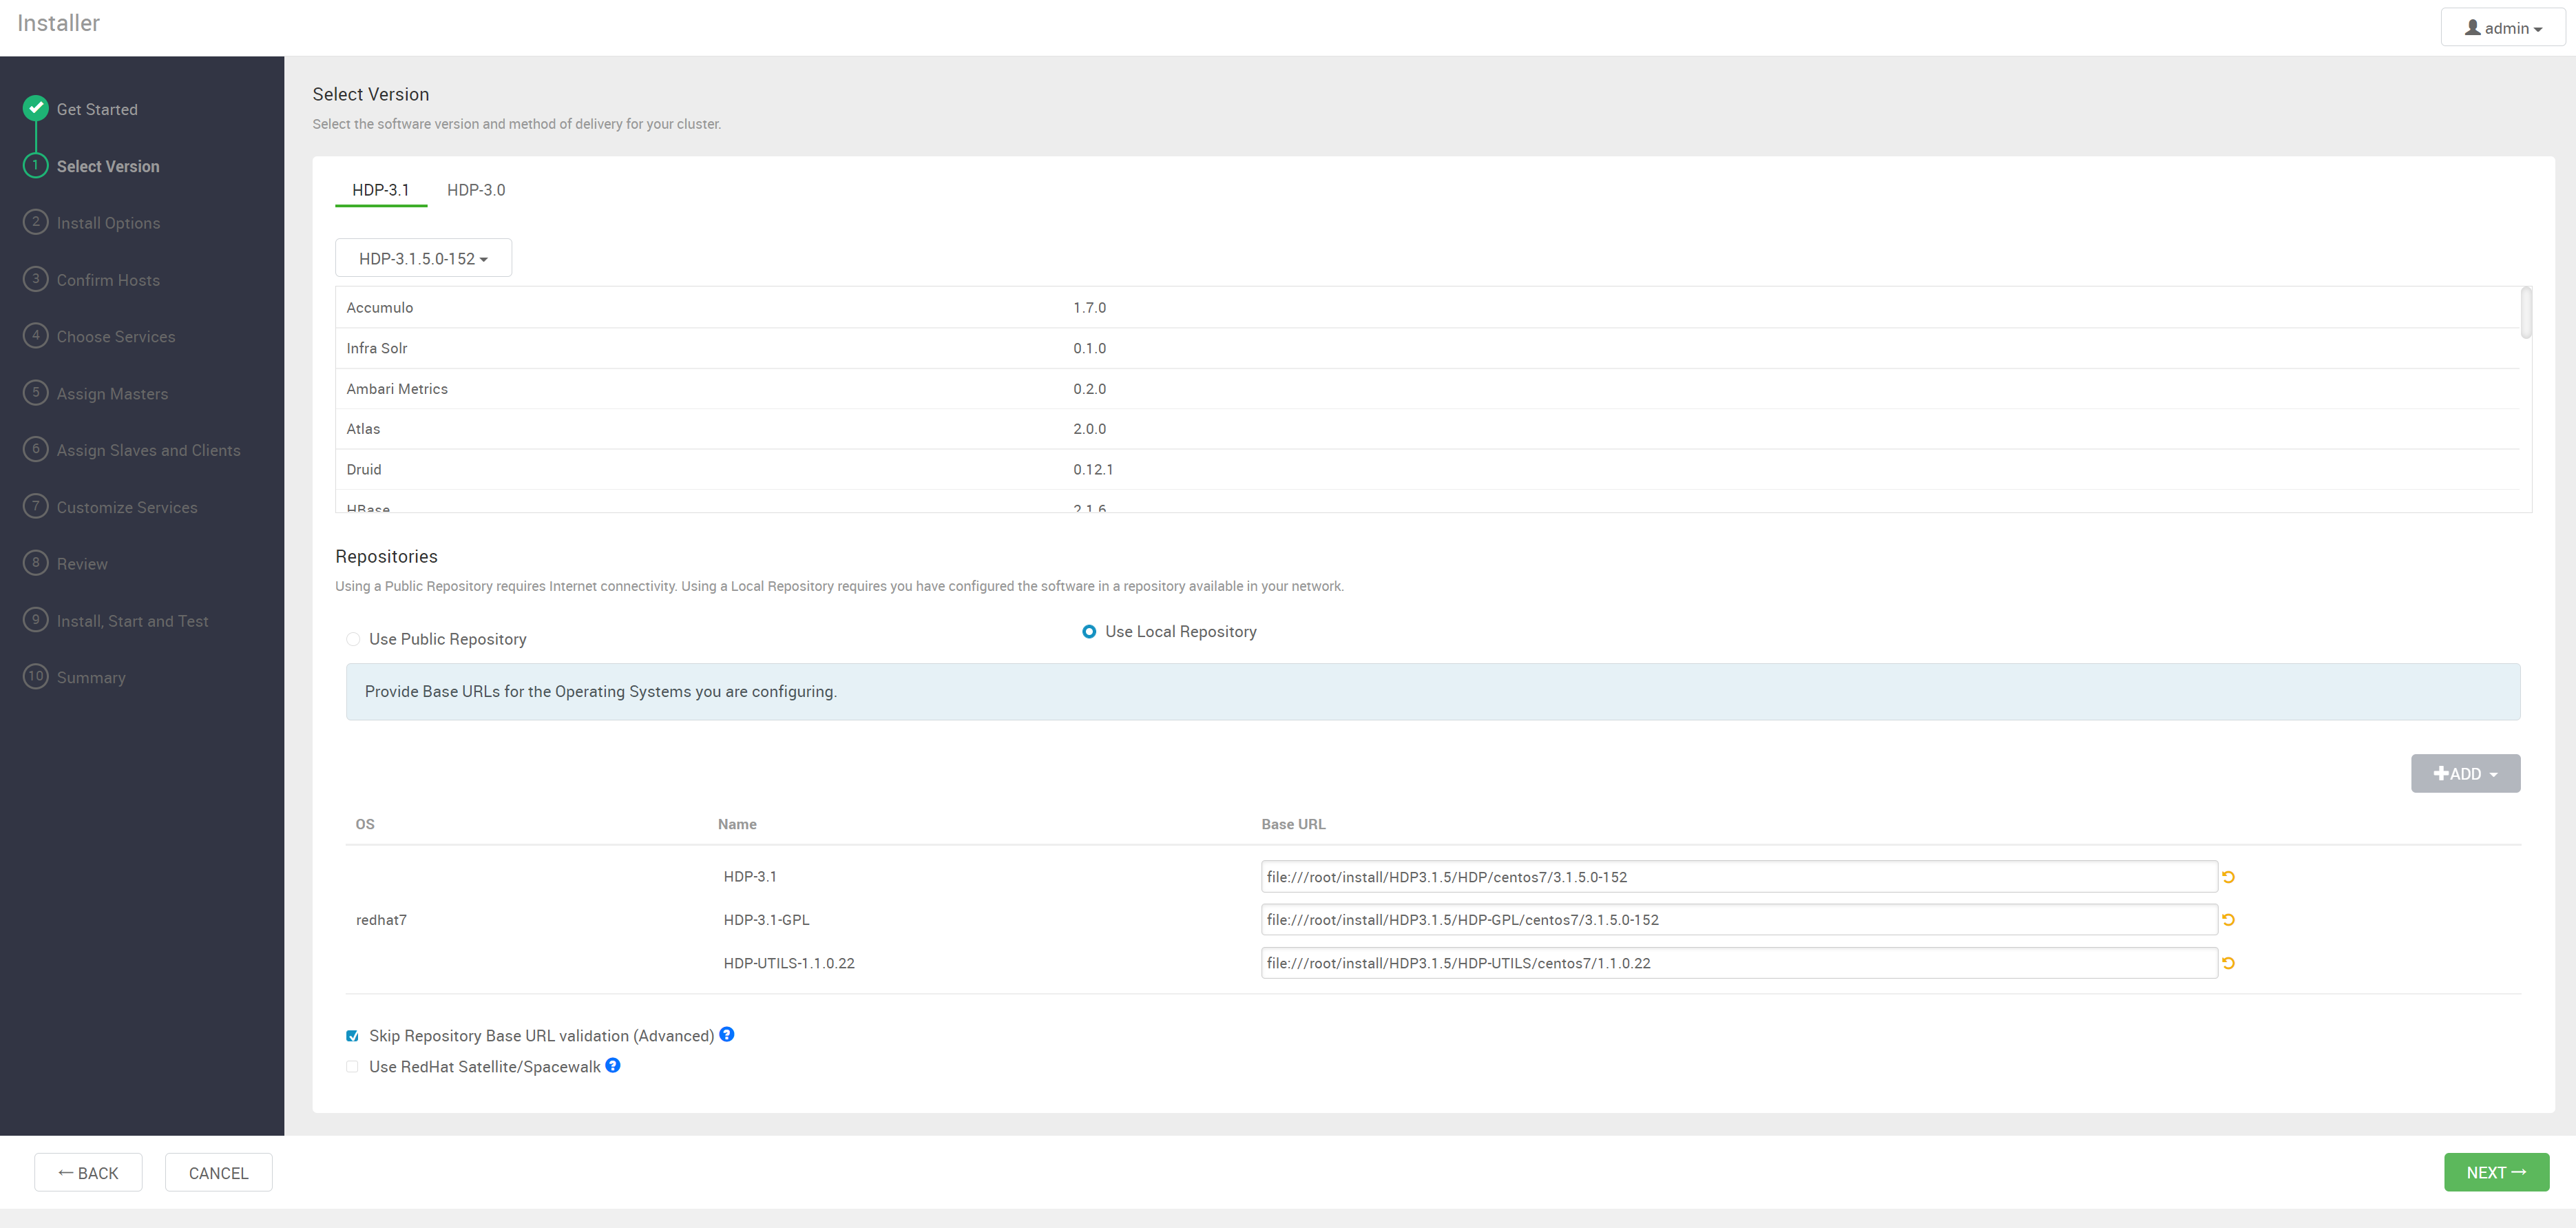
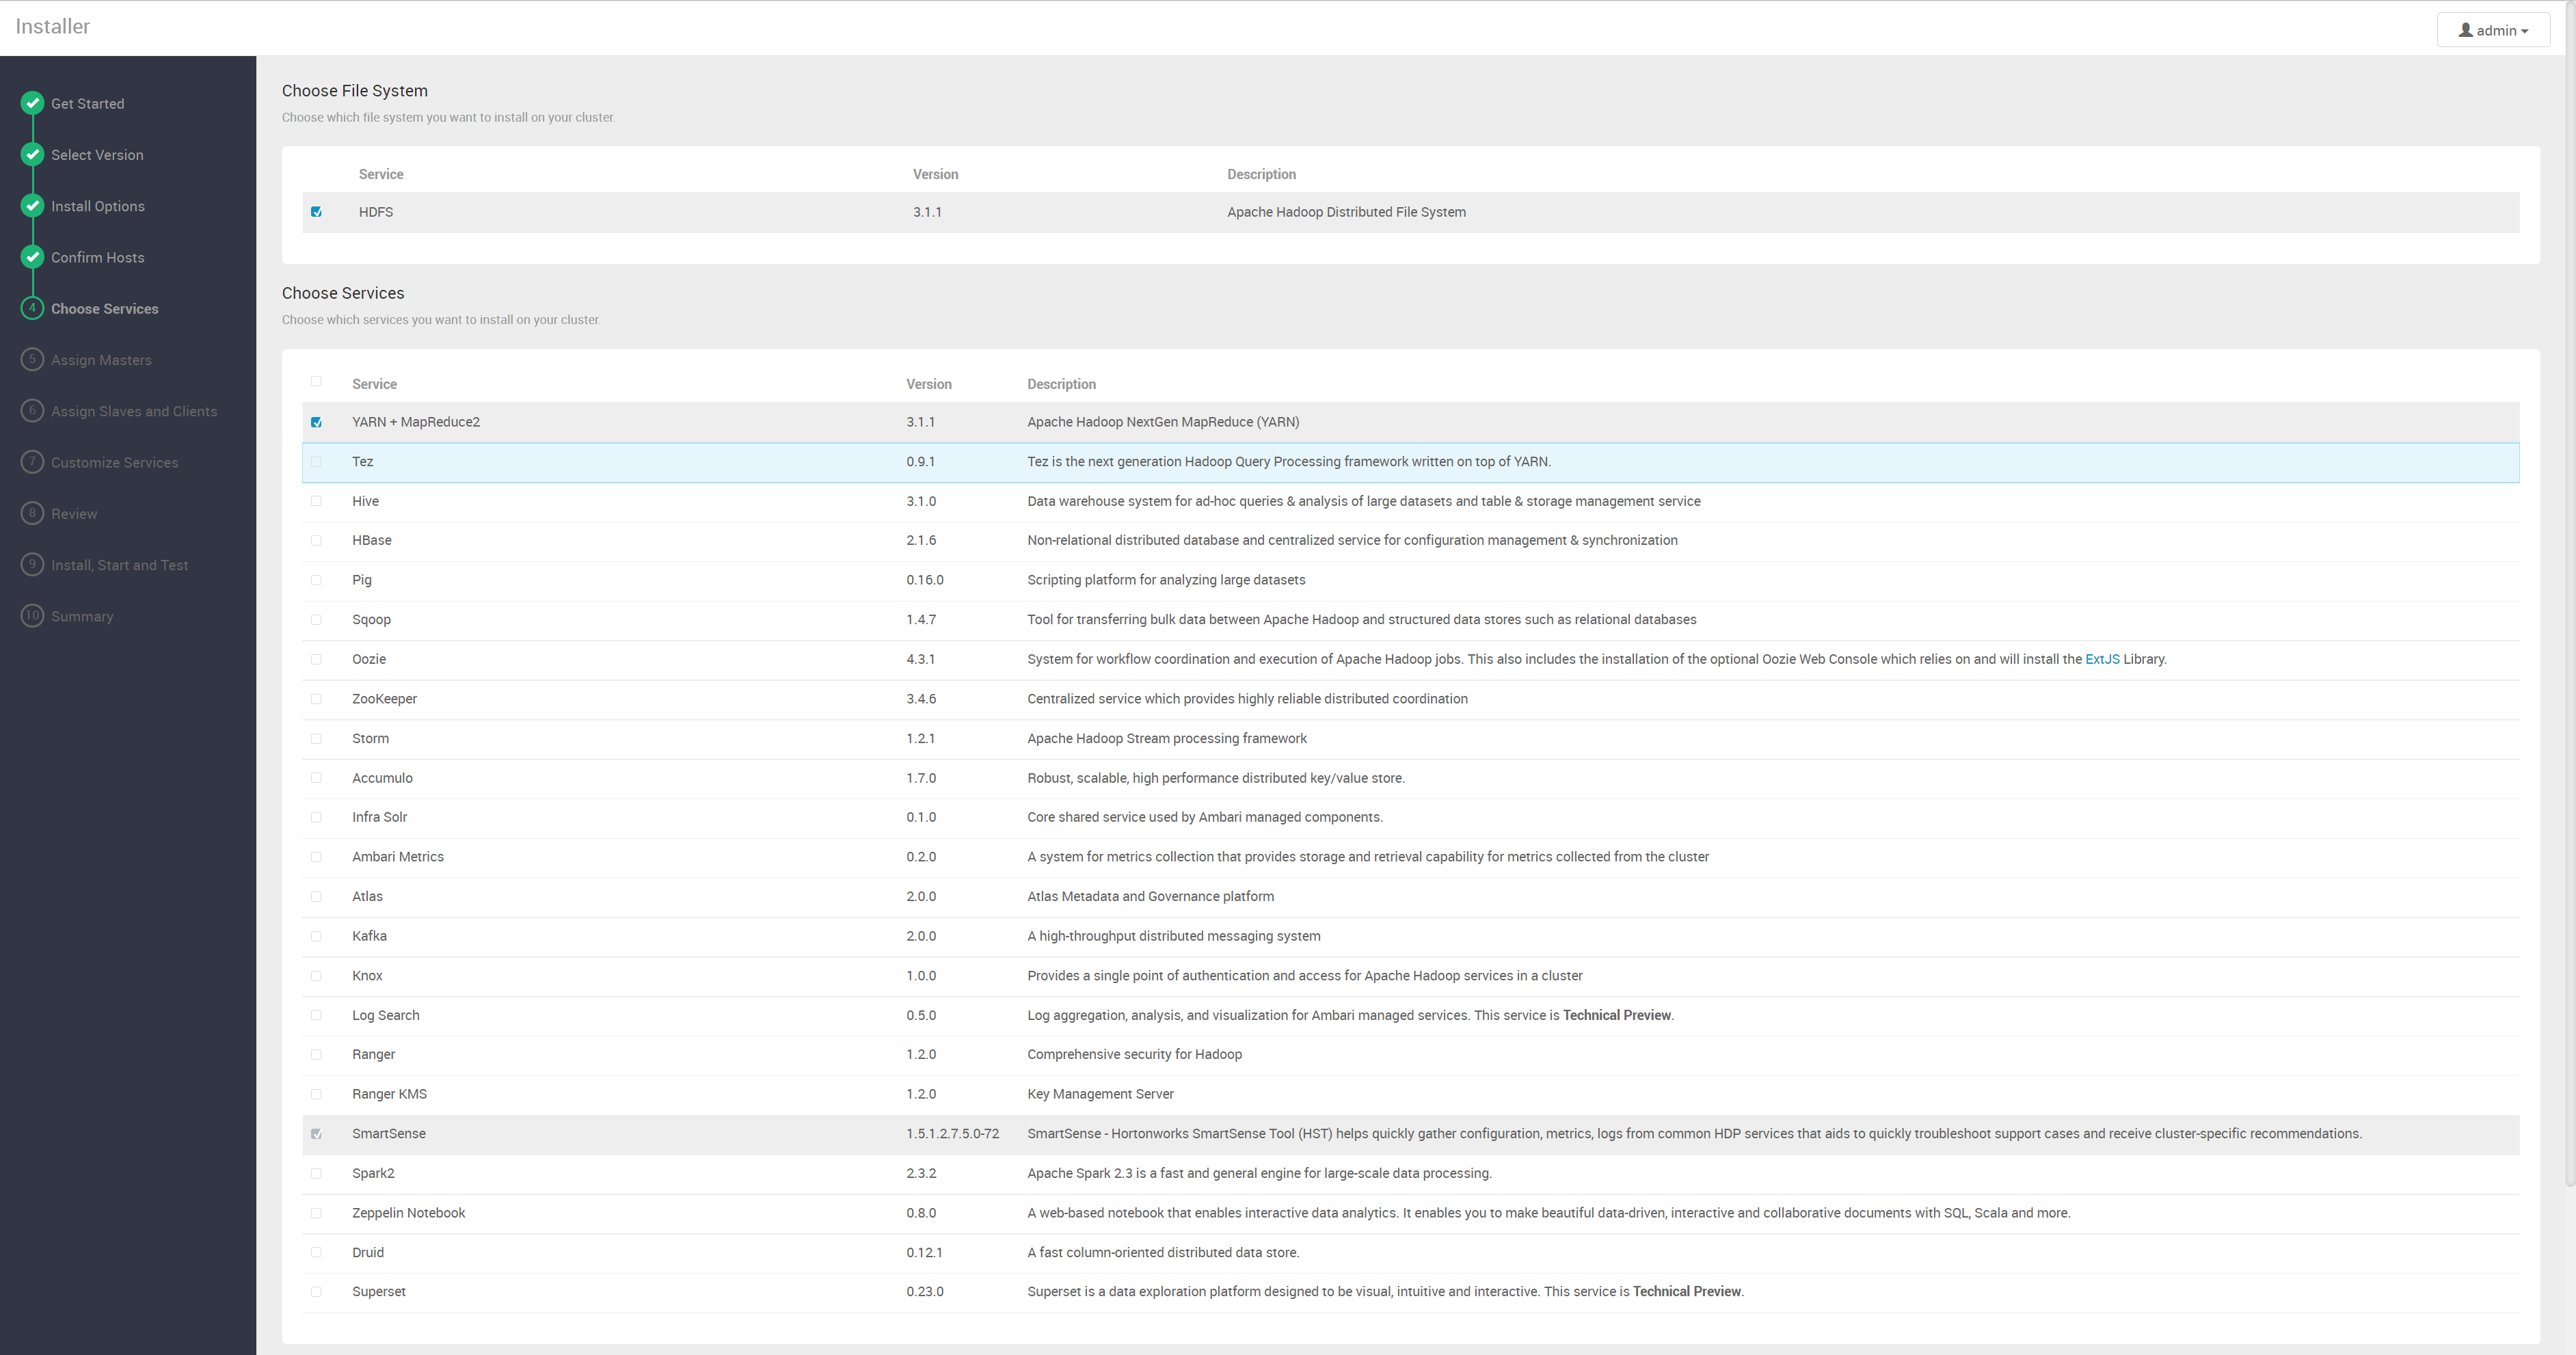

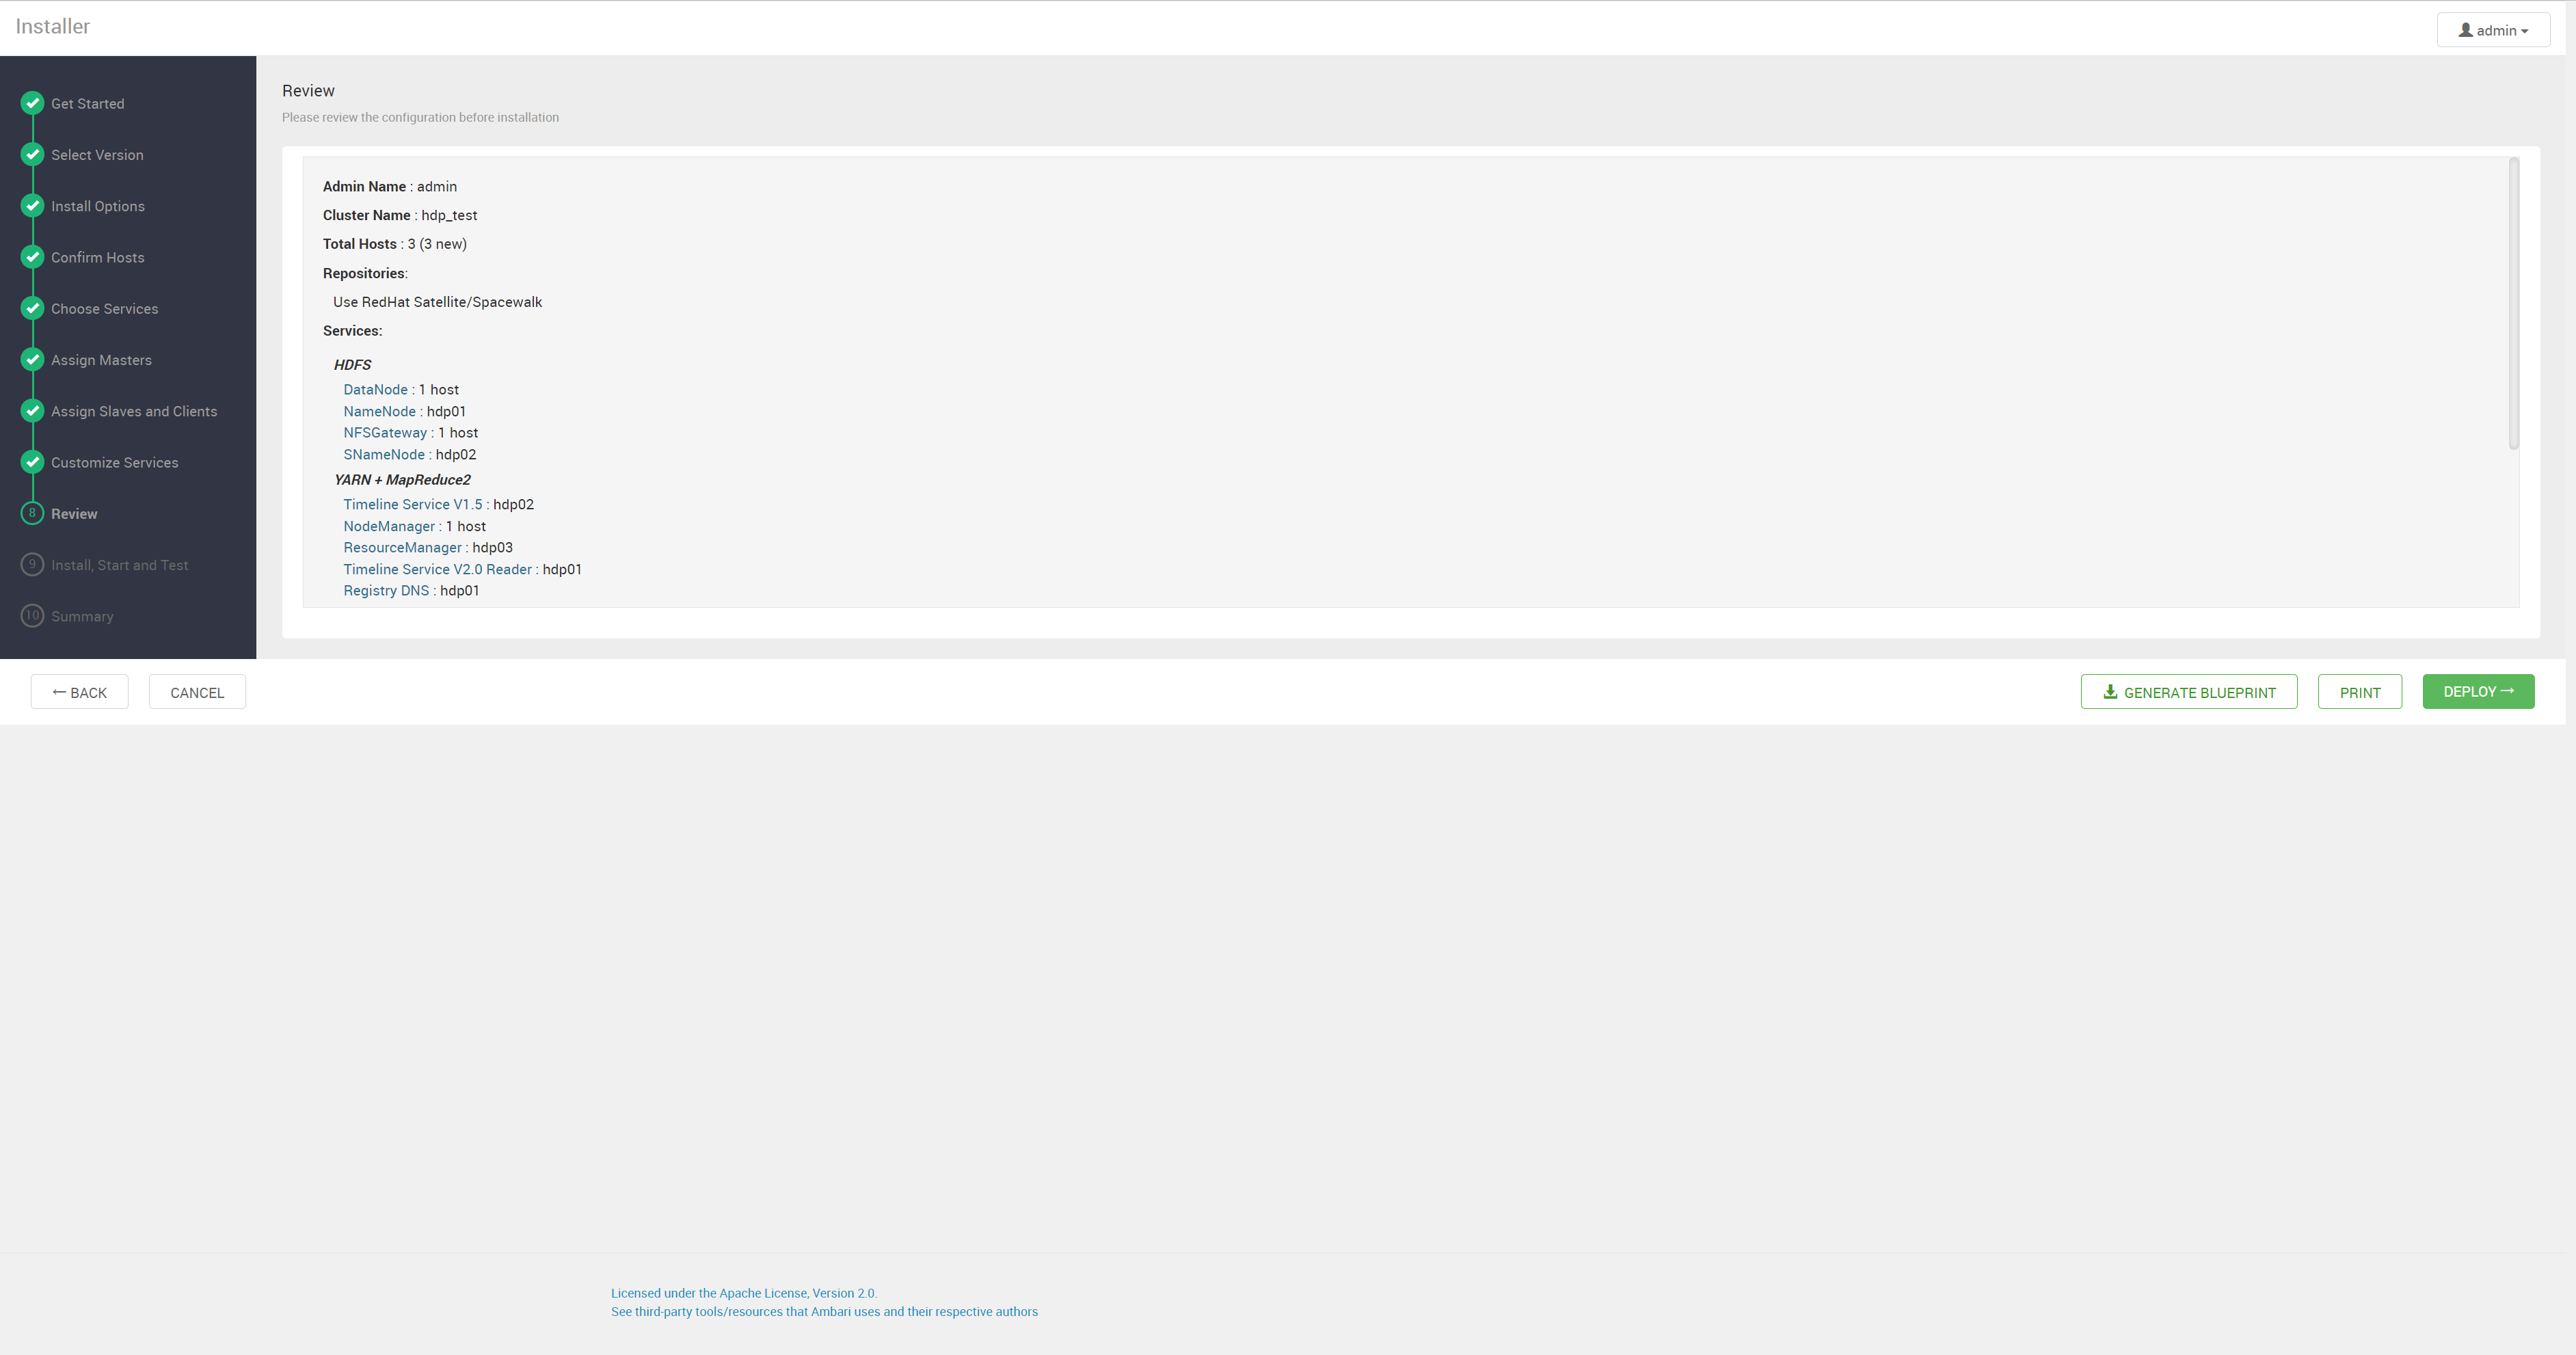
hdp 安装时配置文件
安装配置文件
HDP-3.1.5.0-152.xml1
2
3
4
5
6
7
8
9
10
11
12
13
14
15
16
17
18
19
20
21
22
23
24
25
26
27
28
29
30
31
32
33
34
35
36
37
38
39
40
41
42
43
44
45
46
47
48
49
50
51
52
53
54
55
56
57
58
59
60
61<?xml version="1.0"?>
<repository-version xmlns:xsi="http://www.w3.org/2001/XMLSchema-instance" xsi:noNamespaceSchemaLocation="version_definition.xsd">
<release>
<type>STANDARD</type>
<stack-id>HDP-3.1</stack-id>
<version>3.1.5.0</version>
<build>152</build>
<compatible-with>3\.\d+\.\d+\.\d+</compatible-with>
<release-notes>http://example.com</release-notes>
<display>HDP-3.1.5.0</display>
</release>
<manifest>
<service id="ACCUMULO-170" name="ACCUMULO" version="1.7.0"/>
<service id="ATLAS-200" name="ATLAS" version="2.0.0"/>
<service id="DRUID-0121" name="DRUID" version="0.12.1"/>
<service id="HDFS-311" name="HDFS" version="3.1.1"/>
<service id="YARN-311" name="YARN" version="3.1.1"/>
<service id="MAPREDUCE2-311" name="MAPREDUCE2" version="3.1.1"/>
<service id="HBASE-216" name="HBASE" version="2.1.6"/>
<service id="HIVE-310" name="HIVE" version="3.1.0"/>
<service id="KAFKA-200" name="KAFKA" version="2.0.0"/>
<service id="KNOX-100" name="KNOX" version="1.0.0"/>
<service id="OOZIE-431" name="OOZIE" version="4.3.1"/>
<service id="PIG-0160" name="PIG" version="0.16.0"/>
<service id="RANGER-120" name="RANGER" version="1.2.0"/>
<service id="RANGER_KMS-120" name="RANGER_KMS" version="1.2.0"/>
<service id="SPARK2-232" name="SPARK2" version="2.3.2"/>
<service id="SQOOP-147" name="SQOOP" version="1.4.7"/>
<service id="STORM-121" name="STORM" version="1.2.1"/>
<service id="TEZ-091" name="TEZ" version="0.9.1"/>
<service id="ZEPPELIN-080" name="ZEPPELIN" version="0.8.0"/>
<service id="ZOOKEEPER-346" name="ZOOKEEPER" version="3.4.6"/>
</manifest>
<available-services/>
<repository-info>
<os family="redhat7">
<package-version>3_1_5_0_*</package-version>
<repo>
<baseurl>https://archive.cloudera.com/p/HDP/centos7/3.x/updates/3.1.5.0</baseurl>
<repoid>HDP-3.1</repoid>
<reponame>HDP</reponame>
<unique>true</unique>
</repo>
<repo>
<baseurl>https://archive.cloudera.com/p/HDP-GPL/centos7/3.x/updates/3.1.5.0</baseurl>
<repoid>HDP-3.1-GPL</repoid>
<reponame>HDP-GPL</reponame>
<unique>true</unique>
<tags>
<tag>GPL</tag>
</tags>
</repo>
<repo>
<baseurl>https://archive.cloudera.com/p/HDP-UTILS-1.1.0.22/repos/centos7</baseurl>
<repoid>HDP-UTILS-1.1.0.22</repoid>
<reponame>HDP-UTILS</reponame>
<unique>false</unique>
</repo>
</os>
</repository-info>
</repository-version>
安装步骤详细
mysql 初始化
1 | ecuring the MySQL server deployment. |
ambari-server setup 使用自定义 java, 和 MySQL1
2
3
4
5
6
7
8
9
10
11
12
13
14
15
16
17
18
19
20
21
22
23
24
25
26
27
28
29
30
31
32
33
34
35
36
37
38
39
40
41
42
43
44
45
46
47
48
49
50
51
52
53
54
55
56
57[root@hdp01 ~]# ambari-server setup
Using python /usr/bin/python
Setup ambari-server
Checking SELinux...
SELinux status is 'enabled'
SELinux mode is 'permissive'
WARNING: SELinux is set to 'permissive' mode and temporarily disabled.
OK to continue [y/n] (y)? y
Customize user account for ambari-server daemon [y/n] (n)? y
Enter user account for ambari-server daemon (root):ambari
Adjusting ambari-server permissions and ownership...
Checking firewall status...
Checking JDK...
Do you want to change Oracle JDK [y/n] (n)? y
[1] Oracle JDK 1.8 + Java Cryptography Extension (JCE) Policy Files 8
[2] Custom JDK
==============================================================================
Enter choice (1): 2
WARNING: JDK must be installed on all hosts and JAVA_HOME must be valid on all hosts.
WARNING: JCE Policy files are required for configuring Kerberos security. If you plan to use Kerberos,please make sure JCE Unlimited Strength Jurisdiction Policy Files are valid on all hosts.
Path to JAVA_HOME: /usr/java/default
Validating JDK on Ambari Server...done.
Check JDK version for Ambari Server...
JDK version found: 8
Minimum JDK version is 8 for Ambari. Skipping to setup different JDK for Ambari Server.
Checking GPL software agreement...
Completing setup...
Configuring database...
Enter advanced database configuration [y/n] (n)? y
Configuring database...
==============================================================================
Choose one of the following options:
[1] - PostgreSQL (Embedded)
[2] - Oracle
[3] - MySQL / MariaDB
[4] - PostgreSQL
[5] - Microsoft SQL Server (Tech Preview)
[6] - SQL Anywhere
[7] - BDB
==============================================================================
Enter choice (3):
Hostname (localhost):
Port (3306):
Database name (ambari):
Username (ambari):
Enter Database Password (ambari):
Configuring ambari database...
Should ambari use existing default jdbc /usr/share/java/mysql-connector-java.jar [y/n] (y)? y
Configuring remote database connection properties...
WARNING: Before starting Ambari Server, you must run the following DDL directly from the database shell to create the schema: /var/lib/ambari-server/resources/Ambari-DDL-MySQL-CREATE.sql
Proceed with configuring remote database connection properties [y/n] (y)? y
Extracting system views...
ambari-admin-2.7.5.0.72.jar
....
Ambari repo file doesn't contain latest json url, skipping repoinfos modification
Adjusting ambari-server permissions and ownership...
Ambari Server 'setup' completed successfully.