Volume

容器销毁时,保存在容器内部文件系统中的数据会被清除,为了持久化保存容器数据,可以使用 Kubernetes Volume

Volume 生命周期独立于容器,Pod 中容器可能销毁重建,但 Volume 会被保留。

emptyDir

一个 emptyDir VolumeHost 上的一个空目录。

emptyDir Volume 对容器是持久的。但 Pod 从节点删除时,Volume 的内容也会被删除。容器销毁而 Pod 还在,则 Volume 不受影响。

emptyDir Volume 的生命周期与 Pod 一致。

emptyDir 的用法有:

  1. 暂存空间,例如用于基于磁盘的合并排序
  2. 用作长时间计算崩溃恢复时的检查点
  3. Web 服务器容器提供数据时,保存内容管理器容器提取的文件

emptyDir-example.yaml

1
2
3
4
5
6
7
8
9
10
11
12
13
14
15
16
17
18
19
20
21
apiVersion: v1
kind: Pod
metadata:
name: test-pd
spec:
containers:
- image: nginx:1.7.9
name: test-container01
volumeMounts:
- mountPath: /cache
name: cache-volume
- name: test-container02
image: busybox:1.32.0
imagePullPolicy: IfNotPresent
command: ["/bin/sh","-c","sleep 3600"]
volumeMounts:
- mountPath: /test
name: cache-volume
volumes:
- name: cache-volume
emptyDir: {}
1
2
3
4
5
6
7
8
9
10
11
12
13
14
15
16
17
18
19
20
21
22
23
24
25
26
27
28
[root@k8s01 ~]# kubectl apply -f emptyDir-example.yaml
pod/test-pd created
[root@k8s01 ~]# kubectl get pod
NAME READY STATUS RESTARTS AGE
test-pd 2/2 Running 0 3s

[root@k8s01 ~]# kubectl exec test-pd -c test-container01 -it -- /bin/bash # 进入test-container01 下的/cache 目录
root@test-pd:/# cd cache/
root@test-pd:/cache# date >> index.txt
root@test-pd:/cache# cat index.txt
Mon Aug 31 17:03:13 UTC 2020

### 新开一个窗口
[root@k8s01 ~]# kubectl exec test-pd -c test-container02 -it -- /bin/sh # 进入test-container02 下的 /test 目录
/ # cd test
/test # ls # 发现与 test-container01 下的 /cache 目录 文件内容相同
index.txt
/test # cat index.txt
Mon Aug 31 17:03:13 UTC 2020
/test # date >> index.txt
/test # cat index.txt
Mon Aug 31 17:03:13 UTC 2020
Mon Aug 31 17:05:43 UTC 2020

### 第一个窗口
root@test-pd:/cache# cat index.txt # 内容也同步更新
Mon Aug 31 17:03:13 UTC 2020
Mon Aug 31 17:05:43 UTC 2020

实际路径,pod 调度到了 k8s03 节点上。文件位置如下

1
2
3
4
5
[root@k8s01 ~]#  kubectl get  pod/test-pd -o yaml | grep uid
uid: a6ccf3c2-6f2c-47ff-a6f5-8175e90c01f2

[root@hdp03 ~]# cat /var/lib/kubelet/pods/a6ccf3c2-6f2c-47ff-a6f5-8175e90c01f2/volumes/kubernetes.io~empty-dir/cache-volume/index.txt
Tue Sep 13 02:17:34 UTC 2022

hostPath

hostPath VolumeDocker Host 文件系统中已经存在的目录 mountPod 的容器。一般不会使用,因为增加了 Pod 与节点的耦合,限制了 Pod 的使用。不过那些需要访问 k8sDocker 内部数据的应用则需要使用 hostPath

eg: kube-apiserverkube-controller-manager

kubectl edit --namespace=kube-system pod kube-apiserver-k8s-master 查看 kube-apiserver Pod 的配置。

Pod 销毁,hostPath 对应的目录还会保留。但 Host 崩溃,hostPath 就无法访问了。

使用这种卷类型时请注意

  1. 因为每个节点上的文件都不同,具有相同配置(例如从 podTemplate 创建的)的 pod 在不同节点上的行为可能会有所不同
  2. Kubernetes 按照计划添加资源感知调度时,将无法考虑 hostPath 使用的资源
  3. 在底层主机上创建的文件或目录只能由 root 写入。您需要在特权容器中以 root 身份运行进程,或修改主机上的文件权限以便写入 hostPath

hostPath更多使用方法

hostPath-example.yaml

1
2
3
4
5
6
7
8
9
10
11
12
13
14
15
16
17
18
apiVersion: v1
kind: Pod
metadata:
name: test-pd
spec:
containers:
- image: nginx:1.7.9
name: test-container
volumeMounts:
- mountPath: /test-pd
name: test-volume
volumes:
- name: test-volume
hostPath:
# directory location on host
path: /data
# this field is optional
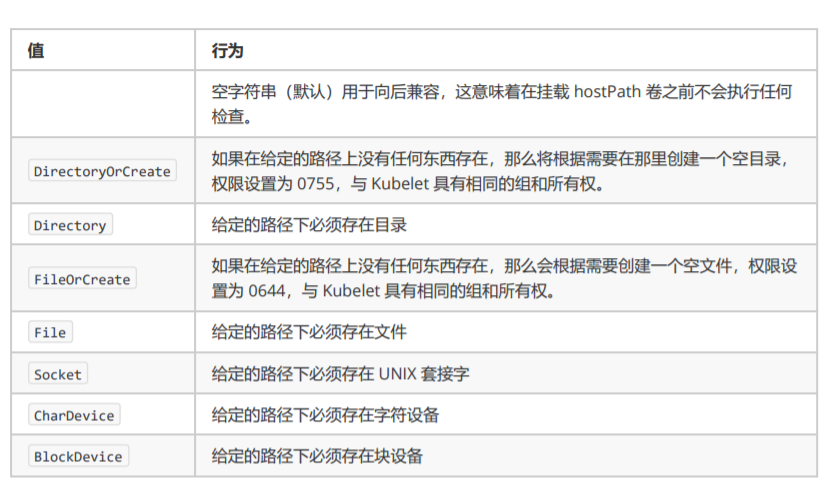
type: Directory

hostPath_type

1
2
3
4
5
6
7
8
9
10
11
12
13
14
15
16
17
18
19
20
21
22
23
24
25
26
27
28
29
30
31
32
33
34
35
36
37
38
39
40
41
42
43
44
45
46
[root@k8s01 ~]# kubectl apply -f  hostPath-example.yaml
pod/test-pd02 created
[root@k8s01 ~]# kubectl get pod # 一直处于 ContainerCreating
NAME READY STATUS RESTARTS AGE
test-pd 2/2 Running 0 19m
test-pd02 0/1 ContainerCreating 0 16s

[root@k8s01 ~]# kubectl describe pod test-pd02 # 查看日志,发现是因为 k8s03上没有 /data 目录

[root@k8s03 ~]# mkdir /data
[root@k8s01 ~]# kubectl describe pod test-pd02 # 节选
Events:
Type Reason Age From Message
---- ------ ---- ---- -------
Normal Scheduled 4m42s default-scheduler Successfully assigned default/test-pd02 to k8s03
Warning FailedMount 3m38s (x8 over 4m41s) kubelet, k8s03 MountVolume.SetUp failed for volume "test-volume" : hostPath type check failed: /data is not a directory
Warning FailedMount 2m39s kubelet, k8s03 Unable to attach or mount volumes: unmounted volumes=[test-volume], unattached volumes=[test-volume default-token-rr77c]: timed out waiting for the condition
Normal Pulled 2m26s kubelet, k8s03 Container image "nginx:1.7.9" already present on machine
Normal Created 2m26s kubelet, k8s03 Created container test-container
Normal Started 2m26s kubelet, k8s03 Started container test-container

[root@k8s01 ~]# kubectl exec test-pd02 -it -- /bin/bash
root@test-pd02:/# ls
bin boot dev etc home lib lib64 media mnt opt proc root run sbin selinux srv sys test-pd tmp usr var
root@test-pd02:/# cd test-pd/
root@test-pd02:/test-pd# date >> index.txt
root@test-pd02:/test-pd# cat index.txt
Mon Aug 31 17:25:09 UTC 2020

[root@k8s03 ~]# cat /data/index.txt # /data 下已有 index.txt 文件,内容相同
Mon Aug 31 17:25:09 UTC 2020
[root@k8s03 ~]# date >> /data/index.txt # /data/index.txt 写入
[root@k8s03 ~]# cat /data/index.txt
Mon Aug 31 17:25:09 UTC 2020
Mon Aug 31 13:27:03 EDT 2020

root@test-pd02:/test-pd# cat index.txt # 容器内也是相同内容
Mon Aug 31 17:25:09 UTC 2020
Mon Aug 31 13:27:03 EDT 2020

[root@k8s01 ~]# kubectl delete pod test-pd02 # 删除 Pod
pod "test-pd02" deleted

[root@k8s03 ~]# cat /data/index.txt # 文件还在 k8s03 节点存在
Mon Aug 31 17:25:09 UTC 2020
Mon Aug 31 13:27:03 EDT 2020

Volume 目录与挂载流程

当一个 Pod 调度到一个节点上之后,kubelet 就要负责为这个 Pod 创建它的 Volume 目录。默认情况下,kubeletVolume 创建的目录是如下所示的一个宿主机上的路径:

1
/var/lib/kubelet/pods/<Pod的ID>/volumes/kubernetes.io~<Volume类型>/<Volume名字>

接下来,kubelet 要做的操作就取决于 Volume 类型。

eg: 远程磁盘

  1. attach:将远程磁盘挂载到 pod 所在 node 节点上(nfs 等不在远程的,可以直接执行第二步)(nodeName,即宿主机的名字)
  2. mount:格式化此磁盘,然后将它挂载到宿主机的指定挂载点(dir,即 Volume 的宿主机目录)
1
2
3
4
5
6
7
8
9
10
11
# 过程类似于:
# 第一步
$ gcloud compute instances attach-disk <虚拟机名字> --disk <远程磁盘名字>

# 第二步
# 通过lsblk命令获取磁盘设备ID
$ sudo lsblk
# 格式化成ext4格式
$ sudo mkfs.ext4 -m 0 -F -E lazy_itable_init=0,lazy_journal_init=0,discard /dev/<磁盘设备ID>
# 挂载到挂载点
$ sudo mkdir -p /var/lib/kubelet/pods/<Pod的ID>/volumes/kubernetes.io~<Volume类型>/<Volume名字>

Local Persistent Volume

Kubernetes 能够直接使用宿主机上的本地磁盘目录,而不依赖于远程存储服务,来提供“持久化”的容器 Volume

相比于正常的 PV,一旦这些节点宕机且不能恢复时,Local Persistent Volume 的数据就可能丢失。使用 Local Persistent Volume 的应用必须具备数据备份和恢复的能力,允许你把这些数据定时备份在其他位置。

难点:

  1. 如何把本地磁盘抽象成 PV
  2. 保证 Pod 始终能被正确地调度到它所请求的 Local Persistent Volume 所在的节点上

不应该把一个宿主机上的目录当作 PV 使用。这种本地目录的存储行为完全不可控,它所在的磁盘随时都可能被应用写满,甚至造成整个宿主机宕机,最好一块额外挂载在宿主机的磁盘或者块设备(“一个 PV 一块盘”)。

调度器就必须能够知道所有节点与 Local Persistent Volume 对应的磁盘的关联关系,然后根据这个信息来调度 Pod(“在调度的时候考虑 Volume 分布”)。

示例

  1. 在名叫 node-1 的宿主机上创建一个挂载点,比如 /mnt/disks;然后,用几个 RAM Disk 来模拟本地磁盘
1
2
3
4
5
6
# 在node-1上执行
$ mkdir /mnt/disks
$ for vol in vol1 vol2 vol3; do
mkdir /mnt/disks/$vol
mount -t tmpfs $vol /mnt/disks/$vol
done
  1. 为这些本地磁盘定义对应的 PV
1
2
3
4
5
6
7
8
9
10
11
12
13
14
15
16
17
18
19
20
21
22
apiVersion: v1
kind: PersistentVolume
metadata:
name: example-pv
spec:
capacity:
storage: 5Gi
volumeMode: Filesystem
accessModes:
- ReadWriteOnce
persistentVolumeReclaimPolicy: Delete
storageClassName: local-storage # 对应
local:
path: /mnt/disks/vol1
nodeAffinity:
required:
nodeSelectorTerms:
- matchExpressions:
- key: kubernetes.io/hostname
operator: In
values:
- node-1
  1. 创建一个 StorageClass 来描述这个 PV
1
2
3
4
5
6
kind: StorageClass
apiVersion: storage.k8s.io/v1
metadata:
name: local-storage # 对应
provisioner: kubernetes.io/no-provisioner # Local Persistent Volume 目前尚不支持 Dynamic Provisioning
volumeBindingMode: WaitForFirstConsumer # 延迟绑定 原本实时发生的 PVC 和 PV 的绑定过程,就被延迟到了 Pod 第一次调度的时候在调度器中进行
  1. 创建 PVC,apply 后还不会绑定,处于 pending 状态
1
2
3
4
5
6
7
8
9
10
11
kind: PersistentVolumeClaim
apiVersion: v1
metadata:
name: example-local-claim
spec:
accessModes:
- ReadWriteOnce
resources:
requests:
storage: 5Gi
storageClassName: local-storage # 对应
  1. 编写一个 Pod 来声明使用这个 PVC
1
2
3
4
5
6
7
8
9
10
11
12
13
14
15
16
17
18
kind: Pod
apiVersion: v1
metadata:
name: example-pv-pod
spec:
volumes:
- name: example-pv-storage
persistentVolumeClaim:
claimName: example-local-claim # pvc name
containers:
- name: example-pv-container
image: nginx
ports:
- containerPort: 80
name: "http-server"
volumeMounts:
- mountPath: "/usr/share/nginx/html"
name: example-pv-storage

删除流程:

  1. 删除使用这个 PV 的 Pod
  2. 从宿主机移除本地磁盘(比如,umount 它)
  3. 删除 PVC
  4. 删除 PV

如果不按照这个流程的话,这个 PV 的删除就会失败——原因是 kubernetes.io/pv-protection 这个 finalizer:只要还有 PVC 绑在上面,kubectl delete pv 会把 deletionTimestamp 写上去,但对象一直卡在 Terminating,等 PVC 先走。PVC 上也有对应的 kubernetes.io/pvc-protection,防的是”Pod 还在用就把 PVC 删了”。所以这个顺序不是习惯问题,是被 finalizer 强制的。

WaitForFirstConsumer 到底解决了什么

volumeBindingMode 默认是 Immediate,字面意思是”立刻绑定”。对 Local PV 来说,这个默认值会造成一个无法自愈的死局,这才是必须改成 WaitForFirstConsumer 的原因。

Immediate 模式下两件事的顺序是:

  1. PVC 一创建,PV controller 就立刻从可用 PV 里挑一个绑上(绑定是排他的、且不可撤销);
  2. 之后 scheduler 才开始给 Pod 找节点,而此时 PV 的 nodeAffinity 已经把 Pod 钉死在某个节点上了。

于是:假如被绑到的那个节点 CPU/内存不够、或者带着 Pod 不能容忍的污点,Pod 就永远 Pending。而且重试也救不回来——PVC 和 PV 的绑定不会因为调度失败而解开,你只能删掉 PVC 重来(还未必不撞上同一个 PV)。

WaitForFirstConsumer 把绑定推迟到第一次调度时:scheduler 的 VolumeBinding 插件在 Filter 阶段同时考虑 CPU、内存、亲和性、污点和 PV 的节点约束,一次性算出一个可行解,然后才提交绑定。也就是把”先绑再调度”改成了”调度和绑定一起决策”。

1
volumeBindingMode: WaitForFirstConsumer

判断要不要用它有个简单标准:PV 带节点约束就必须用。Local PV、hostPath、以及云上的区域盘(EBS/云硬盘只能挂在同一可用区的节点上)都属于这一类。反过来,NFS、CephFS 这类任何节点都能挂的存储,用 Immediate 没问题,还能省掉调度时的一轮计算。

副作用要知道一个:WaitForFirstConsumer 的 PVC 在没有 Pod 引用它之前会一直是 Pending 状态,这是正常的,不是故障——第一次见到很容易误判成 provisioner 坏了。

CSI

CSI 的设计思想,把插件的职责从“两阶段处理”,扩展成了 ProvisionAttachMount 三个阶段。

  1. Provision 等价于“创建磁盘”
  2. Attach 等价于“挂载磁盘到虚拟机”
  3. Mount 等价于“将该磁盘格式化后,挂载在 Volume 的宿主机目录上”
1
2
3
4
5
6
7
8
kind: StorageClass
apiVersion: storage.k8s.io/v1
metadata:
name: do-block-storage
namespace: kube-system
annotations:
storageclass.kubernetes.io/is-default-class: "true" # 使用这个 StorageClass 作为默认的持久化存储提供者
provisioner: com.digitalocean.csi.dobs # 使用 com.digitalocean.csi.dobs 的 CSI 插件处理这个 StorageClass 相关的所有操作