本文深入解析 Istio 服务网格,从控制面 Istiod 与数据面 Envoy 讲起,依次介绍 xDS 协议、核心 API 资源、Ingress/Egress 网关以及金丝雀发布等流量治理实践。
简介 Istio 包含控制面 Istiod 和数据面 Envoy 两个组件。
Istiod 是控制面,负责配置校验、下发、证书轮转等工作。1.5.0 版本以后,Istio 将原本分离的控制面组件整合进 Istiod,主要包含以下模块:
Pilot:Istio 控制面中最核心的模块,负责运行时配置下发。具体来说,就是和 Envoy 之间基于 xDS 协议进行的各种 Envoy 配置信息的推送,包括服务发现、路由发现、集群发现、监听器发现等。Citadel:负责证书的分发和轮换,使 Sidecar 代理两端实现双向 TLS 认证、访问授权等。Galley:负责配置信息的格式和正确性校验,将配置信息提供给 Pilot 使用。
Envoy 是数据面,负责数据代理和流量路由等工作。它是 C++ 编写的高性能边缘网关和代理程序,支持 HTTP、gRPC、Thrift、Redis、MongoDB 等多种协议代理,其中对 HTTP 的支持最完善,几乎具备了 Service Mesh 数据面需要的所有功能,比如服务发现、限流熔断、多种负载均衡策略、精准流量路由等。
Envoy 数据面详解 Envoy 是专为大型现代 SOA(面向服务架构)架构设计的 L7 代理和通信总线,它既可以作为 Service Mesh 中的数据面使用,也可以作为入口网关层使用,可以通过 xDS API 控制 Envoy 的监听、路由、负载均衡等行为。
Envoy 核心功能
高性能设计:采用 C++ 编写,拥有良好的四层、七层代理性能
Filter 架构:可以在四、七层编写 Filter 以扩展 Envoy 的功能,eg: 监听过滤器、四层网络过滤器,以及七层过滤器。不过 Envoy 支持最完善的还是 HTTP 过滤器,支持了限流、路由转发、故障注入等多种服务治理功能良好的 HTTP/2 支持:随着 gRPC 框架的流行以及边缘层网络性能的要求提升,HTTP/2 越来越被重视。Envoy 原生支持 HTTP/2,可以在 HTTP 和 HTTP/2 之间做转换。比如在 Sidecar 模式中,无论应用协议是 HTTP 还是 HTTP/2,Envoy 之间默认使用 HTTP/2 通信,这样极大提升了服务性能和稳定性,避免了 HTTP 频繁建立连接带来的消耗和不稳定性。
多种协议支持:Thrift、gRPC、MongoDB、Redis、MySQL 等多种网络协议都被支持,甚至可以使用 Envoy 做 Redis 的 Mesh 方案,用来代替流行的 Redis 中间件。
可观测性:支持强大的统计系统。日志、Metrics、链路追踪都有良好的支持。
边缘网关:Envoy 本身就是一个高性能的网络代理组件,完全可以作为入口网关层使用,在 Kubernetes 中,也可以作为 Egress 和 Ingress 使用。
服务发现:和其他常见的网络代理软件不同,Envoy 默认支持服务发现组件。Envoy 使用了一套 xDS 的动态 API,获取服务的后端节点并实时更新,结合 Envoy 强大的负载均衡器,可以做到最终一致性。
Wasm 扩展:Wasm 全称为 WebAssembly,最早用在浏览器端用来解决 JavaScript 性能问题和大型项目团队协作问题。近些年,它开始在一些后端技术上使用,用来代替 Lua,作为核心系统的扩展方式。因为 Wasm 可以使用多种语言进行开发,所以方便对核心系统进行扩展,不用担心语言问题。当然相对于原生的 C++ 扩展方式,它大概有 3 成的性能损耗。
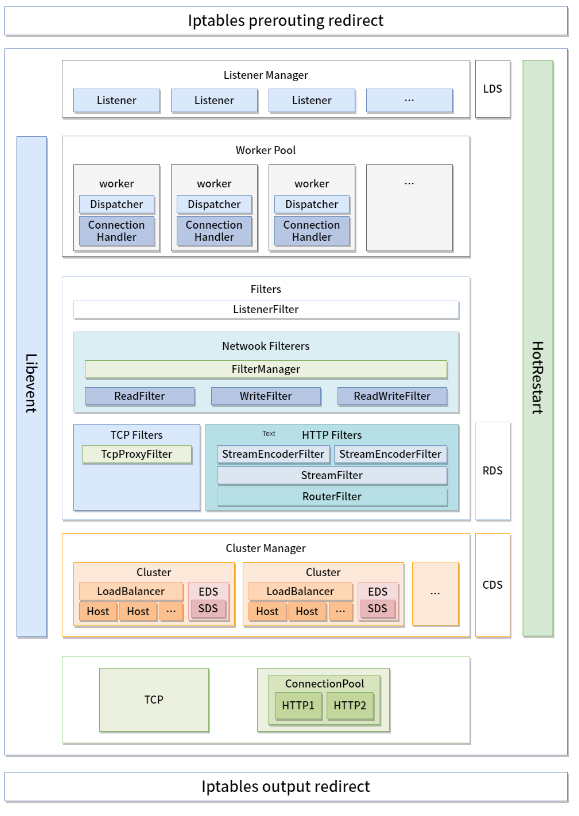
Envoy 架构设计
Iptable:通过 Iptable 劫持,将入口和出口流量都转发到 Envoy 上,达到劫持流量的目的。Listener:Envoy 通过建立多个监听器提供不同的服务。比如通过监听的两个端口分别负责 Sidecar 模式的出流量和入流量,Sidecar 多使用这种设计,这样可以简化编程逻辑,也可以增强 Filter 的通用性。如果提供不同协议,Envoy 也会建立不同的端口来提供服务。Worker:Envoy 是”1 个 main 线程 + N 个 worker 线程”的模型。worker 数量在启动时 由 --concurrency 一次确定(默认等于逻辑核数),之后新增 Listener 不会再创建任何线程——所有 Listener 由全部 worker 共享 ,各 worker 在同一个 listener socket 上 accept,连接被某个 worker 接下后整个生命周期都留在它上面(这也是 Envoy 的连接池和统计按 worker 分片的原因)。要注意启动太多的 worker 线程并不一定是好事,特别是在 Sidecar 模式,我们并不会分配过多的逻辑核心给到 Sidecar,创建过多的 Worker 线程可能导致每个 Worker 线程维护的连接变多,Upstream 压力过大。Filters:可以理解为中间件,通过 Filter,可以做到四层和七层的流量过滤,支持服务治理需要的限流、熔断等功能。Cluster Manager:流量经过 Router,识别出需要转发的 Cluster,通过 Cluster Manager 进行服务发现和负载均衡等功能。Upstream:Upstream 维护了 EndPoint 的连接池,通过负载均衡器,将流量转发到合适的 EndPoint 上面。
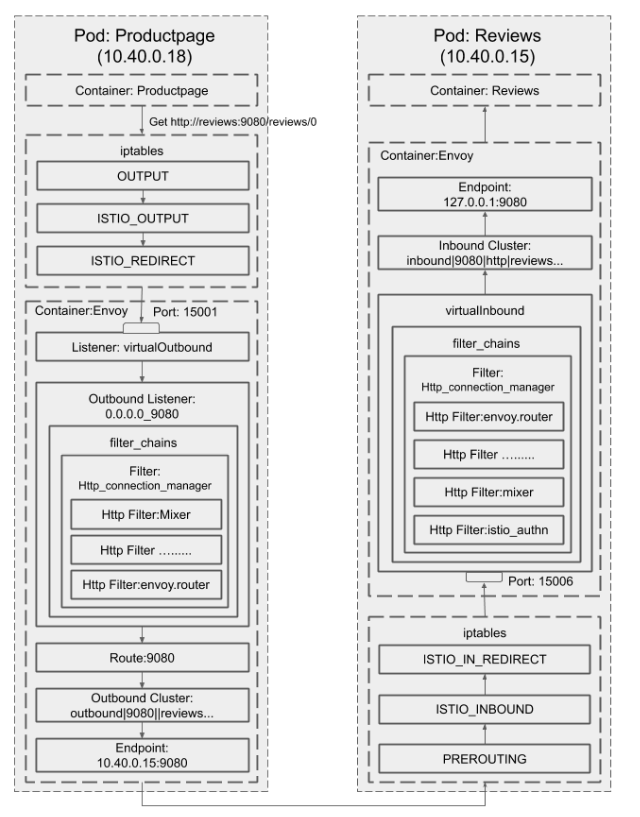
流量处理过程示例 Productpage 服务通过 HTTP 协议,调用 review 服务的过程。
通过 Iptables 对流量进行劫持,将 Productpage 访问 Reviews 的流量转发到 Envoy 的出流量 15001 端口上。
Envoy 先根据 virtual_hosts 进行匹配,再通过路由匹配,发现路由对应的 Cluster,通过服务发现找到 Cluster 对应的 EndPoint,将流量转发到 10.40.0.15:9080 的 Pod 上。Reviews 的 Pod 通过 Iptables 对流量进行劫持,将流量劫持到 Envoy 的入流量端口 15006 上。Envoy 将流量转发到本地地址 127.0.0.1:9080。15006(virtualInbound)这个端口恰恰是做大量匹配的地方:一组 filter chain 分别按原始目的端口、是否 mTLS(transport_protocol: tls 加 ALPN)、应用层协议来选链,再靠 ORIGINAL_DST 还原原始目的地址转到 127.0.0.1:<port>。正是这套按需选链的机制,才让 PeerAuthentication 的 PERMISSIVE 模式能同时接收明文和 mTLS。到这里整个 Sidecar 的流量出入过程就结束了。出入流量都经由 Envoy,最终被正确的转发到了 Reviews 的 Pod 上面。
“通过 iptables 劫持”具体是怎么劫持的 上面第 1、3 步的”通过 iptables 劫持”是这套机制的关键,展开看才知道流量为什么会走 Envoy、以及不走的时候该查哪里。istio-init 这个 initContainer(或者 Istio CNI 插件)会在 Pod 的 netns 里写下四条自定义链:
链
挂在哪
干什么
ISTIO_INBOUNDPREROUTING筛出需要劫持的入向流量
ISTIO_IN_REDIRECT被上面跳转
REDIRECT --to-port 15006
ISTIO_OUTPUTOUTPUT筛出需要劫持的出向流量,同时放行 Envoy 自己发出的包
ISTIO_REDIRECT被上面跳转
REDIRECT --to-port 15001
1 kubectl exec <pod> -c istio-proxy -- iptables -t nat -S
ISTIO_OUTPUT 里那条”放行 Envoy 自己的包”是靠 uid/gid 判断的(sidecar 以 1337 运行):
1 -A ISTIO_OUTPUT -m owner --uid-owner 1337 -j RETURN
没有这条,Envoy 转发出去的包会被 OUTPUT 链再劫持回 15001,形成无限回环。
为什么入向要单独用 15006,不复用 15001? 因为 Envoy 把流量转给应用是发往 127.0.0.1:<port> 的,这个包会经过 OUTPUT 链——如果出入共用一个端口,ISTIO_OUTPUT 就没法区分”这是要出网格的流量”还是”这是刚劫持进来要交给本地应用的流量”,两套规则互相触发形成回环。拆成两个端口,ISTIO_INBOUND → 15006、ISTIO_OUTPUT → 15001,职责就分开了。
Envoy 怎么知道原始目的地是谁? REDIRECT 会改写目的地址,但内核在 conntrack 里留了原始目的。Envoy 的 listener 配了 useOriginalDst,通过 SO_ORIGINAL_DST 取回改写前的 IP:port,再据此选 filter chain 和 cluster。所以 15001 上挂的是一个”虚拟”listener,真正的路由决策靠还原出来的原始目的地。
顺便把 Istio 占用的这几个端口分清,排查时不至于查错对象:
端口
归属
职责
15001
Envoy
virtualOutbound,出向流量入口
15006
Envoy
virtualInbound,入向流量入口
15000
Envoy
admin 接口(curl localhost:15000/config_dump 看全量配置)
15090
Envoy
Prometheus 指标(Envoy 自己的)
15020
pilot-agent
聚合 指标(合并 Envoy 15090 + 应用自身指标)、以及健康检查探针
15021
pilot-agent
/healthz/ready,Pod readiness 探针打的是这个
15012
istiod
xDS + CA(mTLS),sidecar 从这里拉配置和证书
15008
Envoy
HBONE 隧道(ambient 模式)
排查”流量为什么没走 Envoy”的顺序:
1 2 3 4 5 6 7 8 9 kubectl exec <pod> -c istio-proxy -- iptables -t nat -S | grep ISTIO istioctl proxy-config listener <pod> istioctl proxy-config route <pod> istioctl proxy-config cluster <pod> istioctl proxy-config endpoint <pod> istioctl proxy-status
istioctl proxy-config endpoint 里 cluster 为空,通常意味着 Service 的 selector 或端口名(Istio 要求端口名是 http/grpc/tcp- 这类前缀,否则按 TCP 处理)有问题——这是最高频的两个原因。
Envoy 配置 Envoy 的配置分为静态配置和动态配置
静态配置:手动填写的配置
动态配置:xDS API 获取的配置
静态配置 eg:定义 Listener 监听器,监听端口为 10000。virtual_hosts 匹配所有域名,Routes 的匹配规则为所有 Path,也就是所有访问 10000 端口的请求都会被转发到 service_google 服务。
1
2
3
4
5
6
7
8
9
10
11
12
13
14
15
16
17
18
19
20
listeners: - name: listener_0 address: socket_address: { address: 0.0 .0 .0 , port_value: 10000 } filter_chains: - filters: - name: envoy.http_connection_manager config: stat_prefix: ingress_http codec_type: AUTO route_config: name: local_route virtual_hosts: - name: local_service domains: ["*" ] routes: - match: { prefix: "/" } route: { host_rewrite: www.google.com , cluster: service_google } http_filters: - name: envoy.router
service_google
1
2
3
4
5
6
7
8
9
clusters: - name: service_google connect_timeout: 0. 25s type: LOGICAL_DNS dns_lookup_family: V4_ONLY lb_policy: ROUND_ROBIN hosts: [{ socket_address: { address: google.com , port_value: 443 }}] tls_context: { sni: www.google.com }
动态配置 通过查询一个或多个管理服务器获取数据以发现动态资源变更,比如 Router、Cluster、EndPoint 等,我们把这些发现服务及其对应的 API 称为 xDS。xDS 最大的价值就是定义了一套可扩展的通用微服务控制 API,这些 API 不仅可以做到服务发现,也可以做到路由发现、集群发现,可以说所有配置都能通过发现的方式解决。
xDS 协议:Service Mesh 控制面和数据面的通信桥梁。
通过 xDS 协议可以做到 discovery everything,所有配置都可以通过发现的方式解决,这是 Envoy xDS 架构为微服务世界带来的重大变革。
xDS 概念介绍 xDS 包含:
LDS(监听器发现服务)
CDS(集群发现服务)
EDS(节点发现服务)
SDS(密钥发现服务)
RDS(路由发现服务)
xDS 中每种类型对应一个发现的资源,这些类型数据存储在 xDS 协议的 Discovery Request 和 Discovery Response 的 TypeUrl 字段中, 这个字段按照以下格式存储:type.googleapis.com/<resource type>
eg:type.googleapis.com/envoy.api.v2.Cluster 就表明是 Cluster 类型的资源,需要按照 Cluster 类型处理数据
LDS envoy.api.v2.Listener(LDS):对应 Listener 数据类型,包含了监听器的名称、监听端口、监听地址等信息,通过动态更新此类型,可以动态新增监听器或者更新监听器的地址端口等信息。
1
2
3
4
5
6
7
8
9
10
11
12
13
14
15
16
17
18
19
20
21
22
{ "name" : "..." , "address" : "{...}" , "filter_chains" : [ ] , "use_original_dst" : "{...}" , "per_connection_buffer_limit_bytes" : "{...}" , "metadata" : "{...}" , "drain_type" : "..." , "listener_filters" : [ ] , "listener_filters_timeout" : "{...}" , "continue_on_listener_filters_timeout" : "..." , "transparent" : "{...}" , "freebind" : "{...}" , "socket_options" : [ ] , "tcp_fast_open_queue_length" : "{...}" , "traffic_direction" : "..." , "udp_listener_config" : "{...}" , "api_listener" : "{...}" , "connection_balance_config" : "{...}" , "reuse_port" : "..." , "access_log" : [ ] }
RDS envoy.api.v2.RouteConfiguration(RDS):对应 Envoy 中的 Route 类型,用于更新 virtual_hosts,以及 virtual_hosts 包含的路由表信息、路由规则、针对路由的限流、路由级别的插件等,包括路由匹配到的 Cluster。
1
2
3
4
5
6
7
8
9
10
11
12
{ "name" : "..." , "virtual_hosts" : [ ] , "vhds" : "{...}" , "internal_only_headers" : [ ] , "response_headers_to_add" : [ ] , "response_headers_to_remove" : [ ] , "request_headers_to_add" : [ ] , "request_headers_to_remove" : [ ] , "most_specific_header_mutations_wins" : "..." , "validate_clusters" : "{...}" }
CDS envoy.api.v2.Cluster(CDS):对应 Envoy 中的 Cluster 类型,包含了 Cluster 是采用静态配置数据,还是采用动态 EDS 发现的方式,包括 Cluster 的负载均衡策略、健康检查配置等,以及服务级别的插件设置。
1
2
3
4
5
6
7
8
9
10
11
12
13
14
15
16
17
18
19
20
21
22
23
24
25
26
27
28
29
30
31
32
33
34
35
36
37
38
39
40
41
42
43
44
45
{ "transport_socket_matches" : [ ] , "name" : "..." , "alt_stat_name" : "..." , "type" : "..." , "cluster_type" : "{...}" , "eds_cluster_config" : "{...}" , "connect_timeout" : "{...}" , "per_connection_buffer_limit_bytes" : "{...}" , "lb_policy" : "..." , "hosts" : [ ] , "load_assignment" : "{...}" , "health_checks" : [ ] , "max_requests_per_connection" : "{...}" , "circuit_breakers" : "{...}" , "tls_context" : "{...}" , "upstream_http_protocol_options" : "{...}" , "common_http_protocol_options" : "{...}" , "http_protocol_options" : "{...}" , "http2_protocol_options" : "{...}" , "extension_protocol_options" : "{...}" , "typed_extension_protocol_options" : "{...}" , "dns_refresh_rate" : "{...}" , "dns_failure_refresh_rate" : "{...}" , "respect_dns_ttl" : "..." , "dns_lookup_family" : "..." , "dns_resolvers" : [ ] , "use_tcp_for_dns_lookups" : "..." , "outlier_detection" : "{...}" , "cleanup_interval" : "{...}" , "upstream_bind_config" : "{...}" , "lb_subset_config" : "{...}" , "ring_hash_lb_config" : "{...}" , "original_dst_lb_config" : "{...}" , "least_request_lb_config" : "{...}" , "common_lb_config" : "{...}" , "transport_socket" : "{...}" , "metadata" : "{...}" , "protocol_selection" : "..." , "upstream_connection_options" : "{...}" , "close_connections_on_host_health_failure" : "..." , "drain_connections_on_host_removal" : "..." , "filters" : [ ] , "track_timeout_budgets" : "..." }
EDS envoy.api.v2.ClusterLoadAssignment(EDS):常说的服务发现。包含服务名、节点信息和 LB 策略等数据。
1
2
3
4
5
{ "cluster_name" : "..." , "endpoints" : [ ] , "policy" : "{...}" }
SDS envoy.api.v2.Auth.Secret(SDS):用于发现证书信息,以动态更新证书。istio 可以通过 SDS 即可动态更新证书。
1
2
3
4
5
6
7
{ "name" : "..." , "tls_certificate" : "{...}" , "session_ticket_keys" : "{...}" , "validation_context" : "{...}" , "generic_secret" : "{...}" }
gRPC 流式订阅 1 2 3 4 5 6 7 8 9 10 11 12 13 14 15 16 17 grpcurl -v -plaintext admin-rpc-service.demo-infra-dev:30200 list grpcurl -v -plaintext auth-rpc-service.demo-infra-dev:10200 list grpcurl -v -plaintext chat-rpc-service.demo-infra-dev:30300 list grpcurl -v -plaintext conversation-rpc-service.demo-infra-dev:10220 list grpcurl -v -plaintext friend-rpc-service.demo-infra-dev:10240 list grpcurl -v -plaintext group-rpc-service.demo-infra-dev:10260 list grpcurl -v -plaintext msg-rpc-service.demo-infra-dev:10280 list grpcurl -v -plaintext push-rpc-service.demo-infra-dev:10170 list grpcurl -v -plaintext user-rpc-service.demo-infra-dev:10320 list
需要给 grpc 的 svc 添加 appProtocol: http2
参考链接 https://istio.io/latest/docs/ops/configuration/traffic-management/protocol-selection/
1 2 3 4 5 6 7 8 9 10 11 12 13 for svc in \ admin-rpc-service \ auth-rpc-service \ chat-rpc-service \ conversation-rpc-service \ friend-rpc-service \ group-rpc-service \ msg-rpc-service \ push-rpc-service \ user-rpc-service; do kubectl patch svc $svc -n demo-infra-dev --type =json \ -p='[{"op":"add","path":"/spec/ports/0/appProtocol","value":"http2"}]' done
xDS 请求机制 API 请求顺序 典型的 HTTP 路由场景,客户端需要先获取 Listener 资源,通过 Listener 资源拿到 Route 的配置。Route 中包含一个或者多个 Cluster 集群资源,通过 Cluster 集群的信息再获取集群节点的信息,这样整个请求链路就完成了。
全量请求和增量请求 这里要区分两种模式。默认是 SotW(State of the World) :请求里必须带上全量 resource_names,响应也返回该 type 下的全部 资源,任何一个资源变化都会整份重推——这正是大网格下 istiod 推送开销大的根因(下面示例里 resource_names: [foo, bar] 就是 SotW 的全量列举)。
只发送、只返回增量的是 Delta xDS (DeltaDiscoveryRequest/DeltaDiscoveryResponse),需要显式启用。
多条请求流和单条请求流 xDS 协议并不约束在请求多个资源时,多个资源使用同一个请求流,还是每个资源各使用一个请求流,Management Server 应该同时支持这两种模式。
在一个连接中请求多个资源 支持在一条连接中按照顺序获取 xDS 中的各种 API,比如先请求 CDS,然后请求 EDS。
xDS 协议详解 请求信息示例:
1 2 3 4 5 6 7 version_info: node: { id: envoy } resource_names: - foo - bar type_url: type.googleapis.com/envoy.api.v2.ClusterLoadAssignment response_nonce:
回应信息示例:
1 2 3 4 5 6 version_info: X resources: - foo ClusterLoadAssignment proto encoding - bar ClusterLoadAssignment proto encoding type_url: type.googleapis.com/envoy.api.v2.ClusterLoadAssignment nonce: A
在收到 Management Server 推送的新版本数据后,Envoy 会响应 ACK 或者 NACK 告知 Management Server 是否更新版本成功。ACK 代表更新版本成功,这时会携带 Management Server 推送的最新版本号发送 ACK 信息;NACK 代表更新版本失败,这时会携带旧的版本号发送 NACK 信息。
边缘代理模式 Envoy 不仅可以用于 Sidecar 模式,也可以用作边缘网关,但是用作边缘网关层我们有一些注意事项,这些问题不仅在 Envoy 中存在,在其他的边缘网关中也应该处理。
HTTP 标头清理:use_remote_address 设置为 true 来清理 HTTP 标头。
超时控制:连接超时、流超时和路由超时。
连接限制。
安装 用当前最新版本 1.9.0
1 2 3 4 5 6 7 8 9 10 11 12 13 14 15 16 17 18 19 20 21 22 23 24 25 26 27 28 29 30 31 32 33 34 35 36 37 38 39 40 41 42 43 44 45 46 47 48 49 50 51 52 53 54 55 56 57 58 59 60 61 62 63 64 65 66 67 68 69 70 71 72 73 74 75 76 77 78 79 80 81 [root@k8s01 ~]# curl -L https://istio.io/downloadIstio | ISTIO_VERSION=1.9.0 TARGET_ARCH=x86_64 sh - % Total % Received % Xferd Average Speed Time Time Time Current Dload Upload Total Spent Left Speed 100 102 100 102 0 0 73 0 0:00:01 0:00:01 --:--:-- 73 100 4579 100 4579 0 0 552 0 0:00:08 0:00:08 --:--:-- 1219 Downloading istio-1.9.0 from https://github.com/istio/istio/releases/download/1.9.0/istio-1.9.0-linux-amd64.tar.gz ... Istio 1.9.0 Download Complete! Istio has been successfully downloaded into the istio-1.9.0 folder on your system. Next Steps: See https://istio.io/latest/docs/setup/install/ to add Istio to your Kubernetes cluster. To configure the istioctl client tool for your workstation, add the /root/istio-1.9.0/bin directory to your environment path variable with: export PATH="$PATH :/root/istio-1.9.0/bin" Begin the Istio pre-installation check by running: istioctl x precheck Need more information? Visit https://istio.io/latest/docs/setup/install/ [root@k8s01 ~]# istioctl x precheck Checking the cluster to make sure it is ready for Istio installation... ----------------------- Can initialize the Kubernetes client. Can query the Kubernetes API Server. ----------------------- Istio is compatible with Kubernetes: v1.20.0. ----------------------- Istio will be installed in the istio-system namespace. ----------------------- Can create necessary Kubernetes configurations: Namespace,ClusterRole,ClusterRoleBinding,CustomResourceDefinition,Role,ServiceAccount,Service,Deployments,ConfigMap. ----------------------- This Kubernetes cluster supports automatic sidecar injection. To enable automatic sidecar injection see https://istio.io/v1.9/docs/setup/additional-setup/sidecar-injection/#deploying-an-app ----------------------- Install Pre-Check passed! The cluster is ready for Istio installation. [root@k8s01 ~]# istioctl install This will install the Istio 1.9.0 profile with ["Istio core" "Istiod" "Ingress gateways" ] components into the cluster. Proceed? (y/N) y ✔ Istio core installed ✔ Processing resources for Istiod. Waiting for Deployment/istio-system/istiod ✔ Istiod installed ✔ Ingress gateways installed ✔ Installation complete [root@k8s01 ~]# kubectl label namespace default istio-injection=enabled [root@k8s01 ~]# kubectl rollout restart deployment -n default --all namespace/default labeled [root@k8s01 ~]# kubectl get svc -n istio-system NAME TYPE CLUSTER-IP EXTERNAL-IP PORT(S) AGE istio-ingressgateway LoadBalancer 10.99.32.157 <pending> 15021:32027/TCP,80:31794/TCP,443:30320/TCP,15012:31269/TCP,15443:31456/TCP 23h istiod ClusterIP 10.109.186.86 <none> 15010/TCP,15012/TCP,443/TCP,15014/TCP 23h [root@k8s01 ~]# istioctl analyze -n default [root@k8s01 ~]# istioctl profile list [root@k8s01 ~]# istioctl profile dump demo > demo.yaml
自动注入的机制与它的故障面 注入这件事由一个 MutatingWebhookConfiguration 完成,名字叫 istio-sidecar-injector:Pod 创建请求到达 API Server 后,在持久化之前被转发给 istiod,istiod 把 istio-proxy 容器、istio-init 容器和相关 volume 加进 Pod spec 再返回。
1 kubectl get mutatingwebhookconfiguration istio-sidecar-injector -o yaml
由此可以推出四件事:
一、只对新建 Pod 生效。 webhook 拦的是 CREATE 请求,已存在的 Pod 不会被追溯修改。这就解释了为什么卸载时摘掉 namespace 的 label,老 Pod 里的 sidecar 还在——得 kubectl rollout restart 或删 Pod 重建。
二、namespace 级和 Pod 级标签的优先级。 两层控制,Pod 级覆盖 namespace 级 :
namespace istio-injection
Pod sidecar.istio.io/inject
结果
enabled未设置
注入
enabled"false"不注入 (用来给个别 Pod 开天窗,比如 Job、CronJob)
未设置
"true"注入
未设置
未设置
不注入
给 Job 类工作负载关掉注入是常见需求——sidecar 不会自己退出,Job 的 Pod 会一直停在 Running 永远不算完成(较新版本可以用 holdApplicationUntilProxyStarts 和 EXIT_ON_ZERO_ACTIVE_CONNECTIONS 缓解)。
三、webhook 挂掉会影响整个集群的 Pod 创建。 这是生产事故高发点,取决于 failurePolicy:
failurePolicy: Fail(Istio 默认)—— istiod 不可用时,所有 匹配这个 webhook 的 namespace 里 Pod 都创建失败,报 Internal error occurred: failed calling webhook。istiod 自己如果也在这些 namespace 里,就形成了鸡生蛋问题。failurePolicy: Ignore —— istiod 挂了照常创建,只是不注入 sidecar,服务会以”没有 mTLS、不受策略管辖”的状态跑起来,安全上更糟。
所以 istiod 要多副本 + PDB,namespaceSelector 也要精确,别把 kube-system 一起圈进来。
四、手工注入是不依赖 webhook 的备用路径。
1 istioctl kube-inject -f deploy.yaml | kubectl apply -f -
它在客户端就把 sidecar 渲染进 YAML 了,适合两种场景:webhook 出问题时救急;以及想把注入结果固化进 GitOps 仓库、不希望它随 istiod 版本变化。代价是 Istio 升级后这些 Pod 的 sidecar 版本不会跟着走,得重新 inject 一遍。
Istio 核心 API 资源 Istio 通过一组自定义资源(CRD)来管理流量,常用的有:
VirtualServiceGatewayServiceEntryDestinationRuleSidecars
测试
部署 Bookinfo 示例应用
1 2 3 4 5 6 7 8 9 10 11 12 13 14 15 16 17 18 19 20 21 22 23 24 25 26 27 28 29 30 31 32 33 34 35 36 37 38 [root@k8s01 ~]# kubectl apply -f samples/bookinfo/platform/kube/bookinfo.yaml service/details created serviceaccount/bookinfo-details created deployment.apps/details-v1 created service/ratings created serviceaccount/bookinfo-ratings created deployment.apps/ratings-v1 created service/reviews created serviceaccount/bookinfo-reviews created deployment.apps/reviews-v1 created deployment.apps/reviews-v2 created deployment.apps/reviews-v3 created service/productpage created serviceaccount/bookinfo-productpage created deployment.apps/productpage-v1 created [root@k8s01 istio-1.9.0]# kubectl get services NAME TYPE CLUSTER-IP EXTERNAL-IP PORT(S) AGE details ClusterIP 10.98.135.159 <none> 9080/TCP 23h kubernetes ClusterIP 10.96.0.1 <none> 443/TCP 24h productpage ClusterIP 10.101.199.227 <none> 9080/TCP 23h ratings ClusterIP 10.105.246.179 <none> 9080/TCP 23h reviews ClusterIP 10.111.156.154 <none> 9080/TCP 23h [root@k8s01 istio-1.9.0]# kubectl get pods NAME READY STATUS RESTARTS AGE details-v1-79f774bdb9-jm9sx 2/2 Running 2 23h productpage-v1-6b746f74dc-jfnkp 2/2 Running 2 23h ratings-v1-b6994bb9-z5qfr 2/2 Running 2 23h reviews-v1-545db77b95-zzlv8 2/2 Running 2 23h reviews-v2-7bf8c9648f-7vtss 2/2 Running 2 23h reviews-v3-84779c7bbc-85nn2 2/2 Running 2 23h [root@k8s01 istio-1.9.0]# kubectl exec "$(kubectl get pod -l app=ratings -o jsonpath='{.items[0].metadata.name}') " -c ratings -- curl -s productpage:9080/productpage | grep -o "<title>.*</title>" <title>Simple Bookstore App</title>
把应用关联到 Istio 网关
1 2 3 4 5 6 7 8 9 10 11 12 13 14 15 16 17 18 19 20 21 22 23 24 25 26 27 28 29 30 31 32 33 34 35 36 37 38 39 40 41 42 43 44 45 46 47 48 49 50 51 52 53 54 55 56 57 58 59 60 61 62 [root@k8s01 istio-1.9.0]# kubectl apply -f samples/bookinfo/networking/bookinfo-gateway.yaml gateway.networking.istio.io/bookinfo-gateway created virtualservice.networking.istio.io/bookinfo created [root@k8s01 istio-1.9.0]# cat samples/bookinfo/networking/bookinfo-gateway.yaml apiVersion: networking.istio.io/v1alpha3 kind: Gateway metadata: name: bookinfo-gateway spec: selector: istio: ingressgateway servers: - port: number: 80 name: http protocol: HTTP hosts: - "*" --- apiVersion: networking.istio.io/v1alpha3 kind: VirtualService metadata: name: bookinfo spec: hosts: - "*" gateways: - bookinfo-gateway http: - match: - uri: exact: /productpage - uri: prefix: /static - uri: exact: /login - uri: exact: /logout - uri: prefix: /api/v1/products route: - destination: host: productpage port: number: 9080 [root@k8s01 istio-1.9.0]# istioctl analyze ✔ No validation issues found when analyzing namespace: default.
确定入站 ip 和 portip 为 node ip(192.168.43.101、192.168.43.102、192.168.43.103)port 为 31794(80),30320(443)
1 2 3 4 5 6 7 8 9 10 [root@k8s01 istio-1.9.0]# kubectl get svc istio-ingressgateway -n istio-system NAME TYPE CLUSTER-IP EXTERNAL-IP PORT(S) AGE istio-ingressgateway LoadBalancer 10.99.32.157 <pending> 15021:32027/TCP,80:31794/TCP,443:30320/TCP,15012:31269/TCP,15443:31456/TCP 23h [root@k8s01 istio-1.9.0]# kubectl edit svc istio-ingressgateway -n istio-system service/istio-ingressgateway edited [root@k8s01 istio-1.9.0]# kubectl get svc istio-ingressgateway -n istio-system NAME TYPE CLUSTER-IP EXTERNAL-IP PORT(S) AGE istio-ingressgateway NodePort 10.99.32.157 <none> 15021:32027/TCP,80:31794/TCP,443:30320/TCP,15012:31269/TCP,15443:31456/TCP 23h
验证
Ingress 和 Egress Ingress 可以理解为入口网关,而 Egress 和 Ingress 的功能相仿,只是流量的代理流向不同,Egress 负责出口流量的代理。
Ingress kubernetes 中的 Ingress 解决了 NodePort 配置不方便的问题,但通过 YAML 的方式控制 Ingress 依然是一件麻烦事,另外主流的 Ingress Controller(nginx-ingress、traefik)默认是从 EndpointSlice 里直接取 Pod IP 做七层转发,绕过 ClusterIP 的;确实经过 ClusterIP 时,转发由 kube-proxy 以 iptables(默认)或 IPVS 模式完成。具体可查看之前的文章 Ingress。
Istio 用 Istio Gateway 来代替 Kubernetes 中的 Ingress 资源类型。Gateway 允许外部流量访问内部服务,只需要配置流量转发即可。
使用方法见前面「测试」中部署 Bookinfo 示例应用的步骤。
Egress Kubernetes 原生 Egress kubernetes 中的 Egress 只是在 IP 地址或端口层面(OSI 第 3 层或第 4 层)控制网络流量。
eg:
1 2 3 4 5 6 7 8 9 10 11 12 13 14 15 16 17 18 19 20 21 22 23 24 25 26 27 28 29 30 31 32 33 34 apiVersion: networking.k8s.io/v1 kind: NetworkPolicy metadata: name: test-network-policy namespace: default spec: podSelector: matchLabels: role: db policyTypes: - Ingress - Egress ingress: - from: - ipBlock: cidr: 172.17 .0 .0 /16 except: - 172.17 .1 .0 /24 - namespaceSelector: matchLabels: project: myproject - podSelector: matchLabels: role: frontend ports: - protocol: TCP port: 6379 egress: - to: - ipBlock: cidr: 10.0 .0 .0 /24 ports: - protocol: TCP port: 5978
Istio Egress Istio 的 Egress 本质上是一个 Envoy Proxy,通过 Envoy 强大的七层代理功能,提供丰富的路由策略,而不局限于简单的四层网络 IP 端口黑白名单的配置。
默认安装未开启
1 2 3 4 5 6 7 8 9 10 11 12 13 [root@k8s01 istio-1.9.0]# istioctl manifest apply --set values.global.istioNamespace=istio-system --set values.gateways.istio-ingressgateway.enabled=true --set values.gateways.istio-egressgateway.enabled=true This will install the Istio 1.9.0 profile with ["Istio core" "Istiod" "Ingress gateways" "Egress gateways" ] components into the cluster. Proceed? (y/N) y ✔ Istio core installed ✔ Istiod installed ✔ Egress gateways installed ✔ Ingress gateways installed ✔ Installation complete [root@k8s01 user-gateway]# kubectl get pod -n istio-system NAME READY STATUS RESTARTS AGE istio-egressgateway-956cbd66f-xkncd 1/1 Running 0 19m istio-ingressgateway-758985db4f-nglq6 1/1 Running 0 14m istiod-7c9c9d46d4-dn58c 1/1 Running 4 25h
测试
1 2 3 4 5 6 7 8 9 10 11 12 13 14 15 16 17 18 19 20 21 22 23 24 25 26 27 28 29 30 31 32 33 34 35 36 37 38 39 40 41 42 43 44 45 46 47 48 49 50 51 52 53 54 55 56 57 58 59 60 61 [root@k8s01 istio-1.9.0]# cat samples/sleep/sleep.yaml kind: ServiceAccount metadata: name: sleep --- apiVersion: v1 kind: Service metadata: name: sleep labels: app: sleep service: sleep spec: ports: - port: 80 name: http selector: app: sleep --- apiVersion: apps/v1 kind: Deployment metadata: name: sleep spec: replicas: 1 selector: matchLabels: app: sleep template: metadata: labels: app: sleep spec: terminationGracePeriodSeconds: 0 serviceAccountName: sleep containers: - name: sleep image: curlimages/curl command : ["/bin/sleep" , "3650d" ] imagePullPolicy: IfNotPresent volumeMounts: - mountPath: /etc/sleep/tls name: secret-volume volumes: - name: secret-volume secret: secretName: sleep-secret optional: true --- [root@k8s01 istio-1.9.0]# kubectl apply -f samples/sleep/sleep.yaml serviceaccount/sleep created service/sleep created deployment.apps/sleep created [root@k8s01 istio-1.9.0]# echo $(kubectl get pod -l app=sleep -o jsonpath={.items..metadata.name}) sleep-557747455f-rjlwd [root@k8s01 istio-1.9.0]# export SOURCE_POD=$(kubectl get pod -l app=sleep -o jsonpath={.items..metadata.name}) [root@k8s01 istio-1.9.0]# kubectl exec -it $SOURCE_POD -c sleep -- curl -I https://www.douban.com | grep "HTTP/" ; kubectl exec -it $SOURCE_POD -c sleep -- curl -I https://edition.cnn.com | grep "HTTP/" HTTP/1.1 200 OK HTTP/2 200
创建一个 ServiceEntry,允许流量直接访问一个外部服务
ServiceEntry-test.yaml
1 2 3 4 5 6 7 8 9 10 11 12 13 14 15 apiVersion: networking.istio.io/v1alpha3 kind: ServiceEntry metadata: name: cnn spec: hosts: - edition.cnn.com ports: - number: 80 name: http-port protocol: HTTP - number: 443 name: https protocol: HTTPS resolution: DNS
为 edition.cnn.com 端口 80 创建 Egress Gateway,并为指向 Egress Gateway 的流量创建一个 Destination Rule:
1 2 3 4 5 6 7 8 9 10 11 12 13 14 15 16 17 18 19 20 21 22 23 apiVersion: networking.istio.io/v1alpha3 kind: Gateway metadata: name: istio-egressgateway spec: selector: istio: egressgateway servers: - port: number: 80 name: http protocol: HTTP hosts: - edition.cnn.com --- apiVersion: networking.istio.io/v1alpha3 kind: DestinationRule metadata: name: egressgateway-for-cnn spec: host: istio-egressgateway.istio-system.svc.cluster.local subsets: - name: cnn
定义一个 VirtualService,将流量从 Sidecar 引导至 Egress Gateway,再从 Egress Gateway 引导至外部服务
1 2 3 4 5 6 7 8 9 10 11 12 13 14 15 16 17 18 19 20 21 22 23 24 25 26 27 28 29 30 31 32 apiVersion: networking.istio.io/v1alpha3 kind: VirtualService metadata: name: direct-cnn-through-egress-gateway spec: hosts: - edition.cnn.com gateways: - istio-egressgateway - mesh http: - match: - gateways: - mesh port: 80 route: - destination: host: istio-egressgateway.istio-system.svc.cluster.local subset: cnn port: number: 80 weight: 100 - match: - gateways: - istio-egressgateway port: 80 route: - destination: host: edition.cnn.com port: number: 80 weight: 100
访问第三方服务
1 2 3 4 5 6 7 8 9 10 11 12 13 14 15 16 17 18 19 20 21 22 23 24 25 26 27 28 29 30 31 32 33 34 35 36 37 38 39 40 41 42 43 44 45 46 47 48 49 50 51 52 [root@k8s01 istio-1.9.0]# kubectl exec -it $SOURCE_POD -c sleep -- curl -sL -o /dev/null -D - http://edition.cnn.com/politics HTTP/1.1 301 Moved Permanently server: envoy retry-after: 0 content-length: 0 cache-control: public, max-age=600 location: https://edition.cnn.com/politics accept-ranges: bytes date : Thu, 25 Feb 2021 07:36:24 GMTvia: 1.1 varnish set-cookie: countryCode=CN; Domain=.cnn.com; Path=/; SameSite=Lax set-cookie: stateCode=FJ; Domain=.cnn.com; Path=/; SameSite=Lax set-cookie: geoData=xiamen|FJ|361000|CN|AS|800|broadband|24.430|118.050; Domain=.cnn.com; Path=/; SameSite=Lax x-served-by: cache-hnd18725-HND x-cache: HIT x-cache-hits: 0 x-envoy-upstream-service-time: 252 HTTP/2 200 content-type: text/html; charset=utf-8 x-servedbyhost: ::ffff:127.0.0.1 access-control-allow-origin: * cache-control: max-age=60 content-security-policy: default-src 'self' blob: https://*.cnn.com:* http://*.cnn.com:* *.cnn.io:* *.cnn.net:* *.turner.com:* *.turner.io:* *.ugdturner.com:* courageousstudio.com *.vgtf.net:*; script-src 'unsafe-eval' 'unsafe-inline' 'self' *; style-src 'unsafe-inline' 'self' blob: *; child-src 'self' blob: *; frame-src 'self' *; object-src 'self' *; img-src 'self' data: blob: *; media-src 'self' data: blob: *; font-src 'self' data: *; connect-src 'self' *; frame-ancestors 'self' https://*.cnn.com:* http://*.cnn.com:* https://*.cnn.io:* http://*.cnn.io:* *.turner.com:* courageousstudio.com; x-content-type-options: nosniff x-xss-protection: 1; mode=block via: 1.1 varnish, 1.1 varnish accept-ranges: bytes date : Thu, 25 Feb 2021 07:36:24 GMTage: 1943 set-cookie: countryCode=CN; Domain=.cnn.com; Path=/; SameSite=Lax set-cookie: stateCode=GD; Domain=.cnn.com; Path=/; SameSite=Lax set-cookie: geoData=humen|GD|523061|CN|AS|800|broadband|23.040|113.780; Domain=.cnn.com; Path=/; SameSite=Lax set-cookie: FastAB=0=9064,1=5573,2=5753,3=6142,4=3408,5=6424,6=7127,7=4704,8=0524,9=3950; Domain=.cnn.com; Path=/; Expires=Sat Jul 01 2023 00:00:00 GMT; SameSite=Lax x-served-by: cache-dca17742-DCA, cache-hnd18720-HND x-cache: HIT, HIT x-cache-hits: 1, 1 x-timer: S1614238585.990516,VS0,VE2 vary: , Accept-Encoding content-length: 1285597 [root@k8s01 istio-1.9.0]# kubectl logs -l istio=egressgateway -c istio-proxy -n istio-system | tail 2021-02-25T06:50:10.204968Z info cache generated new workload certificate latency=233.025588ms ttl=23h59m59.795040317s 2021-02-25T06:50:10.213941Z info ads ADS: new connection for node:router~10.244.235.153~istio-egressgateway-956cbd66f-xkncd.istio-system~istio-system.svc.cluster.local-2 2021-02-25T06:50:10.213941Z info ads ADS: new connection for node:router~10.244.235.153~istio-egressgateway-956cbd66f-xkncd.istio-system~istio-system.svc.cluster.local-1 2021-02-25T06:50:10.214124Z info cache returned workload certificate from cache ttl=23h59m59.785880303s 2021-02-25T06:50:10.214315Z info sds SDS: PUSH resource=ROOTCA 2021-02-25T06:50:10.214476Z info sds SDS: PUSH resource=default 2021-02-25T06:50:11.037012Z info Initialization took 1.11720873s 2021-02-25T06:50:11.037051Z info Envoy proxy is ready 2021-02-25T07:21:20.431323Z warning envoy config StreamAggregatedResources gRPC config stream closed: 0, 2021-02-25T07:21:20.737031Z info xdsproxy connected to upstream XDS server: istiod.istio-system.svc:15012
删除测试
1 2 3 4 kubectl delete gateway istio-egressgateway kubectl delete serviceentry cnn kubectl delete virtualservice direct-cnn-through-egress-gateway kubectl delete destinationrule egressgateway-for-cnn
金丝雀发布 金丝雀发布也被称为灰度发布,实际上就是将少量的生产流量路由到线上服务的新版本中,以验证新版本的准确性和稳定性。
k8s 原生方式 启动两个版本,service 指向这两个版本,完成简单的金丝雀发布。但这样的方式依然达不到精准控制的目的。
eg:
svc
1 2 3 4 5 6 7 8 9 10 11 12 13 14 [root@k8s01 test ]# cat service.yaml apiVersion: v1 kind: Service metadata: name: my-nginx-svc namespace: demo labels: app: nginx spec: type : ClusterIP ports: - port: 80 selector: app: nginx
my-nginx-deployment-v1.yaml
1 2 3 4 5 6 7 8 9 10 11 12 13 14 15 16 17 18 19 20 21 22 23 apiVersion: apps/v1 kind: Deployment metadata: name: my-nginx-v1 namespace: demo labels: app: nginx version: v1 spec: replicas: 9 selector: matchLabels: app: nginx template: metadata: labels: app: nginx spec: containers: - name: nginx image: nginx:1.14.2 ports: - containerPort: 80
my-nginx-deployment-v2.yaml
1
2
3
4
5
6
7
8
9
10
11
12
13
14
15
16
17
18
19
20
21
22
23
apiVersion: apps/v1 kind: Deployment metadata: name: my-nginx-v2 namespace: demo labels: app: nginx version: v2 spec: replicas: 1 selector: matchLabels: app: nginx template: metadata: labels: app: nginx spec: containers: - name: nginx image: nginx:1.7.9 ports: - containerPort: 80
测试
1 2 3 4 5 6 7 8 9 10 11 12 13 14 15 16 17 18 19 20 21 22 23 24 25 26 27 28 29 30 31 [root@k8s01 test ]# kubectl get svc -n demo NAME TYPE CLUSTER-IP EXTERNAL-IP PORT(S) AGE my-nginx-svc ClusterIP 10.103.204.234 <none> 80/TCP 47s [root@k8s01 test ]# kubectl get pod -n demo NAME READY STATUS RESTARTS AGE my-nginx-v1-66b6c48dd5-7vbhr 1/1 Running 0 52s my-nginx-v1-66b6c48dd5-llpbv 1/1 Running 0 52s my-nginx-v1-66b6c48dd5-tchrh 1/1 Running 0 52s my-nginx-v1-66b6c48dd5-4wq2n 1/1 Running 0 52s my-nginx-v1-66b6c48dd5-8xk7p 1/1 Running 0 52s my-nginx-v1-66b6c48dd5-c9rmt 1/1 Running 0 52s my-nginx-v1-66b6c48dd5-hdz5v 1/1 Running 0 52s my-nginx-v1-66b6c48dd5-p2ljx 1/1 Running 0 52s my-nginx-v1-66b6c48dd5-zn6fq 1/1 Running 0 52s my-nginx-v2-5d59d67564-28bbf 1/1 Running 0 52s [root@k8s01 test ]# curl -I 10.103.204.234 HTTP/1.1 200 OK Server: nginx/1.7.9 [root@k8s01 test ]# curl -I 10.103.204.234 HTTP/1.1 200 OK Server: nginx/1.7.9 [root@k8s01 test ]# curl -I 10.103.204.234 HTTP/1.1 200 OK Server: nginx/1.14.2 [root@k8s01 test ]# curl -I 10.103.204.234 HTTP/1.1 200 OK Server: nginx/1.7.9
原生方式只能靠副本数比例 去逼近想要的流量占比:两个 Deployment 标签相同,Service 会把它们的 Pod 一并放进 endpoints,按 9 : 1 配就大致是 10% 打到新版本。如果两边都写 replicas: 3,那就是对半分流,跟开头说的”少量的生产流量”完全不是一回事了。
局限也很清楚:粒度受副本数限制(想要 1% 就得堆 100 个副本),而且没法按 header、cookie 或权重做精确控制——这正是引出 Istio 的动机。
istio 中的金丝雀发布 在看配置之前先说清 subset 的机制和它的一个顺序依赖,否则很容易配出间歇性 503。
DestinationRule.subsets 做的事情是:按 Pod label 把一个 Service 的 endpoint 切成几组,在 Envoy 里落成 lb_subset_config。VirtualService 里写 subset: v1 时,引用的就是这些组。
顺序依赖:必须先下发 DestinationRule,再下发引用它的 VirtualService。
反过来的话,VirtualService 已经开始把流量往 subset: v1 送,而 Envoy 里还没有对应的 subset 定义,就会短暂返回 503,日志里的 response flag 是 NC(no cluster)或 UF(upstream failure)。GitOps 一次性 apply 整个目录时尤其容易撞到——两个对象几乎同时到达,谁先被 istiod 处理并推给 sidecar 是不确定的。稳妥做法是分两步 apply,或者用 sync wave 之类的机制排序。
还有三点值得知道:
weight 按请求分配,不是按连接。 weight: 90/10 的含义是每 100 个请求 里约 10 个走新版本。所以长连接场景(gRPC 流、WebSocket)下权重几乎不起作用——连接一旦建立就固定在某个后端上了,要按比例分流得在应用层做,或者配 maxRequestsPerConnection: 1 强制每请求一连接(代价是丧失连接复用)。
分流规则挂在被调用方的 VirtualService 上。 productpage 调 reviews 时,规则要写在 reviews 的 VirtualService 里,而不是入口 gateway 上。这是 Istio 和传统 ingress 灰度最大的区别:控制点在每一次服务间调用 上,所以内部调用链也能灰度,不只是入口流量。
比权重更精确的两种方式:
一、按 header/cookie 定向 —— 让指定的人看到新版本,其他人不受影响:
1 2 3 4 5 6 7 8 9 http: - match: - headers: end-user: exact: jason route: - destination: {host: reviews , subset: v2 } - route: - destination: {host: reviews , subset: v1 }
二、影子流量 —— 复制一份真实流量打给新版本,响应被丢弃:
1 2 3 4 5 6 7 8 http: - route: - destination: {host: reviews , subset: v1 } mirror: host: reviews subset: v2 mirrorPercentage: value: 10
mirror 是上生产前最有价值的一招:新版本用真实流量压测,但响应不返回给用户,出问题也不影响任何人。注意被镜像的请求对下游是真实写入 ,所以有副作用的接口不能这么玩。
配合 DestinationRule 里的 outlierDetection 还能自动摘除坏实例——新版本开始报 5xx 时自动把它从负载均衡池里踢掉,这比人工盯着看要快:
1 2 3 4 5 trafficPolicy: outlierDetection: consecutive5xxErrors: 5 interval: 10s baseEjectionTime: 30s
还是使用 book_info
节选
1 2 3 4 5 6 7 8 9 10 11 12 13 14 15 16 17 18 19 20 21 22 23 24 25 26 27 28 29 30 31 32 33 34 35 36 37 38 39 40 41 42 43 44 45 46 47 48 49 50 51 52 53 54 55 56 57 58 59 60 --- apiVersion: apps/v1 kind: Deployment metadata: name: reviews-v1 labels: app: reviews version: v1 spec: replicas: 1 selector: matchLabels: app: reviews version: v1 template: metadata: labels: app: reviews version: v1 --- apiVersion: apps/v1 kind: Deployment metadata: name: reviews-v2 labels: app: reviews version: v2 spec: replicas: 1 selector: matchLabels: app: reviews version: v2 template: metadata: labels: app: reviews version: v2 --- apiVersion: apps/v1 kind: Deployment metadata: name: reviews-v3 labels: app: reviews version: v3 spec: replicas: 1 selector: matchLabels: app: reviews version: v3 template: metadata: labels: app: reviews version: v3
查看信息
1 2 3 4 5 [root@k8s01 istio-1.9.0]# kubectl get pod -l app=reviews NAME READY STATUS RESTARTS AGE reviews-v1-545db77b95-zzlv8 2/2 Running 2 26h reviews-v2-7bf8c9648f-7vtss 2/2 Running 2 26h reviews-v3-84779c7bbc-85nn2 2/2 Running 2 26h
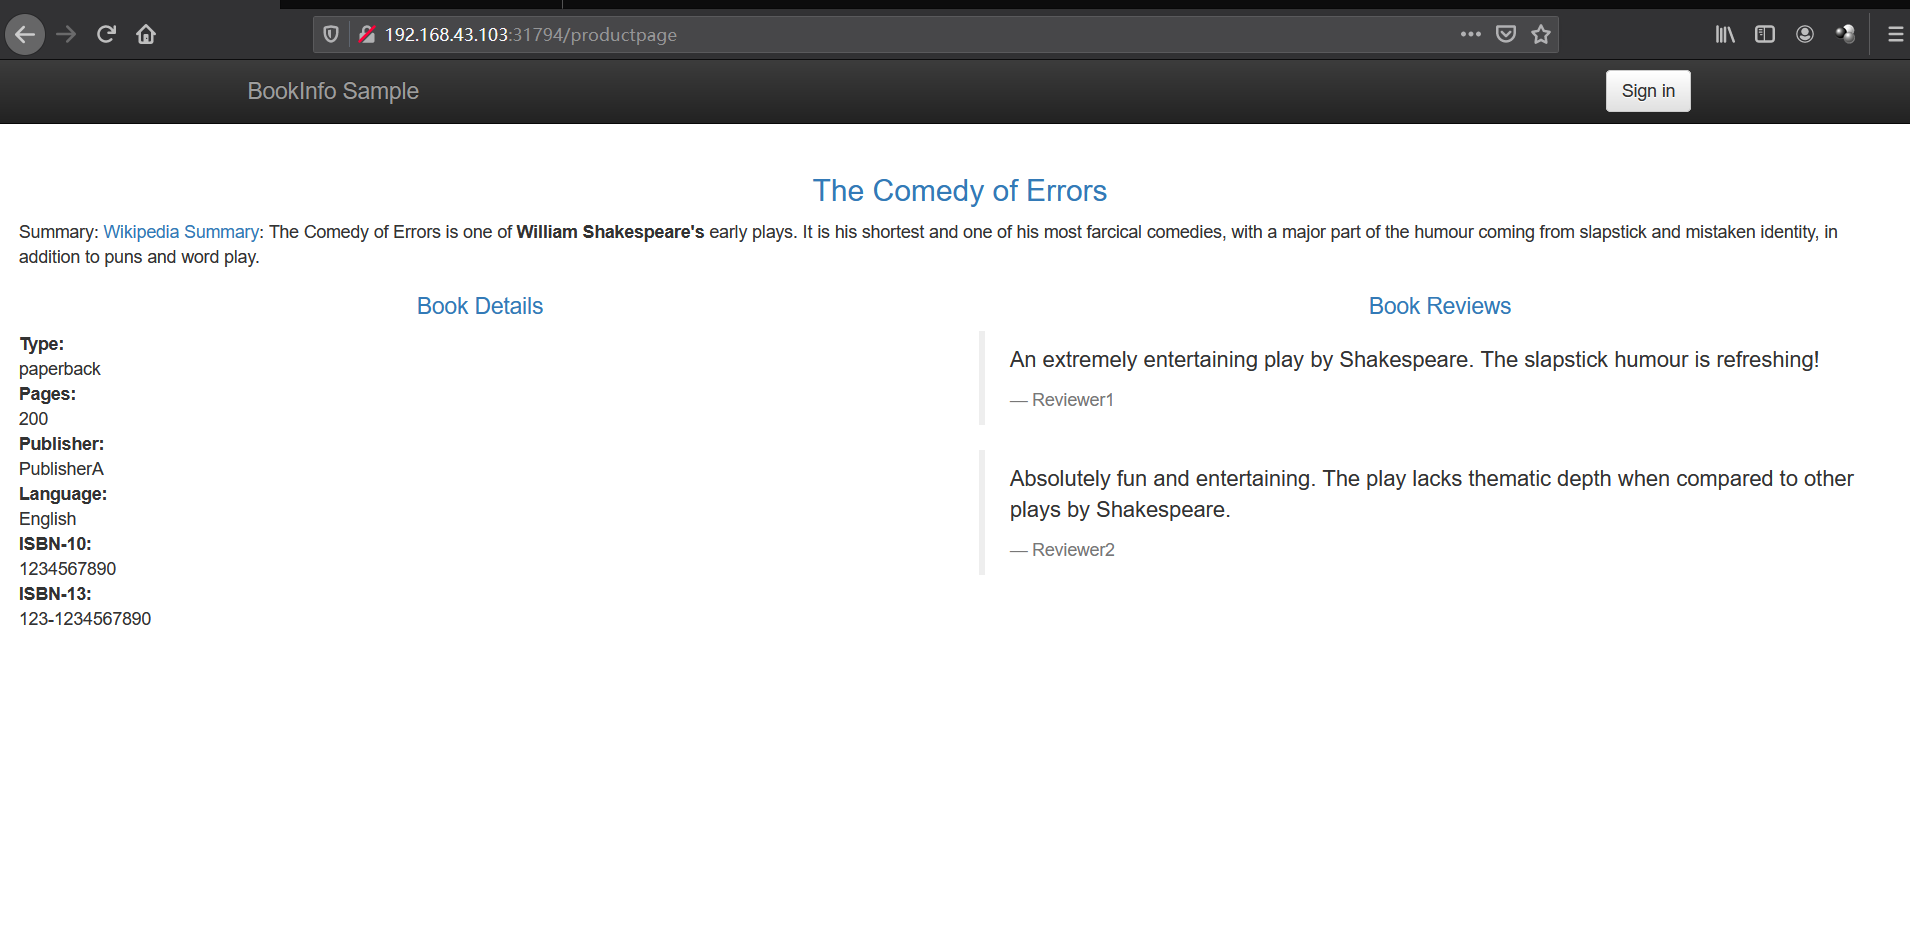
访问 http://192.168.43.101:31794/productpage 三个版本几乎是随机出现的,类似于 k8s 原生方式。
创建一个 reviews 的路由规则,为了方便验证,这个配置将所有流量指向 reviews 的 v1 版本
1 2 3 4 5 6 7 8 9 10 11 12 13 14 15 16 17 18 19 20 21 22 23 24 25 26 27 28 29 30 31 kubectl apply -f - <<EOF apiVersion: networking.istio.io/v1alpha3 kind: VirtualService metadata: name: reivews spec: hosts: - reviews http: - route: - destination: host: reviews # 必填,留空会被 Istio 校验直接拒绝 subset: v1 --- apiVersion: networking.istio.io/v1alpha3 kind: DestinationRule metadata: name: reviews spec: host: reviews # svc subsets: - name: v1 labels: version: v1 - name: v2 labels: version: v2 - name: v3 labels: version: v3 EOF
多次刷新界面,http://192.168.43.101:31794/productpage 均为 v1 界面。
50% 去 v1,10% 去 v2,40% 去 v3
1 2 3 4 5 6 7 8 9 10 11 12 13 14 15 16 17 18 19 20 21 22 23 kubectl apply -f - <<EOF apiVersion: networking.istio.io/v1alpha3 kind: VirtualService metadata: name: reivews spec: hosts: - reviews http: - route: - destination: host: reviews subset: v1 weight: 50 - destination: host: reviews subset: v2 weight: 10 - destination: host: reviews subset: v3 weight: 40 EOF
多次刷新界面,http://192.168.43.101:31794/productpage 得以验证。
卸载 卸载
1 2 3 4 5 6 7 8 9 10 11 12 13 14 15 16 17 18 19 20 21 22 23 24 25 26 27 28 29 30 31 32 33 34 35 36 37 38 39 40 41 42 43 44 45 46 47 48 49 50 51 52 53 54 55 56 57 58 [root@k8s01 ~]# istioctl x uninstall --purge All Istio resources will be pruned from the cluster Proceed? (y/N) y Removed IstioOperator:istio-system:installed-state. Removed HorizontalPodAutoscaler:istio-system:istio-egressgateway. Removed HorizontalPodAutoscaler:istio-system:istio-ingressgateway. Removed HorizontalPodAutoscaler:istio-system:istiod. Removed PodDisruptionBudget:istio-system:istio-egressgateway. Removed PodDisruptionBudget:istio-system:istio-ingressgateway. Removed PodDisruptionBudget:istio-system:istiod. Removed Deployment:istio-system:istio-egressgateway. Removed Deployment:istio-system:istio-ingressgateway. Removed Deployment:istio-system:istiod. Removed Service:istio-system:istio-egressgateway. Removed Service:istio-system:istio-ingressgateway. Removed Service:istio-system:istiod. Removed ConfigMap:istio-system:istio. Removed ConfigMap:istio-system:istio-sidecar-injector. Removed Pod:istio-system:istio-egressgateway-54658cd5f5-fvlwg. Removed Pod:istio-system:istio-ingressgateway-7cc49dcd99-ppmhp. Removed Pod:istio-system:istiod-db9f9f86-7665m. Removed ServiceAccount:istio-system:istio-egressgateway-service-account. Removed ServiceAccount:istio-system:istio-ingressgateway-service-account. Removed ServiceAccount:istio-system:istio-reader-service-account. Removed ServiceAccount:istio-system:istiod-service-account. Removed RoleBinding:istio-system:istio-egressgateway-sds. Removed RoleBinding:istio-system:istio-ingressgateway-sds. Removed RoleBinding:istio-system:istiod-istio-system. Removed Role:istio-system:istio-egressgateway-sds. Removed Role:istio-system:istio-ingressgateway-sds. Removed Role:istio-system:istiod-istio-system. Removed EnvoyFilter:istio-system:metadata-exchange-1.8. Removed EnvoyFilter:istio-system:metadata-exchange-1.9. Removed EnvoyFilter:istio-system:stats-filter-1.8. Removed EnvoyFilter:istio-system:stats-filter-1.9. Removed EnvoyFilter:istio-system:tcp-metadata-exchange-1.8. Removed EnvoyFilter:istio-system:tcp-metadata-exchange-1.9. Removed EnvoyFilter:istio-system:tcp-stats-filter-1.8. Removed EnvoyFilter:istio-system:tcp-stats-filter-1.9. Removed MutatingWebhookConfiguration::istio-sidecar-injector. Removed ValidatingWebhookConfiguration::istiod-istio-system. Removed ClusterRole::istio-reader-istio-system. Removed ClusterRole::istiod-istio-system. Removed ClusterRoleBinding::istio-reader-istio-system. Removed ClusterRoleBinding::istiod-istio-system. Removed CustomResourceDefinition::authorizationpolicies.security.istio.io. Removed CustomResourceDefinition::destinationrules.networking.istio.io. Removed CustomResourceDefinition::envoyfilters.networking.istio.io. Removed CustomResourceDefinition::gateways.networking.istio.io. Removed CustomResourceDefinition::istiooperators.install.istio.io. Removed CustomResourceDefinition::peerauthentications.security.istio.io. Removed CustomResourceDefinition::requestauthentications.security.istio.io. Removed CustomResourceDefinition::serviceentries.networking.istio.io. Removed CustomResourceDefinition::sidecars.networking.istio.io. Removed CustomResourceDefinition::virtualservices.networking.istio.io. Removed CustomResourceDefinition::workloadentries.networking.istio.io. Removed CustomResourceDefinition::workloadgroups.networking.istio.io. ✔ Uninstall complete
删除
1 2 3 4 5 6 7 8 9 10 11 12 13 kubectl delete namespace istio-system kubectl label namespace default istio-injection- [root@k8s01 ~]# kubectl get ns --show-labels NAME STATUS AGE LABELS default Active 45h <none> kube-node-lease Active 45h <none> kube-public Active 45h <none> kube-system Active 45h <none> kubernetes-dashboard Active 39h <none> monitoring Active 27h <none> rook-ceph Active 23m <none>